Creating Bulleted and Number Lists
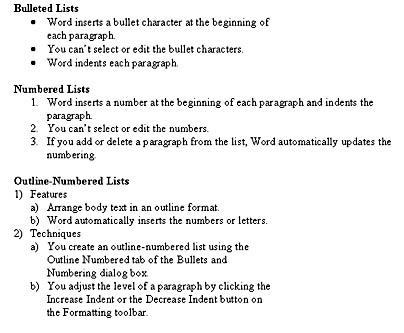
You can create lists in your document by having Word add bullet characters or numbering, together with hanging indents. Such automatic bullets and numbering are a part of the paragraph formatting. Unlike any bullet characters or numbers you might type in manually, you can't select or perform normal editing on automatic bullets or numbers. Also, if you rearrange the paragraphs in a numbered list, Word renumbers the list for you. Figure 9-11 shows examples of the three kinds of lists you can create by adding automatic bullets or numbers.

Figure 9-11. Examples of bulleted, numbered, and outline-numbered lists.
ON THE WEB
The ListDemo.doc document file, used for the example in Figure 9-11, is on the Running Office 2000 Reader's Corner page.
You can apply bullets and numbers using the Formatting toolbar or using the Bullets And Numbering dialog box.
NOTE
Because bullets and numbering are considered to be paragraph formatting, you can use most of the techniques for paragraph formatting that were discussed in the previous chapters. For example, you can copy the formatting from one paragraph to another, or assign the formatting to a paragraph style.
Adding Bullets and Numbering Using the Formatting Toolbar
The quickest way to have Word apply bullets or numbering to a list is to use the Bullets button or the Numbering button on the Formatting toolbar, as follows:
- Type the list. Press Enter at the end of each list item so that it's contained in a separate paragraph.
- Select all the paragraphs in the list.
- Click the Bullets button to apply bullets, or click the Numbering button to apply numbering.
![]()

If you apply numbering to a series of paragraphs and then delete or rearrange one or more of them, Word will update the numbering. If you place the insertion point at the end of a bulleted or numbered paragraph and press Enter, the new paragraph will also be bulleted or numbered. If, however, you press Enter twice without typing text, the new paragraphs will not be bulleted or numbered; this is a convenient way to stop adding bullets or numbering when you reach the end of your list.
You can remove bullets or numbering by selecting one or more paragraphs and clicking the Bullets button or the Numbering button again. You can also remove the bullet or number from a single paragraph by placing the insertion point immediately following the bullet or number and pressing Backspace.
To control the starting number for a list of automatically numbered paragraphs, you'll need to use the Bullets And Numbering dialog box, described in the next section.
SEE ALSO
For information on creating bulleted and numbered lists with the AutoFormat command, see "Formatting Documents Automatically". For instructions on numbering the lines in a document, see "Adjusting the Page Setup".
TIP
Number Cells in TablesYou can number the cells in a Word table by selecting the cells and clicking the Numbering button. Word will number the cells beginning with the upper left cell and progressing through each row from left to right. If you want to number just the first cell in each row, select the first column before clicking the Numbering button.
Adding Bullets and Numbering Using the Bullets and Numbering Dialog Box
If you apply bullets or numbering using the Bullets And Numbering dialog box rather than using the Formatting toolbar, you have the following additional options:
- You can choose any character or graphic image for the bullets in a bulleted list.
- You can specify the starting number for a numbered list.
- You can modify the appearance and position of the bullet characters or images, or the numbers.
- You can create an outline-numbered list with a custom style. An outline-numbered list displays text in an attractive outline format, without using the Heading styles or Outline view.
- Select all the paragraphs in the list.
- Open the Bullets And Numbering dialog box by choosing Bullets And Numbering from the Format menu, or by right-clicking the selection and choosing Bullets And Numbering from the pop-up menu.
- To apply bullets, click the Bulleted tab of the Bullets And Numbering dialog box.
Note that applying a theme to your document will modify the bullets in bulleted lists throughout the document.

To apply numbering, click the Numbered tab:

To apply outline numbering, click the Outline Numbered tab:

TIP
Automatically Number Your Document's HeadingsYou can apply automatic outline numbering to all the headings throughout your document, even though they aren't contained in a list, provided that you have assigned all your heading paragraphs the standard heading styles, Heading 1 through Heading 9. To do this, place the insertion point within any heading in the document, display the Outline Numbered tab of the Bullets And Numbering dialog box, and select one of the four outline-numbering styles in the bottom row, shown earlier. (Notice that the sample on the Outline Numbered tab for each of these styles contains the names of Heading styles.)

