I’m sure if you had asked me about the laundry room after we first looked at our house, I wouldn’t have really remembered anything about it beyond that it was disgusting. Little details like the lack of a dryer seemed insignificant (and I didn’t really think about the fact that dryers need their own electrical supply and vent and stuff”¦which they do, FYI). This was still in the rose-colored glasses days, when all I saw were all the amazing original details I wanted the opportunity to save, and all the potential the house had. Even when thinking seriously about all the work we had ahead of us, the tiny little laundry room off the kitchen was so overshadowed in scale and biohazard-ness that I really don’t recall considering it at all. It’s just a laundry room, right? The idea that we might someday even have a washer and dryer in our place of residence seemed more than posh enough for us, so I really didn’t even think about how it would look or what form a renovation of the space might take.
But then things changed. Demo and dust and debris and general filth became a huge part of our lives, which meant that laundry became a huge part of our lives. And when you’re in Obsessive Renovation Mode, as I am between 99-100% of the time, having to stop everything for a few hours on a Saturday to get your tushy to the laundromat carting so much gross laundry really kind of sucks. I’m well aware that this is the reality for plenty of people for whom having their own laundry isn’t an option, but for us it was an option. All of a sudden, having a working laundry room couldn’t come soon enough. Added to this is that Max—while hardly involved in the nuts-n-bolts of renovation at all—loves to do laundry. All I had to do was renovate a room, and then I could pass the torch to my boo to actually use it. So, since I like to think of myself as both romantic and stylish, I decided to build that boy the best damn laundry room this little space could handle. The room had to be utilitarian, yes, but it could also stand to be beautiful and fancy-feeling, so that Max could really commit himself to removing the frequent blood/grease/filth stains from my clothing with panache and style.
You guys. I totally did it. My semi-evil semi-romantic plan is working.
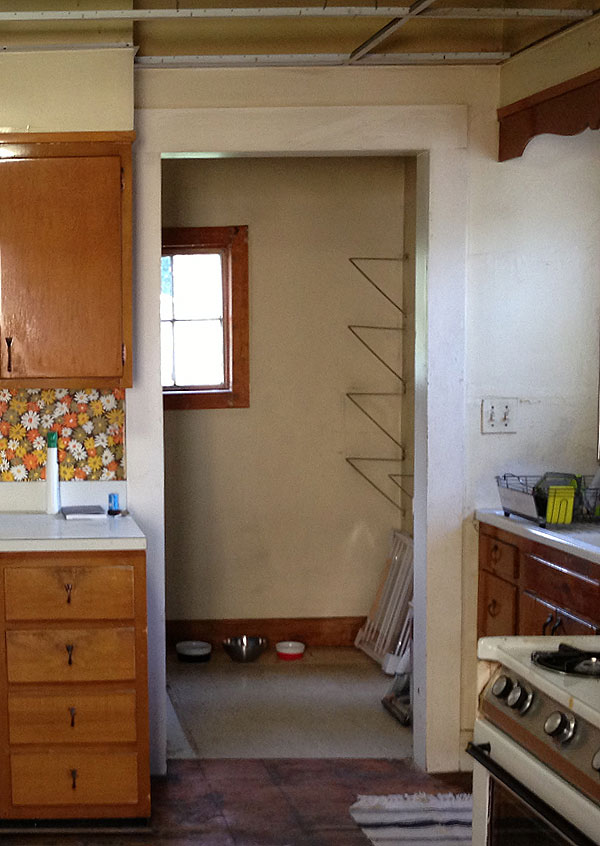
Let’s take a horrifying look back, shall we? Way back. Here’s a picture of the kitchen looking into the laundry room after about a week in the house. The funny thing about this room that separates it from basically all the other spaces in our house is that pretty much any nice architectural detail that perhaps once existed had been stripped from it years ago. On the kitchen side, 1×6 pieces of lumber had been cut to various thicknesses (why? Who knows! But each side was different!) to frame out the doorway. Inside the laundry room, the same 1×6 lumber had been used for baseboards, and dinky 1×3’s surrounded the super crooked window in a super crooked way. The window itself is old, which is kind of nice, but that’s about it. The original plaster had been covered over with drywall, and anything that may have been nice about the room way back when had just been lost in the process. So unlike in other spaces, where I want to highlight all the original architectural details, the task here ended up being to basically recreate them to give this room back some old-fashioned charm.
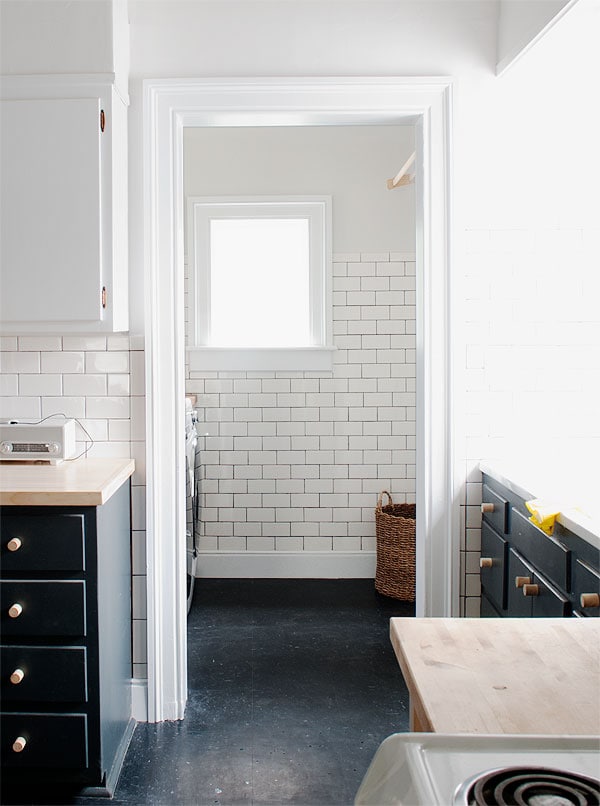
Ohhhh yeahhhhh. That looks a whole lot better, can we agree? I hope we can agree.
I ended up slightly decreasing the size of the doorway (both width and height) to accommodate an old door I found in the basement. The plan was to erect this poor forlorn door as a swinging door between the two spaces, which I still intend to do, but it just hasn’t happened yet. But that’s OK! It will. Some other time. After some careful/creative drywall, tile, and baseboard patching, it really looks like this doorway has looked like this all along, which I’m so happy about. If we ever get to gut the kitchen, I think this doorway will be one of the few things that just stays put as it is.

The molding on the outside of the doorway actually came from the only thing that was really worth salvaging from the inside of the laundry room, which was the original door casing! I carefully pried off the pieces (which, due to the later addition of the drywall over the original plaster, were basically sitting flush with the drywall—not cute), and then verrrry carefully cut them down to their new size to accommodate the smaller opening.

In the process, it looked kind of like this—which was a whole lot of sadness, considering the kitchen was looking pretty good before I had this bright idea to destroy it again. Whoops!
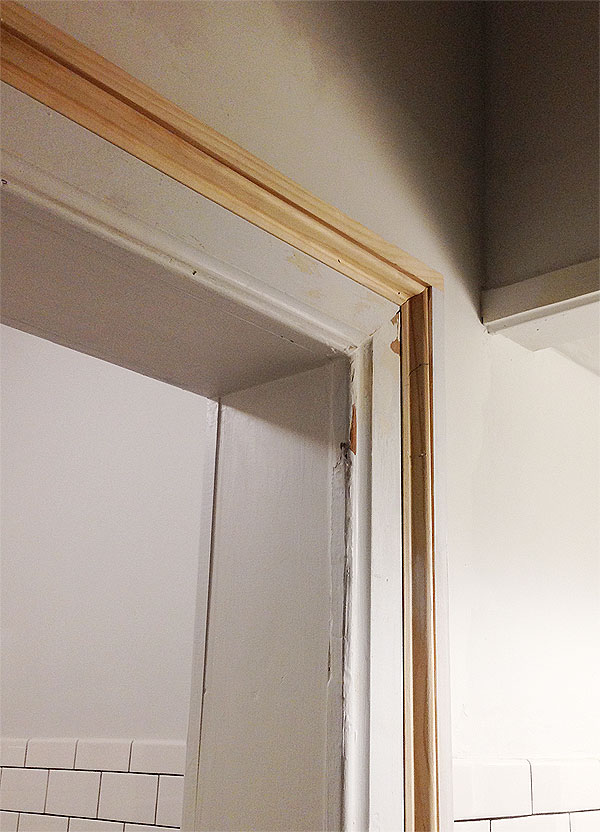
This is a truly horrendous picture, but after cutting the old pieces to their new sizes and nailing them up, I wrapped them in 1×2’s and then added this stock piece of pine base cap molding from Lowe’s. These added details do a nice job of matching the original 1850s moldings in the kitchen, and after it was all primed, caulked, and painted, it looks really authentic!
OK, enough dorky molding talk (jk, there will be more). Shall we go inside? WE SHALL.

Just look at this sad awful mess. It was sad and awful.
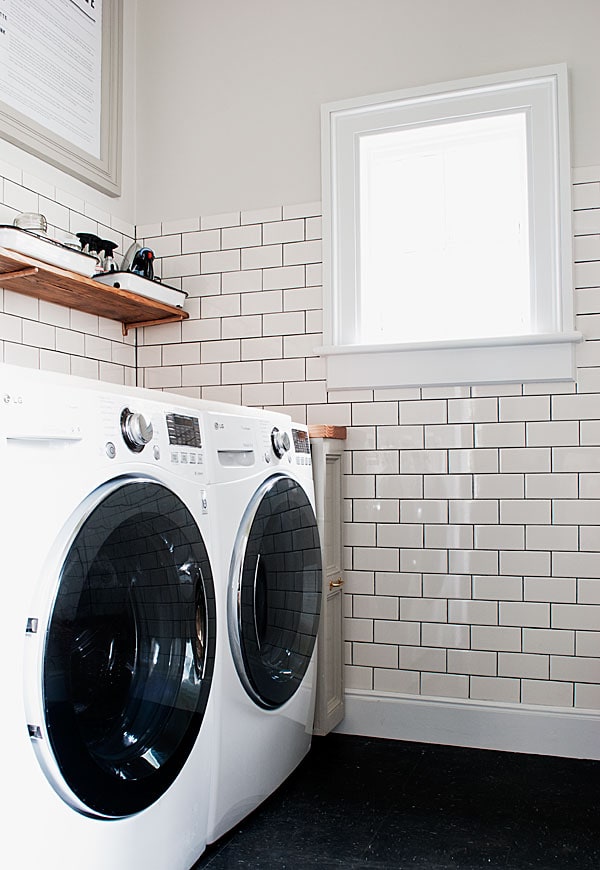
I don’t even know where to begin. I’m overwhelmed.
1. You can read all about how I replicated the original moldings for the window casing and baseboards here. I’m so proud of how this turned out! Even if they don’t look 100% original, they definitely tie the room together with the rest of the house and really make the space feel special. I obviously tell everyone that I made all the millwork, because I have zero shame and a developed need for praise, so for that reason alone they aren’t fooling anyone.
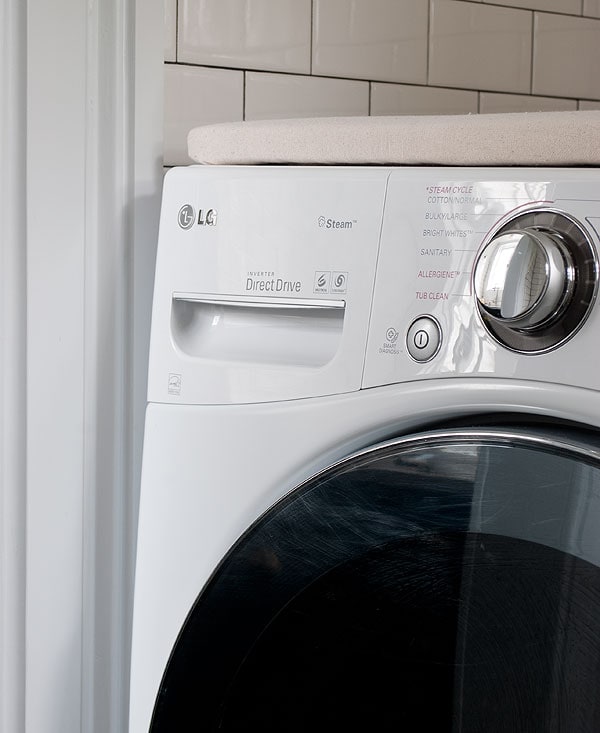
2. I am in LOVE (LOVE LOVE LOVE) with our machines. We wanted to get machines that were the largest capacity we could, while taking up the smallest footprint, and of course with good ratings. These LG models (washer & electric dryer) fit the bill perfectly—they’re slightly shallower than competitive brands, meaning they fit the space between the back wall and the doorway like a glove, they have amazing reviews, large capacity, fancy features, and even sing a very jolly jingle when they’re finished with their cycles. I could go on and on! I can’t imagine being any more satisfied with them. One thing of note is that we purchased them at full price, but a couple weeks later Lowe’s was running a promotion (10% off, I believe) on large appliances! We brought back our receipt, and Lowe’s was happy to honor the current promotion because it was happening within a month of our original purchase. We got about $300 back in store credit, which I immediately spent on”¦wait for it”¦A TABLE SAW. There may have been tears. Table saw = life-changing.
3. Since this room is attached to the kitchen, we wanted to tie it in visually with our earlier kitchen renovation—which meant subway tile, and lots of it! I’m so happy with how the tile came out—combined with the millwork, it really makes the space feel finished and fancy, not to mention how nice it is to clean and everything. Regular 3×6 subway tile is really inexpensive, too, so tiling the whole room was only a few hundred dollars. Can’t beat it! These are American Olean white subway tiles, and the grout is TEC unsanded grout in Raven.
4. Are you seeing that little cabinet next to the dyer? Are you seeing it? Well…
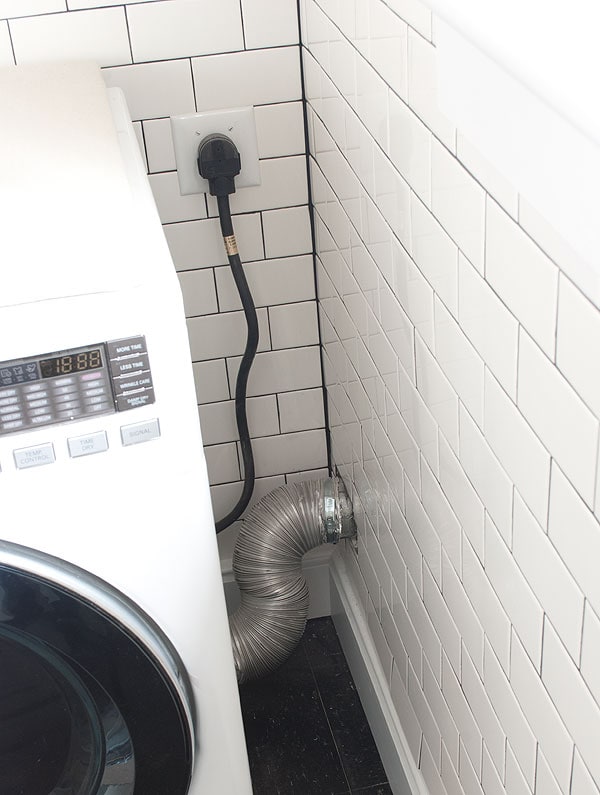
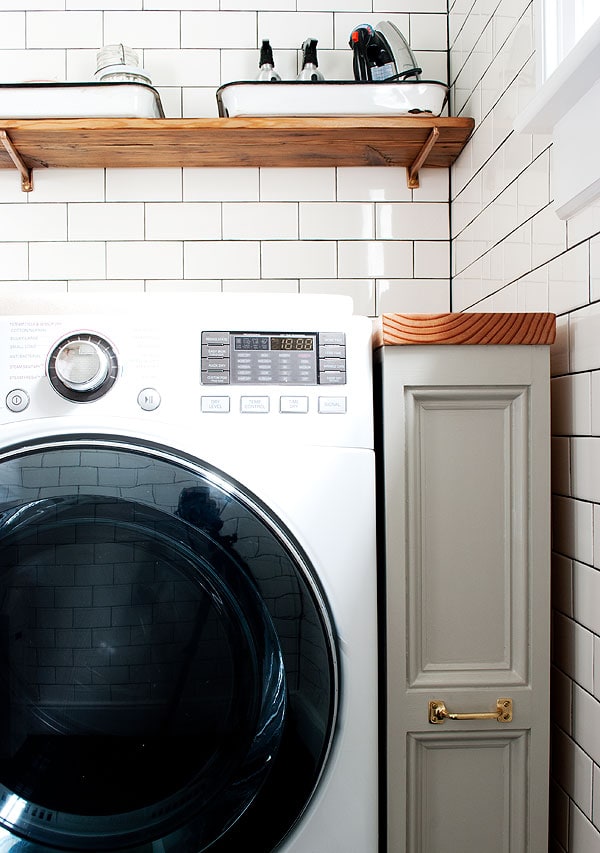
There’s about 8 inches of space next to the dryer, which I didn’t want to go to waste. To keep the machines as close to the back wall as possible, I had the electrician install the dryer plug to the right of the dryer itself, and we chose to side-vent the dryer for the same reason (lots of dryers offer this option nowadays, and the conversion is easy with a couple special-order parts). This left an awkward little ugly space that I didn’t want to look at, and it seemed like letting it go to unused would be a wasted opportunity.
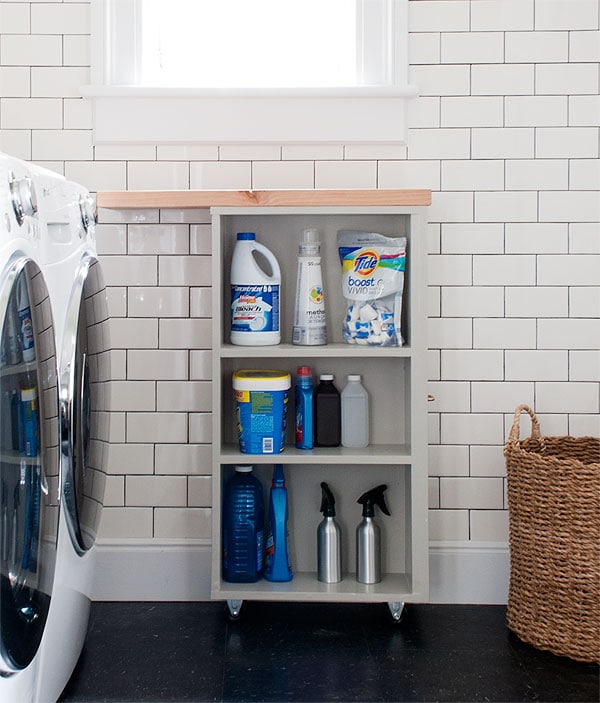
So, out of some scrap plywood, I cobbled together this little rolling cabinet! It holds all kinds of stuff that we don’t really need for every single load of laundry, but do end up using frequently. As you can see, it isn’t even full, so we do have some room to expand where our laundry potions are concerned.
For the top, I just cut down a piece of our old fir countertops (gone, but not forgotten), gave it a good cleaning, and sealed it with three coats of water-based polyurethane. The polyurethane is a HUGE improvement over the original oil finish in terms of keeping it clean and wipe-able. I made it extra-long so that the back edge of the countertop hits the wall before the back of the cabinet can hit the plug or the dryer vent. Sneaky!
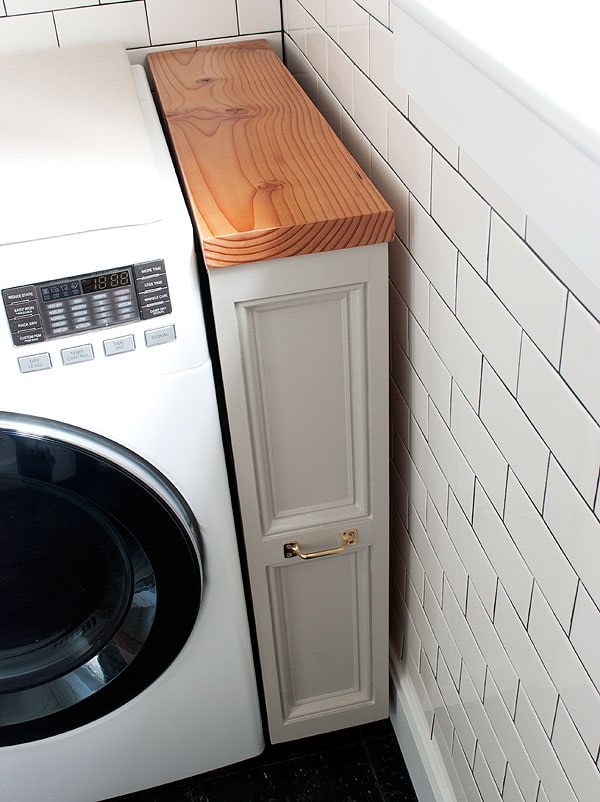
I’m so happy with how it came out, and the wood top adds a nice natural element to the space to keep it from feeling too cold. The handle is just a cheap brass sash lift I had lying around for some reason. I painted it in Bedford Gray by Martha Stewart’s line for Glidden, color-matched in semi-gloss to Valspar paint from Lowe’s. I love this little thing! Even though the decorative paneling elements on the front are a little more traditional than my style tends to skew, I feel like it fits right in in this space.
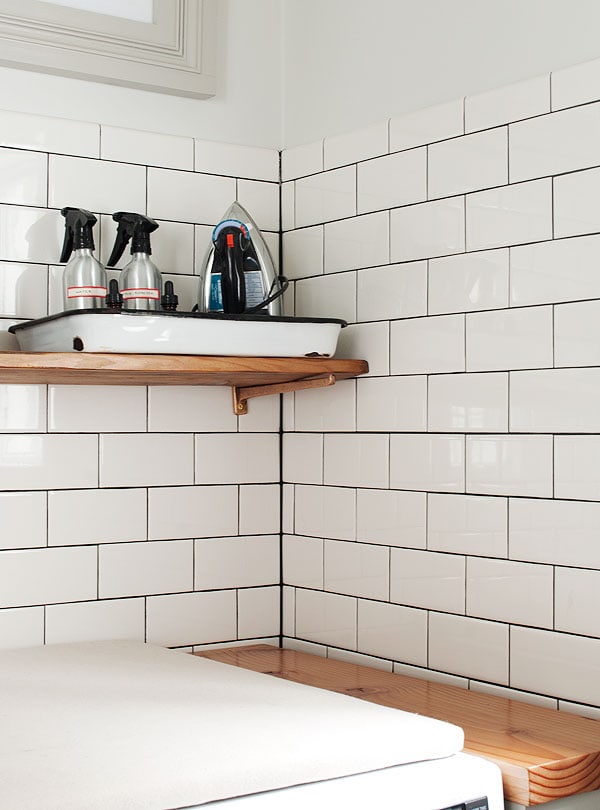
On top of the machines, I made a simple ironing board out of a piece of 3/4″ plywood cut to size, cotton batting, and a piece of a canvas drop cloth, which was inspired by a Martha Stewart project. The original concept was to make a removable cover that could be washed, but once I broke out the sewing machine, I quickly got overwhelmed and just stapled the fabric to the underside of the board. I still have plans to make a removable cover”¦if I can figure it out with my rudimentary sewing skills, I’ll do a whole DIY tutorial. For now, though, this is totally fine and a functional way to take advantage of the top of our front-loaders, and the natural cotton texture is really nice in the room.
Also, SHELF! The copper-coated brackets were a lucky find from a local coffee shop/vintage store in Kingston, Outdated (who also have an Etsy shop!). They were super rusty when I bought them, so I soaked them in CLR, scrubbed them with Barkeeper’s Friend, and spray-painted them with matte varnish to keep them from rusting. I love them. The enamel tray is vintage, and the stainless steel spray bottles and medicine droppers are from the Container store.
The shelf is a piece of super old salvaged wood from the attic, which I cut down to size, sanded, and coated with water-based poly. Really old far-gone-looking wood cleans up so well!
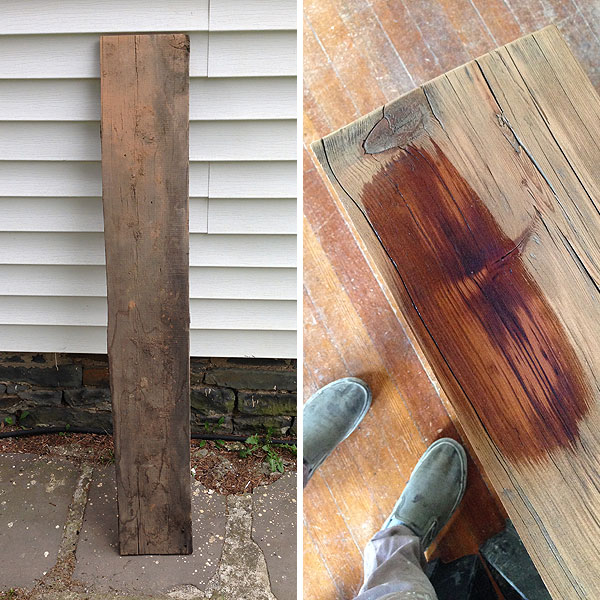
I figure it’s been like this for about 150 years, so I’m not too worried about it warping.
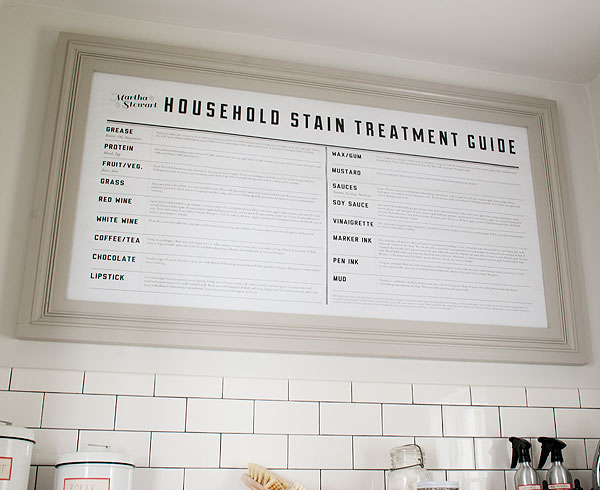
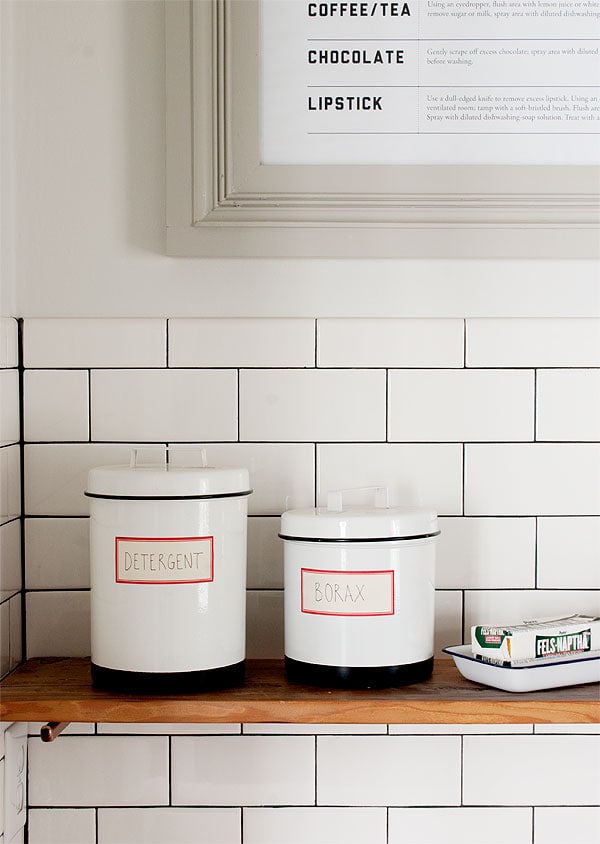
One of my favorite things in the room is this ENORMOUS poster that Max designed—Martha Stewart’s Household Stain Treatment Guide! We defer to Martha for all things home-maintenance related, and homegirl knows a thing or two about doing laundry. I know the writing might look illegible, but that’s just the picture”¦it’s easy to read in real life and reference in a stain-fighting conundrum. We had it printed at Staples for a few bucks (it’s just one of their cheap 4’x3′ posters, cut down to size). I wish I could offer the image as a free download, but I fear it would violate all sorts of copyright laws and I can’t have Martha on my bad side.
Sorry.
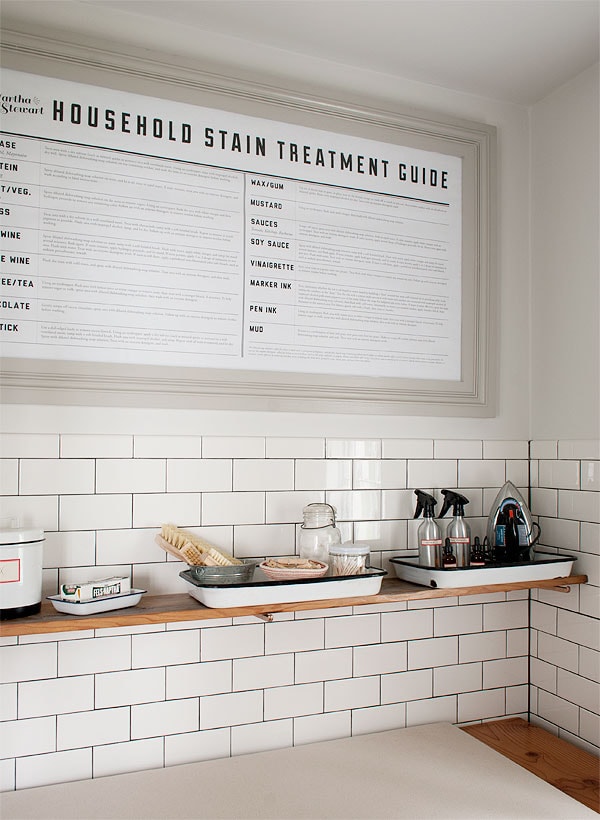
I made the frame myself out of some scrap wood and a few inexpensive trim pieces from Lowe’s, and painted it the same Bedford Gray as the rolling cabinet. For the glass, I had a piece of plexiglass cut to size at Lowe’s, which was awesomely easy and cheap.
The walls, by the way, are Benjamin Moore’s “Calm” color-matched to Valspar in matte. I’m really glad I tried out this Valspar paint—I went one level below the top-of-the-line option, and the paint is SO nice—especially for the price (like $34/gallon). I used the color recently in a client space and I love it—it’s such a nice super pale grey that contrasts nicely with white trim and doesn’t go purple or blue. It’s my new leading contender for the entryway!

At the end of the shelf are a couple of enamel canisters from West Elm, which hold our powdered detergent and Borax, which Max uses as a laundry booster. We use these for pretty much every load, so it’s nice to have them accessible but also pretty and decanted into these containers. The labels are from the Martha Stewart collection at Staples. (are you sensing a theme? no? WE LOVE MARTHA THAT IS THE THEME.)
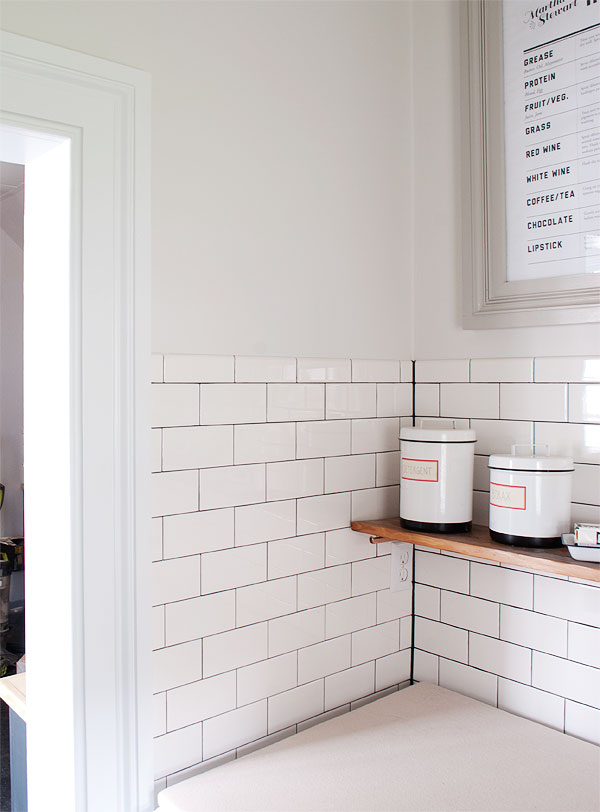
The shelf is hung just above the outlet for the iron. Check out how pretty the doorway molding is! I MADE THAT. Check out how cute that frame is! I MADE THAT TOO.
Other side of the room? Other side of the room.
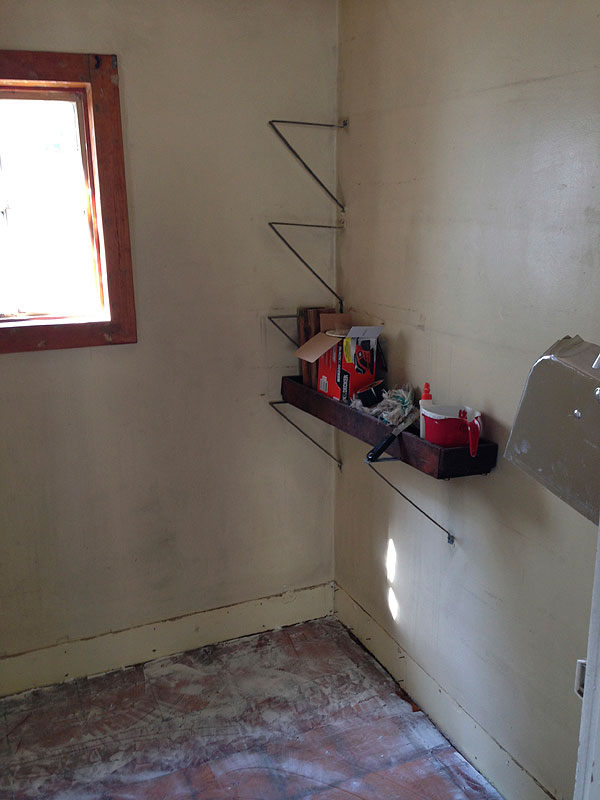
Obviously, this was a bummer. I only include it for the DRAMA.
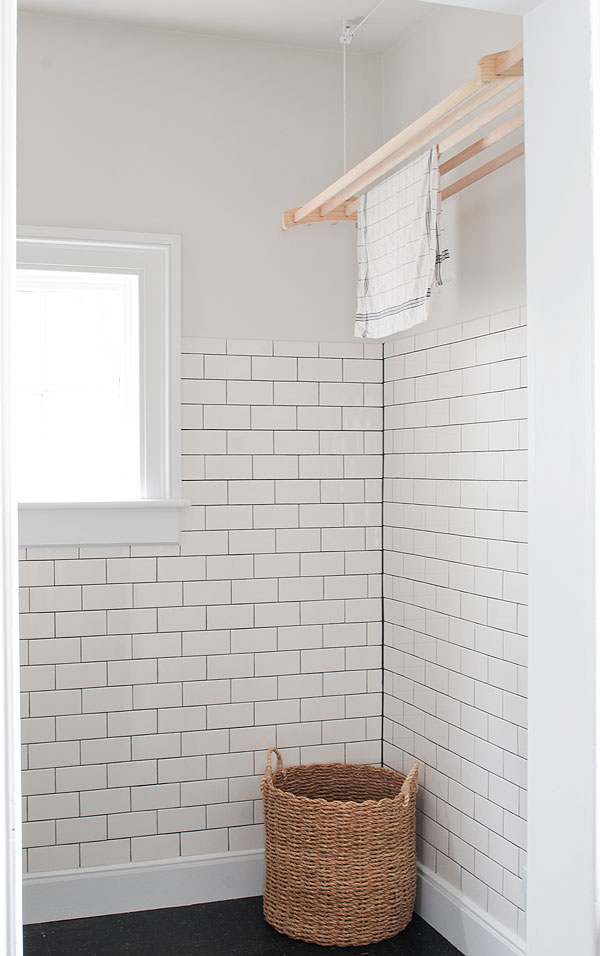
There’s only about 14″ of space between the doorway and the wall on the other side of the room, but I fell in love with the idea of installing a hanging rack for things that need to hang-dry. Enter the WOODi! It’s the same idea as the very pretty Sheila Maid that a bunch of readers suggested (thanks, guys!) but I found it at one of my favorite Brooklyn shops, Dry Goods, and I liked that it was a little more contemporary and American-made. It lifts up or down on a pulley system attached to the ceiling, which sounds intimidating but it was really simple to assemble and install. So cute, right? It fits the room perfectly, and I love the functionality.
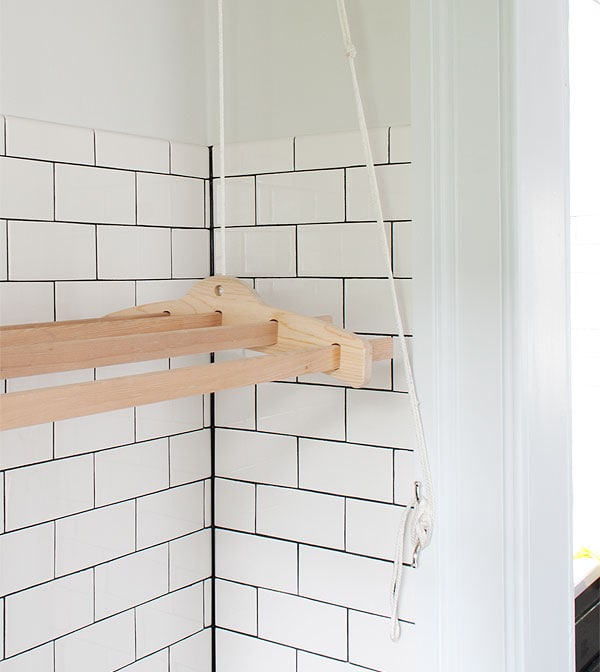
The rope for the WOODi (which could be exchanged for a cotton rope or something else, but I used the stock nylon rope it came with) is held up by a little chrome cleat that comes with it, which I attached to the new doorway molding.
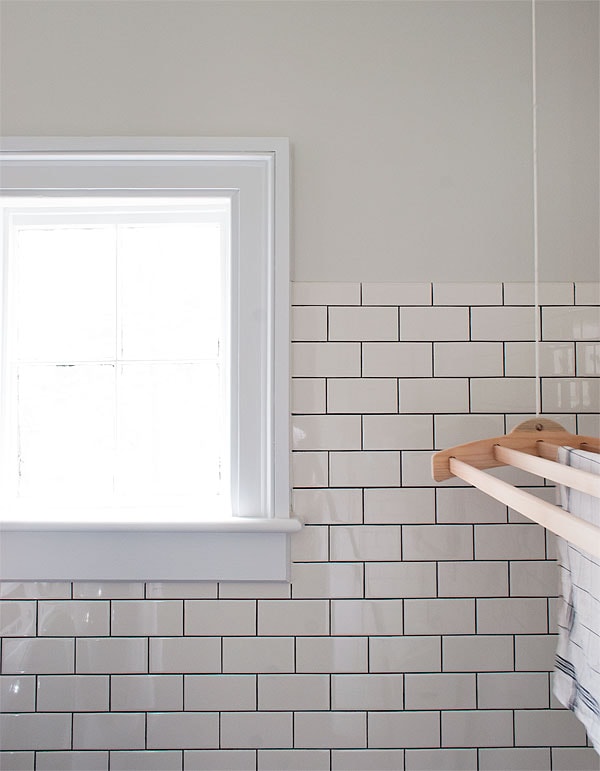

Can we just talk about the window some more? I think it’s my favorite part of the room. It’s the little things! This window was such an eyesore before since it was so small and crooked, but adding beefier moldings (and installing them LEVEL) changed EVERYTHING. Instead of spending hundreds of dollars on a new window, I spent maybe $50 on lumber and made this one work, and I’m SO glad I did. Now it feels like the perfect size for the space, and I even like the crookedness of the window itself in its own funny little way. The whole thing makes me happy every time I look at it.
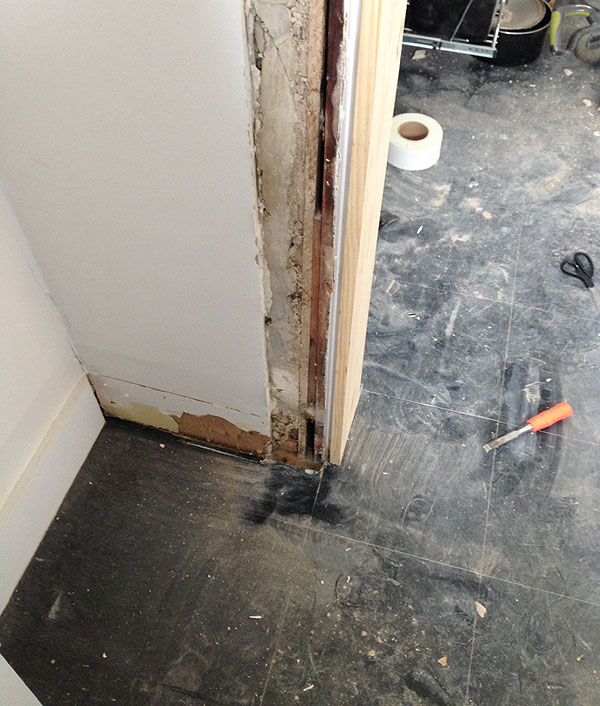
I swear I’ll shut up about the moldings at some point, someday, but man—it just made all the difference. From this, up there…
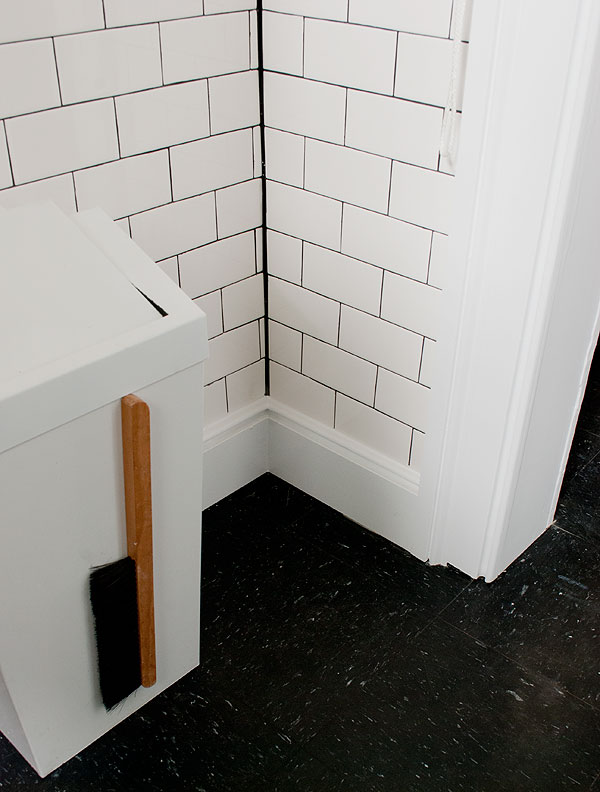
To THIS. Worth every bit of time and effort and expense. I probably dropped about $300 on lumber for just this little room, but I can’t imagine it any other way. Trying to make all the tile work with the existing moldings would have been an ugly nightmare!
The trashcan is by Brendan Ravenhill for West Elm (and currently on sale!)—the top part lifts off to become a dust pan, and the little broom is held on by magnets! So smart. We originally bought it for the kitchen, but there isn’t really any space for it in there, so now it collects dryer lint and whatnot. I love this trashcan, so I’m glad we found the perfect place for it!
I’m so, so incredibly thrilled with how this room came out—and I can say, really and truly, that it’s changed our lives in such a great way. I so appreciate all of the input and encouragement from you guys along the way, and I’m so thankful to Lowe’s for helping us make it happen! Getting this little room checked off our incredibly long list is such a morale boost, and I’m so excited to start working on all the other spaces calling out for attention!
Yay, clean clothes!
This post is in partnership with Lowe’s! Lowe’s has generously provided funding for this project, however all designs and opinions are my own.






Beautiful!
LOVE IT. Showing this to everyone I know just to share the love for this amazing laundry room. Well done! :)
Wow, just amazing. I love the little cart and the Martha Stewart laundry instructions, and I am especially so impressed by the window. Even after following your blog for several years I confess I was sceptical, but it really really works. Wow.
Wow. Great job!!! I love everything about this little space.
Is there a way to buy that poster? Does Martha sell it somewhere?
Thanks, Chelsey! I mentioned this in the post, but you can get all the information from the poster here. Unfortunately my fiancé, Max, designed the poster itself, but since the content isn’t our intellectual property I don’t think it would be OK to offer it as a sale or download or anything. Sorry!
I LOVE this poster! I would love to have the infomation! Max did an AMAZING job on this!!!! LOVE, LOVE, LOVE it!
OMG!! Bravo, awesomeness all round.
I’m from Warrnambool Australia and my husband refers to you as my imaginary internet friend.
I have been following you for ever and this is the first time that I have posted to you – I had to finally say YOU ARE FREAKING AMAZING – bloody well done!
OH, I’m so depressed knowing that I have to go down to my dingy damp basement to do my laundry. This is awesome, and I’m so jealous…. GREAT JOB!
wow! your creativity never ceases to amaze me. every piece, detail, and moulding is so carefully thought out, so meticulously done. your house is truly a labor of love! bravo to you and max.
Whoa. What a transformation.
I never thought it would be possible to have laundry room envy, but you’ve managed to make it happen.
Every element is perfect. The tile, the color, the little rolling cabinet, the shelf with the enameled trays and containers… Especially that amazing chart with the custom frame.
I always associate a laundry room with adulthood and homeownership. My second apartment in Brooklyn had laundry in it, but it was in the basement and was coin operated. That, along with the fact the floors in the apartment were clad with dollar-store peel-and-stick tiles, managed to make the whole thing feel much less special and grown up.
Your laundry could not be any more adult or elegant. Well done.
GOD! It’s gorgeous. And I am so jealous of your Sheila Maid. I’m dying for one, but the only place we could put it right now would be over the tub in the bathroom, which is also our laundry room. Anyway, you did a great job, especially with the moldings and the window, and I love the little cabinet!
Laundry.Room.Envy. This whole thing = inspiring and fabulous and truly, a new blog post from you makes my day, every single time. Thank god your house needs a lot of work because if you were going to be all finished with it in like 2 weeks I am not sure what I’d do. That sneaky rolling cabinet will be rattling in my head for days so I think I have just mentally committed to figuring out how to use my husband’s fancy automatic saw things. WELL DONE!
I don’t think I have ever gotten so excited about Mouldings! Seriously, bro the space is amazing and you have done a wonderful job! Hooray!!
Holy hell, you turned that room upside down. You killed it on the mouldings, and I like all your pretty products. I was dubious about the subway tile at first, but you’re right, it connects the laundry to the kitchen and totally makes sense.
(Looks like Max used the same heading type on the poster as on your blog? That’s some brand consistency, haha.)
Ha! I think it’s actually a different font, but it’s definitely similar. I’ll have to ask him.
And thank you! :)
Holy shit, Daniel. This is AMAZING. You’re like a god.
Daniel STAHP. This is UHHHMAZING. The laundry freak in me is squealing with delight! You did such an amazing job. This room is perfect.
Also, Max’s Martha poster is to die for.
Daniel and Max: OMG. This just made my day! I’ve been obsessively checking for this final post for days! Your final product is perfect! Tell Lowe’s they’ve gained another customer — so clever of them to fund your project.
It is literally, PERFECT!
Fantastic! This is the laundry room I never knew I always wanted! :) Pitch perfect in every way.
Amazing. You brag about those moldings all you want, because they are seriously gorgeous. I kinda want to wrap the whole room up and take it home with me. Brilliant, brilliant job!
It all looks great, but it there no light in the room?
Oh, there is! Just a small overhead light we installed back when we renovated the kitchen. It isn’t really anything special or interesting and I’d like to replace it with something cuter and maybe vintage, but it does the job for now. (the lights are off in the photos since interior photography almost always looks better with natural light)
perfect. just perfect.
well done!
This is AMAZING. Gorgeous, gorgeous, gorgeous.
Also, good to hear that Max is committed to removing your clothing with panache and style :)
OMG. Did I write that??! Apparently I wrote that. I’m appalled.
(sentence edited to reflect stain removal rather than clothing removal. yeesh.)
I’m dying laughing over the best Freudian typo ever.
hahahahaha – laughing WITH you, not at you – life is ironic, it so amuses me!
And the room is gorgeous, just simply gorgeous. So many singular small(notsmallineffort) things all come together to make one amazing space. EXCELLENT!
I am agog at the awesome. Wow!
Martha would be proud. This is definitely a good thing!!
What a great blog this is. I always look forward to seeing you pop on my feedly.com list with another installment. Its just great fun to watch you rustle and tussle your way into a beautiful home. The laundry room looks “neat” and I mean that in the best way possible. All the light and openness into the kitchen. I thought I was sick of white walls, but clearly they’re being put to great use here.
Great work. Enjoy!
OMG, I’ve never been jealous of a laundry room before. It is so fantastic! Love the Martha poster – genius!
Super travail comme toujours Bravo
Wow! I never thought I’d be enamoured with a laundry room. The rolling side cabinet”¦ genius.
Amazing job! Love to see a gross little room transformed into a functional and beautiful space!
I wish you could come to Illinois and transform my kitchen like that. So fantastic.
WOW. Yep, pretty sure that sums it up. Great idea, how about you come on down to New Orleans and replicate this in my utility room/laundry room/bike storage room/I don’t know where to put it let’s toss it in there room. :)
Seriously, this looks amazing. It makes doing laundry look like an activity I would look forward to. Beyond impressed!
Love it all! Totally right about the moldings making the space, along with that little rolling laundry cabinet, which is brilliant and perfect. Happy Daniel, happy Max. Win-win, and with great style. And this post about the laundry room was worth the wait in words and photos.
Yaaaassssssssss!! Sucess! Pride! Glory! So excited to finally see the big reveal. Now that you are a pro you are tackling so many incredible feats from project to project. You’ve shared so much about learning the woodworking- but I am gawking over how you made that frame for the poster. Who knew Lowes cut plexiglass?? I would love a quick and dirty how-to on that DIY. I know the poster itself is off limits, but I would love to see more on making a frame!
xx
Wow! Daniel this is so great, the rolling cabinet is genius, Max’s poster is so pretty and usefull, this room feels so right in all the possible way. I am very touched at how you seem so proud of yourself (with great reason) with the woodwork you did. Now you can’t change the kitchen because it match the laundry room perfectly! Again, I love how much you are proud! Damn, I wish I could express myself better in English so you can understand what I am really saying…anyway, GREAT JOB!!!!!!
Max loves to do laundry? Where can I find myself someone like that??
That’s a sexy little cabinet next to the washer! Very clever, sir.
Congrats on a gorgeous room. Martha would be proud.
Just lovely! Tell Max we are all jealous of his poster. Madame Stewart should totally hire the two of you!
I love the tile. On a lot of the blogs people say things like “subway tile is so dated – it’s this decade’s avacado” EXCUSE ME – it’s been in constant use for over 100 years plus now and it looks good. Period. And THIS, ladies and gentlemen, is how it should be done.
I think I’d iron more if I had your space – that “ironing table” is genius. I may have to steel the idea if I ever get front loaders.
Thank you!
I know”¦I don’t know what these blogs are or where they’re getting their ideas, but talking about subway tile like it’s a passing trend is so strange to me! I understand that it’s had a resurgence in popularity in residential spaces over the past several years (and, to be fair, I do find it a little tiresome in new construction, where it seems like there are just so many other options!), but in old houses, I just think it looks really natural and really”¦anti-trend? I have a hard time imagining feeling like it will look dated, even in 10 or 20 years. Anyway, I’m glad you like it. :)
Holy shit, it looks fantastic
This is amazing. AMAZING. It is beautiful room.
O.M.G. This looks aMAZing.
“Well done” doesn’t even begin to express it…!
Amazing! Amazing! Your evil plan worked. We need a picture of Max doing laundry!
Martha, if you see this, you should sponsor Manhattan-nest!
Wow looks awesome! I’m always impressed by how quickly you seem to knock out these projects. Congrats!
So so good! Happy laundering!!
Nothing new to add to the many other compliments offered — suffice it to say I’m equally impressed! It’s been fun to follow your journey over the years and see how much your confidence and skills have grown. I think you’ve always had the vision . . . as a DIYer of many many decades I find your creativity and your uniqueness to be most inspiring. Fantastic job on this whole laundry room project; you found the tiny burning ember of pretty in the original room and really fanned the flames!
OMG – BRAVO
I just LOVE visiting your blog!!!!!!!!
It looks so wonderful! You did such an awesome job. And that little rolling cart? Genius.
Best laundry room EVER!
It’s so thoughtfully put together-and yes, your “I made these!” moldings rock that room to new heights.
Well done!
I’m in awe!
Oh my stars! It must feel really nice to have that room finnished, and you did a great job on it too! :)
This room, and all your designs, remind me of this quote:
“The details are not the details. They make the design.”
– Charles Eames
Laundry room looks fantastic! You inspire me.
I second the request for a tutorial on how you made the picture frame – please, please!
Wow, this looks great! I second Amanda’s request for a quick tutorial on how you created the frame for Max’s poster. Please.
Noted!! I’ll try to put something together!
Beautiful room. I really enjoy your blog. I would also like to know how you did the frame for the poster. What are the dimensions of your laundry room? I think I have an adequate space to have a similar layout for a laundry room–although I doubt I’ll have your genius in putting it all together. I love the wall color!
The room is a little over 5×7!
This is… amazing. I saw that bit about a client, and I’m glad people are coming to you – your magic and hard work needs to spread around!
This room is impossibly chic! I’m incredibly envious of your vision, skills and stamina for a project! I am not one to get excited about doing laundry but this room gets me very excited about it! I would happily be a laundry slave in this gorgeous room! Well done Max on the poster too.. its fabulously designed – minimalist chic! You should sell something similar on etsy (with your own wording so as not to upset Martha!, or why not partner up with her, now there would be a match made in heaven!).. I guarantee it would sell out in minutes! A perfect finishing touch to your perfect laundry room! Beautiful just beautiful <3
Sigh… This room is simply stunning. I never thought I’d say that about a laundry room either. Absolutely everything was thought out and executed perfectly. Well done. I love it.
Best,
Jackie
I mean, come on. You (and Max) are hitting out of the park once again. This is so good. You need to collab with Martha, just saying.
Can’t wait to see what is next in that gorgeous house of yours.
Gosh, I am speechless. That little shelf/drawer by the washing machine is GENIUS. I would basically live in that laundry room.
Absolutely stunning. I’m incredibly jelly but it’s also making me feel motivated to do our laundry room. Really well done, yet again. You’re a genius.
Ever since I started reading your blog, I’ve been impressed by your ability to just TACKLE something and go into it whole-hearted, and being able to get up and re-do something right even when you don’t really want to. But for some reason, you casually mentioning you built a mini cabinet cart from SCRATCH and a custom frame from SCRATCH made a special impression today. I think it’s because that it shows that through all the physical effort and mental power you have to dedicate, you still have lots of creativity and a sense of “why not” left over. That’s super inspiring. Love your blog!
You are a magical person. I’ve never wanted to do laundry so badly in my life!!! All the little details… that rolling cabinet… the stain removal guide… ahhhhhh! You guys are incredible. Congratulations, I’m sure it feels amazing!
Seriously I just had to comment again – just…Wow. I even pulled my coworkers around my desk so we could all ogle and enjoy.
You do incredible work!
I love the laundry room and I’m trying to figure out where I could install one of those drying racks in my house. It should probably go in the laundry corner of the basement, but mine is so dirty and basementy still.
Years ago I made a small laundry poster with the definitions of all the laundry symbol labels. I gave them to my sister and mother but I’ve never made a copy for myself. I love the oversized-ness of the poster above the washer. I look forward to your upcoming tutorial on making the frame. I’ve been thinking of making a similar one myself for a large print but haven’t gotten around to it yet…
My jaw dropped when I saw the roll-out cart. DROPPED.
I too think the subway tile looks very natural in an old home & have a hard time imagining that it will ever look out of date.
Lowe’s was SO SMART to partner with you on this. I hope they’ll be back – come on, Lowe’s, how about the bathroom remodel?! :D
Who needs a door when the room looks so great?
Once again you hit it out of the ballpark! I love all the little details you put in the room although
the moldings ARE what makes it!
Great job!!
You are TOO amazing! I wish some of your handiness (& perfectionism) would rub off on my boyfriend… :)
Sublime. Simply sublime.
I too am a laundry nut and I share my secret with anyone that will listen. Country Save laundry detergent. Life changing. My clothes have never looked better. I learned about Country Save when I had a child in cloth diapers. I quickly started using it for all of my laundry. I’ve converted all of my family members and several close friends. Everyone is always impressed at how white my whites are and how good our clothes look given their age. I have a five year old son and none of his clothes have stains or look faded and gross. I owe it all to Country Save. I purchase it on Amazon in bulk and the four boxes in the order last for a year. A year.
For delicates I use “Forever New”. It also does amazing things for white cotton sheets and cotton sweaters. Check out “The Laundress Wool and Cashmere Shampoo” for the wool and cashmere items.
This laundry room looks INCREDIBLE. I love the simplicity and timelessness of it, while still being so chic. I think it couldn’t fit your house more perfectly. I don’t even know how you could put a door there to block your view of it while you are in the kitchen. Also, you MILLED YOUR OWN WOOD?! I just….there are no words. Bravo!
I’m not surprised by your final results, yet blown away by it all. For such a small room, it is fabulous. Just enough, not too much. It’s in the details and I envy your eye.
This little room is so beautiful! I have a question about the ironing board. Do you find that it shifts or falls off at all when the machines are on? If I put anything down on top of either my washer or dryer (both new HE!) it will definitely get bounced off during the wash or dry cycle because the machines shake so much.
Not at all, fortunately! These machines really don’t move at all, even during spin cycle. It’s kind of amazing!
Parker, my machine shakes a little too but machines shouldn’t shake too much. Check to be sure the shipping bolts were removed before you started using it and also that it is level.
WOW. As the song goes, “You’re the meaning in my life- you’re my inspiration.” OK, you’re actually NOT the meaning in my life but dang, you are my inspiration! Truly. Things I never thought possible, even though I’d done DIY before, are now in my grasp. MOLDING! It is gorgeous and you SHOULD brag on it forever. And thank you for blogging the whole process so that others might learn.
DUDE.
OMG this is AMAZING and you Daniel ROCK!
So happy to see the update, I’ve been looking forward to seeing this all finished. So gorgeous! Based on the before pictures of your house, I can’t wait to see what else you do in the house. Beautiful work! Max is so lucky this is your passion. Wishing my husband had a passion like that.
On Jan 8th of this year, six different water pipes froze then cracked in my laundry room. Flooded, ruined, decimated it. $10,000.00 later, paid by insurance but still, it doesn’t look even 1/4 as good as yours. I’m so filled with deep seething envy at the amaze balls job you did. Really fantastic. I hate you.
just WOW – once again, amazing job!! I absolutely love how light and airy it looks thanks to your color scheme. That Martha print that Max made is so ridiculously chic, if my laundry room looked like this I’d be much more keen on doing my laundry :)
This looks incredible. It’s all super impressive…especially all of those moldings.
The drying rack reminds me of my friend’s apartment complex in Berlin. One laundry room, super high ceilings. Each apartment gets a (huge) drying rack suspended by cables from the ceiling by this elaborate pulley system. And then there’s a cute little monthly tally of loads completed for each apartment. Struck me as so very…German. Precise and thoughtful and egalitarian.
Just amazingly, breathtakingly beautiful! Your blog is my favorite of all the ones I follow, as much for the pictures as your writing style. I get so excited when I see you pop up in my rss feed!
Gah, I love it so much!!! I love it more than that video of the goat reuniting with his burro friend.
Holy crap. I’m crazy about the moldings and millwork, and the fact that you made all that is such an inspiration. Gorgeous transformation!
It’s just wonderful :) I love it!
Wow!! This is amazing and quite inspiring.
I want to be able to do this when I have my own home someday!
I would probably love doing laundry if I had a room like that. It’s truly beautiful.. congrats on an amazing job. One thing only, is there no room for a laundry sink. Invaluable for soaking clothes, washing dogs, etc.
Wow, just wow! Love the cart, the poster, the subway tiles, the ironing board and especially the moldings. Just an amazing transformation. I also have an LG washer and dryer and my vent is hooked up to the back so it sticks out in my laundry room. I’ve kinda gotten used to it that way but now after seeing this I’m going to finally order the parts so we can vent it out the side and gain some more space.
if I ever get really delusional and buy and old house, I’m blaming you for everything that ensues because you’re so inspiring!! bravo!
Amazing as always!
Could you share the font styles used in the poster? Wonderful idea.
Sure! The header/title fonts are Duke and Liberator from Lost Type Co-op, the Martha Stewart “logo” is Sail available for free at Font Squirrel, and the regular text is Garamond. :)
Thank you!
Dont forget to put bumpers at the end of the extra long countertop on your rolling cabinet. Dont want that gorgeous tiles to get any cracks. :) As someone who loves to do laundry, I must say you totally created a laundry-doing haven. Totally in love with the little room.
The Dry Goods site is using your images for the drying rack! So neat!
Yes, I gave the owner, Carla, permission! She’s the best, as is her store. :)
“The handle is just a cheap brass sash lift I had lying around for some reason.” Only you Daniel. Only you.
That door frame shrinking made me think that you are an actual wizard. IMPRESSED.
Can I move into your laundry room? I’ll be like Harry Potter under the stairs.
Martha 4ever.
Beautiful, beautiful job on the remodeled laundry room!! Due to the fact that you haven’t owned a washer and dryer in a while or maybe never? I want to alert you to the fact that that front load washers will smell after a while if you don’t wipe down the inside seal and leave the door open sometimes so the inside can dry. They are wonderful and clean well but they do require a bit of maintenance.
Nice job there Dan!
Love the final room, though I understand you may get a better ceiling light, or pendant at some future time. Still, it’s a great place to do laundry.
I only envy you because you have a private laundry room and I don’t. I live in a rented apartment with a communal laundry room down 4.5 or so floors down in the basement, and yes, I have to plug the damned things with quarters every time I use them ($1.75, each).
Some day I will have my own private laundry room, and I’m in the hunt for a place to buy that I hope will have such an amenity.
Good job overall though I have to say, even though I’m gay too, I’m not exactly a fan of Martha Stewart, but don’t hold that against you, or Max though!
A totally gorgeous laundry room – and a table saw too !
Joy
Oooh what a transformation!!! Looks stunning! But, where is the ABSOLUTELY MANDATORY picture with the dogs in there?
They were in Brooklyn when I was taking the pictures!
Ok, I’m officially asking. Will you come to France and renovate my barns, you will be paid handsomely. Truly, you are the only person I know who would get it right for me…
Bravo for the beautiful laundry room!!!!
Um”¦yes? I feel like renovating French barns is probably my calling in life?
Oh you’d love this place, 50cm thick stone walls, everything has to be done, plumbing, elec, heating, floors….
I plan to use reclaimed materials wherever I can to keep it’s aura…..:)
look up Solomiac 32120 France on google maps …
Speechless. You have every reason to be very very proud of this. And I’m sure it makes all the difference in the reno chaos to have this. Applause!
Hey, just a tip: maybe you should put a couple of rubber thingies on the back of the wooden top of that cabinet, to keep it from bumping into the tiles if you do laundry a bit too enthusiastically? (I have made do with menstrual pads in the past, but somehow I think you wouldn’t go for that…)
That’s a good plan! Thank you!
It’s just… I mean…. I don’t really have words. I just love it so much.
AB-SO-LUTE-LY fabulous.
Seriously…the BEST laundry room ever. Not even kidding. You make me want to gut my whole house and start over again.
I want to hug and pet all the things in that room. Being a vintage girl, I especially love the enamel trays holding your goodies and the copper brackets. But the wood elements, the tile, the trim, that crazy cute crooked window….it makes me smile too! I wanna come down and do laundry!
Where do Linus and Mekko eat now?
Ha! We just starve them.
(they eat in the kitchen! I don’t even remember putting their bowls in the laundry room pre-reno”¦so weird! Those were strange and confusing times for everyone…)
Upper-right corner of the stain removal poster: wax/cum?
Martha would know how to get that out.
BAHAHAHAHAHA. GUM. IT SAYS GUM.
(cum is in the “protein” section, presumably.)
The before and afters are just bananas! So amazing! You make me want to tile my laundry room, though I was not wanting extra work. Hm.
Wonderful as usual and worthy of all the praise but I second Ne’s comment about the pups. We need a few new Linus and Mekko pics. Also, crazy dog person question, do they travel well in the car and is there an adjustment between apt/sidewalk living vs house/backyard?
Yes, they love the car! They’re pretty easy dogs…happy in both places, but Mekko definitely LOVES her backyard in Kingston!
Bravo Daniel, such an amazing job!! I can’t believe the mouldings, are you self taught? That takes a lot of talent. I also love the poster over the washer and dryer, this room is awesome.
Yes, self-taught! I did some work in my high school theater where I learned basic took knowledge, but beyond that this is all trial and error. Thank you!!
Dude, this laundry room is supercalifragilisticexpialidocious! I love all of it, but I think my favorite part is the dark corner seam in your walls – that tile job is so AWESOME and that detail takes it over the top!
Love all the many well-thought out details, especially the drying rack and the moldings.
This is absolutely beautiful and totally functional. This is why I heart your blog, you can actually USE these rooms! Perfection! That poster is the beautiful bow, well done!
I love everything about this room, but that little cart … stole my heart.
FABULOUS. GIVING ME LIFE.
Wow. Great job! I love how the room turned out, makes me want to do something with subway tiles as well. Just not sure what though… Might have to steal that hanging rack idea as well, never seen that before. Also some great wood working hacks ‘n tricks, extremely thought through.
Keep up the great work!
Brilliant laundry room!
Brilliant drama!
Brilliant writing!
And especially brilliant … little rolling cupboard with automatic wall stop! Seriously brilliant!
Love the Outdated shout-out! It’s owned by a family member of mine. Psyched to see it here. Great job, Daniel!
I think you’re going to love the location of the room as well. We helped my parents redesign their laundry room adjacent to the kitchen and convinced them to put in nicer finishes and tie it into the kitchen design because it’s very visible when the door is open. The added benefit of the layout is that the countertop space provides overflow food storage – so it’s perfect when everyone’s there for the holidays – extra cookie storage! And when they have parties, it makes a great place to stash platters while keeping the kitchen counters free.
I so enjoy these posts – they remind me of the early days in our renovation where we’d geek out over moldings for weeks on end.
Daniel, you are just incredible. In every single way. Looking forward to the day when you have your own “This Old House”-style show on TV.
Bravo.
I’d love to see you on a TV show/challenge consisting of on the spot personalized room designs incorporating your unique DIY design elements.
Yeah, yeah, yeah, lovely room, lovely room.
That’s all very well, but WHERE are the pictures of Max modeling your new line of demolition clothing, alternatively you modeling plywood?
Who knew a laundry room could be so exciting?! It looks incredible- I love how creative you are with the odd spaces like the rolling cabinet! Your ironing board cover made me think of a post on another blog I read regularly- a tutorial on making a super simple cover! I never thought it would be so easy, might be of use to you :)
http://www.abeautifulmess.com/2014/01/ironing-board-cover-diy.html
SHUT UP. I want to live in your laundry room.
I have the same Martha Stewart stain chart hung up in my laundry room and I thought I was fancy because I used washi tape. I seriously need a huge print of this in my life. So fab.
Your kitchen is jealous, I’m thinking. Great idea and execution on that little cart–so functional yet attractive! Good job. Madame Stewart ought to give you her copy-righting blessing because the interwebs will be abuzz with this thing. Nice going, both you and Max.
Be proud. Be VERY proud. (And thanks as always for the inspiration!)
Coming late to the party to say what an awesome job you’ve done with this, yet again. Everything about this looks amazing, and I love the rolling cart!
Perfection!!! Bravo. You’d make Martha proud. :)
OMG awesome! I had that Martha stain chart taped to the inside of a utility cabinet forever, but this is so. much. better!
On another note, do you know if there are regional differences in the colors Clark and Kensington Paint offers at Ace? I just visited my store today, and they were unable to find either Casablanca or Arabian Nights! I looked on the Ace site too. . . did they discontinue these colors?
Guess I’ll stick with Designer White in the meantime. . .
Keep up the amazing design! We love it.
Thanks! I really don’t know about Ace. I guess it’s possible they discontinued? Bizarre. Lemme see if I can dig up the color codes and email you…
This is fabulous! Congrats! I love the entire room but especially how you fixed the window! Lovely! So bright and airy! Love your blog!
What a freakin’ dreamy laundry room! I want to wash my dirty laundry in there!
holy crap! you are amazing, this little laundry room is absolute perfection! I myself love all the moulding talk, I need all the help I can get, my husband and I just bought a house and it lacks any moulding. It’s super helpful to see what tricks and tactics you used to recreate the moulding in your adorable home :) don’t stop.
Please come live in my house and make it beautiful like yours. I can’t live in this 70s hell hole anymore.
Awesomness!
Love it…. want more. When will you back to blogging? I miss you.
Momentarily :)
thanks… i love it.
Hey Daniel… you know, if you’re sew-phobic, you could just take a square table cloth or large table runner and wrap it around your wonderfully quadrilateral ironing board. A couple of self adhesive velcro strips and you’re done. It’s not your usual super-fancy way of getting things done, but it will do the job.
One word.
PERFECTION.
P.S. Do you know what fonts Max used on the poster? I’m obsessed.
Amazing job! We recently bought a new house and a new LG washer. We had two major hurdles, one was battling tamper resistant plugs (never thought plugging something in would be an issue). The second is vibration in the floor. Did you do anything to dampen the vibrations of the spin cycle for your washer, or do you not have that issue because it is on the ground floor or similar? We built a pedestal for it, but still the vibrations are quite strong.
I’m so sorry to hear that, Lisa!! I’m actually amazed by the extent to which our machines DON’T vibrate”¦like, at all. They’re the quietest, least vibrate-y machines I’ve ever seen/used. They seem to be very well-reviewed for that, too, especially in comparison with other brands like Samsung.
I wonder if there’s something faulty about your machines? It might be worth calling LG or the place where you purchased them to see if there’s any way to get a service-person out or the machines fixed/replaced. I don’t think they should be doing that!
Seriously!! Shut up with the greatness that is this space. Fav part: the little rolling cart! GENIUS!
I’m late to the party, but very much enjoying reading about your renovations. I had an idea about your ironing board re: removable cover. Crib sheet? Like, for a baby crib. :) Could be close to your current board dimensions (or easily modifiable), and the elastic is already built-in, for the ease of the novice sewer. They come in lots of stylish patterns/colors these days, and it seems you’ve already got the necessary padding installed and just need a removable/washable cover, right?
Oh wow, clever clever! I’m totally letting Max take the reigns on this one”¦I did enough in this room! :)
Hi Daniel, I’ve gone back to this post to ask…what is the width of your grout lines? I am incapable of making an independent decision and need to ask lots of people, and saying as you have nailed the look I thought I’d ask you!
Where oh where did you manage to hide your laundry hookups?!n
They’re behind the washing machine, just below the top of the machine! I know that’s not super recommended (our plumber wanted to install it above the machines, but I didn’t want that!), but we actually can easily just reach over the back of the machine to access stuff, and easily just pull it out of there’s an issue, so I fail to see a hazard. I didn’t want to look at it! We also used braided stainless steel hoses instead of the ones that came with the machine for added security against leaks/floods.
I am very drawn to enthusiastic people! I am not as clever as you and neither my husband nor I are handy, but you definitely get my creative wheels spinning!
LOVE this laundry room esp the poster. I know you can’t sell it or anything but any chance you can tell me what type of font Max used and if he did this in a word document or something. Also what font did he use for the martha stewart part.
thanks!
Love the cabinet for the wasted space! Maybe something like that could work for the wasted space in between a stove and refrig. We have a very small kitchen! Bungalow from 1949.