Hieroglyphics or Laundry Symbols?

As if life wasn’t confusing enough with emoji’s and acronyms – now we have to deal with squares, circles, triangles, lines and dots on the labels of our clothing! However, clothing-care symbols are a code worth knowing.

The American Society for Testing and Materials, ASTM International, put out a standardized set of care symbols with the goal of creating a universally understood “laundry language”.

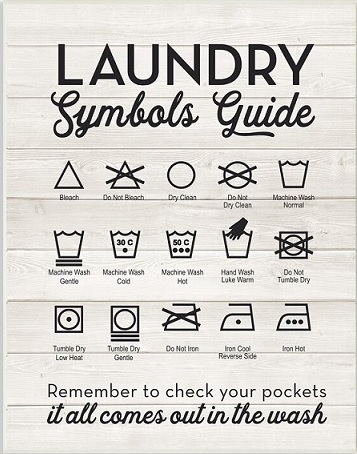
ASTM symbols follow a simple scheme and a set order: wash (tub shape), bleach (triangle), dry (square), iron (iron) and special care (circle). A circle by itself usually means dry cleaning or wet cleaning. A circle (special care) inside a square (drying) changes “dry” to “tumble dry.”

Adding lines, dots and other marks modify these base symbols and adds info. For example, a large X through a symbol offers a warning, where an empty symbol often means that any version of what the symbol represents is OK to use. A crossed-out triangle means do not bleach, where an empty triangle tells you that any bleach will do. Adding two parallel diagonal lines means to use only non-chlorine/oxygen bleach.

Clear as mud?  Don’t worry, I’ve included a chart to help you decipher what seem to be ancient Egyptian hieroglyphics:

Read More �6 Ways to Cut Down Energy Costs In The Summer�

Cleaning Summertime Mildewed Towels

Its summertime and that means wet towels from the swimming pool, lake, or the beach. At some point most of us have used a towel, for whatever reason, and tossed it into the dirty laundry and forgotten it was wet. A few days later and the smell will remind you! That smell is caused by mildew that sets in, and isn’t very easy to get rid of.  Washing your towels a few times on a normal setting may get rid of that stink, but if that isn’t enough to combat the mildew smell, I’ve found a way to get your towels back in shape and get that unpleasant smell out quickly. Here is how:

  1. Place your smelly towels in the washing machine and fill with the hottest water possible. Add in 2 cups of white vinegar and let them soak for at least 30 mins. Do not add any other products (detergent, softener etc.). This will allow the vinegar to penetrate the material without interference.
  2. Run a full cycle after your towels have soaked in the vinegar water. Leaving the towels in the washer repeat step 1, only this time use baking soda instead of vinegar. Run a full cycle once again.
  3. Dry the towels on hottest setting possible until they are fully dry

Your towels will smell like brand new!

Read More �6 Ways to Cut Down Energy Costs In The Summer�

Stuffed Animal Care


Did you know it’s perfectly safe to throw most stuffed animals in the washing machine? On gentle cycle using warm or cold water, a washing machine will get your stuffed animals clean without ruining them.

Most care labels instruct to hand wash, but after raising two kids and needing to deep clean their beloved friends, I tried machine washing.  Set the washing machine  to the delicate cycle, apply  some Spray N’ Wash, Mean Green, or your choice of stain remover if needed,  scrub a little, and wash. Afterwards hang them up to dry. I learned the hard way. Throwing them in the dryer can melt the faux fur.

SOME THINGS TO CONSIDER WHEN DECIDING IF YOUR STUFFED ANIMALS CAN BE WASHED IN THE WASHING MACHINE:

  • The care label – if it can be hand washed, it can likely withstand the delicate cycle in the washing machine. Your washing machine may even have a hand wash cycle.
  • Material – Take notice of the care label and use your sense of touch as well as sight to thoroughly examine all parts of the stuffed animal to be washed. Polyester and acetate (a form of cotton) are fine to wash. The stuffed animals I washed have plastic pellets and were fine, but you wouldn’t want to machine wash something with foam balls such as Beanie Babies. Be cautious of delicate clothing items and things that are glued on, they may not survive!
  • Age – The older it is, the more fragile it will be.

Read More �6 Ways to Cut Down Energy Costs In The Summer�

Vodka….Not just for Cocktails

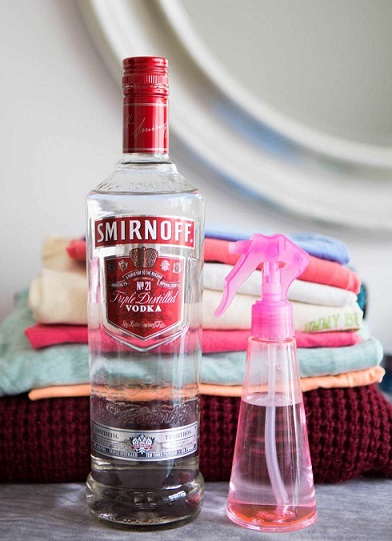
When it comes to odor removal and stains, why not consider vodka? Pour some in a spray bottle, then spritz it on the musty clothes. As the alcohol evaporates, it will lift the odors away. No need to dilute the alcohol. Vodka’s odor-eliminating power comes from its high alcohol content and adding water will only weaken its potency. Best of all, even the cheapest brand will do. Make sure to choose PLAIN vodka over a flavored one, it won’t leave any sort of boozy after-smell.

Removing Stains:

Blot the stained area with a soft white cloth, if the stain is fresh or still wet, absorb as much as the stain as possible. Don’t rub a wet stain, as that may spread it and make the stain worse. Pour the vodka onto a soft white cloth and dab it over the stain. It works great on food, ink or grass-stained clothes. Vodka works much the way rubbing alcohol does to remove some types of stains, as it is another form of clear alcohol without additives.

Odor Removal:

Add 1/2 cup vodka to your regular wash and it will remove musty, mildew, smells!

Read More �6 Ways to Cut Down Energy Costs In The Summer�

Don’t Forget To Clean Your Mattress

Dust, mold, mildew, body sweat, fungal spores, allergens – all make mattresses the ideal breeding ground for bacteria and dust mites.  If you’re as grossed out as I am by this, keep reading and learn how to clean your mattress for a better, cleaner sleep.

Vacuum It

Vacuum your mattress every month or so or as often as every time you change the sheets, if you or family members have severe allergies. Run the vacuum very slowly over the mattress, so it has time to inhale the dust and dust mites. Break out the crevice tool for the edges and crevices.

Treat Stains

Treat any stain immediately. The longer liquids sit in a mattress, the likelier you are to foster mold and mildew growth.

This may sound crazy, but use foaming shaving cream for mattress cleaning, in part because of its thickness. Liquids will soak right through a mattress, not allowing adequate time to dissolve the stain. Foaming shaving cream contains denatured alcohol, which is a stain remover, and it’s thick, so it sits on the surface to work on the stain. Wait 10 to 15 minutes, wipe with a damp cloth, and rinse with a 50/50 vinegar/water solution. Repeat if necessary.

Other helpful solutions for common mattress stains:

  • Blood: A 50/50 hydrogen peroxide/water solution.
  • Urine, fecal matter, or vomit: An enzyme cleaner, such as Bac-Out by BioClean, or Nature’s Miracle, available at pet stores.

Freshen Fast

Use a mixture of cornstarch and baking soda to remove smells.  Place in a colander and just shake the mixture on to the mattress, let it sit for a few hours or longer, then vacuum. The cornstarch will absorb body oils, while the baking soda will work on smelly odors.

Sheet Strategy
Don’t put new sheets on until evening. This will allow the mattress to air all day discouraging dust mites and bacterial growth.

Pad It
Remember, mattress pads aren’t just for comfort. They keep your mattress cleaner, too.  Wash monthly in hot water, and machine dry thoroughly, unless the tag instructs otherwise.

Read More �6 Ways to Cut Down Energy Costs In The Summer�

The holidays are fast approaching, so here are some clever ways to display your towels to impress your guest!

On a Hook

One of the easiest ways to display towels is to place them on a hook like a locker room.  The nice thing about this option is that anyone can hang a towel on a hook, including children so you don’t have to worry about perfectly folded towels.

Stacked

Folded and stacked towels are a great option. You can fold towels in half or thirds for your stacks and place on an open shelf for easy access.

Rolled

Roll your towels and place on a shelf if you like a spa look.  This is a great space saver and looks very decorative.  It’s super easy to roll your towels, so this is a great option for saving space while looking great.

Layer

Layer your towels for easy use.  This option is pretty self explanatory.  Simply fold your towels neatly and layer on top of each other over towel rack.  I like to layer a bath towel, hand towel and wash cloth.

Group with a Ribbon

Group your towels with a ribbon for a chic look.  It’s also a great way of saying, “hands off” if you don’t want someone to use a particular set of towels.

Hang on Decorative Holders

Decorative holders are super great because they can be useful as well as decorative. You can even find towel holders that have a built in shelf.

Fold in Fun Shapes

Fold your towels into fun shapes like a resort.  You can find lots of towel folding tutorials on-line from pretty shapes like fans, baskets and animals.

Decorative Decor

Add a touch of decorative decor to your towels by embellishing with elements from your decor.  This bathroom has a nautical theme so the starfish is the perfect piece of decorative decor.  It’s easy to add the shell to a simple stack of towels.


Read More �6 Ways to Cut Down Energy Costs In The Summer�

Properly Wash Your Clothes

Start by sorting your clothes according to colors or whites and by using the garments care labels. Some garments may say hand wash or delicate cycle etc. Washing symbols can be difficult to decipher but you can usually find the correct wash temperature by looking at the garments label (check out our blog “Understanding Laundry Language”). The machine wash symbol often looks like a tub of water, if there’s a cross through it, it can’t be machine washed.

 (Do not machine wash)

If you’re using a Tide Pod, or one of the other “pod” detergents, toss it into the drum first. The detergent will properly dissolve during the wash cycle. For small and medium loads use only one pod, for large loads use two pods. When using liquid detergent pour it into the dosing cap. Fill until line 1 for medium loads, line 3 for large loads, and line 5 for HE full loads. For powder detergent, fill the drum until line 1 for medium loads, line 3 for large loads, and line 5 for HE full loads.

Fill the machine with your clothes. Don’t overload the drum – 3/4 full is about right.

Choose a water temperature that’s right for your laundry load. Select a wash cycle.  Start the machine.

Read More �6 Ways to Cut Down Energy Costs In The Summer�

The Importance of Washing New Clothes


There are three good reasons to wash new clothes, especially those that are worn in direct contact with your skin, before you wear them.

  • One is to wash out extra dye that can be transferred to your skin or other garments. Most fabric made from synthetic fibers (polyester, acrylic) are colored with azo-aniline dyes. These dyes can cause severe skin reactions for those who are allergic to them. If the allergy is severe, the rash will be similar to poison ivy. But even less severe reactions can cause dry, itchy inflamed patches of skin.
  • It is possible to transfer lice, scabies, bacteria and fungus from person to person when clothes are tried on. Dressing rooms can become breeding grounds for everything from viruses to athlete’s foot.


  • And, most importantly, to remove the chemical finishes that manufacturers put on clothes to enhance color or texture. The finishes won’t bother everyone, but if you have sensitive skin you can develop a rash especially in constant contact areas like armpits, collars, cuffs and trouser waists and thighs.


Urea formaldehyde is often the chemical used to prevent mildew on clothes that have to be shipped long distances in hot, humid containers from overseas to the United States. It has a very strong odor that will remain in the fabric until the garment is washed. One washing will not remove formaldehyde completely but you will reduce the build up significantly and it will continue to be removed with each wash.


It is especially important that children’s clothing, especially clothes for babies, be washed before they are worn. Babies are particularly sensitive to chemicals and skin rashes can occur. Select a detergent that is fragrance free and dye free as these can also cause skin reactions. Washing the clothes for children will also make them softer and more comfortable for them to wear.

Washing new sheets/blankets and towels is also important to remove chemicals since these come in direct contact with skin. Washing will also improve the absorbency of the fabric by removing surface fiber coatings.


If you have a tag on the garment that reads “wash separately before wearing”, beware of dye transfer and color bleeding. Washing will help remove the excess dye but check the rinse water. If color remains in the water, it make take several washings to get rid of the excess dye so continue to wash separately or with similar colors.


Read More �6 Ways to Cut Down Energy Costs In The Summer�

As the primary laundry caretaker in our home I understand the frustration of having to turn clothes right side out while folding them. However, there are particularly good reasons for washing them wrong side out.

1) When you turn the garments wrong side out all the wear & tear of washing is done on the inner side & does not affect the outside (right side) of the garments. If fading occurs, it’s also on the inner side, therefore, leaving the right side looking new.

2) All the buttons, rivets, sequins etc. on the right side of the garment don’t undergo the friction during washing.

3) Turning wrong side out also helps when targeting tough spots on collars and cuffs. These areas get a better scrub during the washing process resulting in better cleaning of these areas.

4) Color fast fabrics can cross stain during washing. Turning the garments wrong side out can help to avoided or minimize this from happening.

5) As the garments rub against each other during washing it creates friction. Friction results in fuzziness and pilling (those pesky lint balls that form on fabric) – washing them wrong side out prevents this from happening.

Read More �6 Ways to Cut Down Energy Costs In The Summer�

Understanding Laundry Language

As if life wasn’t confusing enough with emoji’s and acronyms – now we have to deal with squares, circles, triangles, lines and dots on the labels of our clothing! However, clothing-care symbols are a code worth knowing.

The American Society for Testing and Materials, ASTM International, put out a standardized set of care symbols with the goal of creating a universally understood “laundry language”.

ASTM symbols follow a simple scheme and a set order: wash (tub shape), bleach (triangle), dry (square), iron (iron) and special care (circle). A circle by itself usually means dry cleaning or wet cleaning. A circle (special care) inside a square (drying) changes “dry” to “tumble dry.”

Adding lines, dots and other marks modify these base symbols and adds info. For example, a large X through a symbol offers a warning, where an empty symbol often means that any version of what the symbol represents is OK to use. A crossed-out triangle means do not bleach, where an empty triangle tells you that any bleach will do. Adding two parallel diagonal lines means to use only non-chlorine/oxygen bleach.

Clear as mud?  Don’t worry, I’ve included a chart to help you decipher what seem to be ancient Egyptian hieroglyphics:

Read More �6 Ways to Cut Down Energy Costs In The Summer�
bottom Gears Mobile bottom Gears