This post may contain affiliate links. If you make a purchase, Anton Gorlin Photography may earn an affiliate commission. Please read our disclosure for more info.
Often, when we travel to the seaside, we want to create some great shots, not just to remember, but also to impress others. The sea is beautiful, the coast is picturesque, but the photos need a bigger punch, right? No worries, I’ll teach you the photography basics and how to create some stunning seascape photography pieces. Read further to learn about all aspects of coastal photography: types of light, composition, shutter speeds, planning, the spirit of freedom, types of the coast, etc.
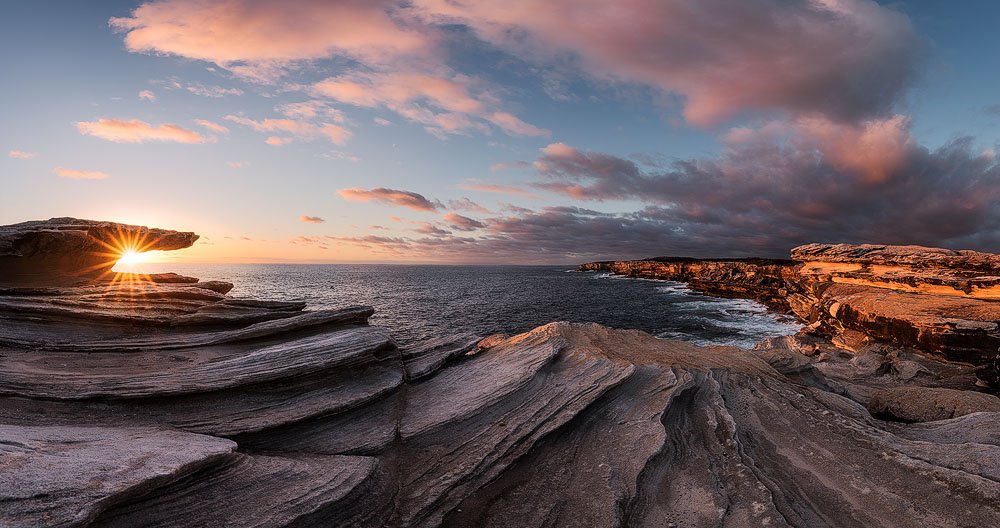
Table of Contents
- What Is Seascape Photography
- Safety Photographing Seascape
- Planning Seascape
- Composition
- Seascape Photography Tips: Photography Basics
- Seascape Long Exposure Ideas
- How Do I Photograph Waves
- Exposing Photos Correctly
- Backpack Checklist For Seascape Photography
- Best Lens For Seascape Photography
- Final Word
1. What Is Seascape Photography
Seascape photography is a sub-genre of landscape photography depicting the sea or the ocean as a more substantial portion of the photo. The other elements are the beach, the coastal features, the cliffs, the rock pools, marine creatures, etc. Of course, coastal photography has many things in common with other types of subjects in nature, but there are some differences. Unlike the regular landscape shot, the success or failure is often a split second away. The water keeps moving all the time, every wave is different and unique, every splash has another shape, and every second, there is an entirely different picture. Same applies to every type of landscape, but most of all – to the seascape. In most natural scenes, a long exposure only affects the cloud movement, while in our case, it also affects the water, which makes a significant impact on the overall look and feel.
Read further to learn how to create a pretty beach sunset or implement breathtaking sunrise photography. I’ll try to keep it as practical as possible without overwhelming you too much with theory.

2. Safety Photographing Seascape
Any type of landscape photography requires safety measures and seascape photography more than any other. First of all, check the swell and tides forecast. These forecasts affect your safety! You don’t want to stand on some rock only to find yourself locked out of the shore because the water level just grew higher. Planning section appears somewhere later in the article.
Coastal Hazards
- Wet rocks. Look out for the wet stones. If they are damp and there is no rain, it means that the wave will eventually hit that place again. Especially on the rising tide. So spend some time and look around to decide where it’s safe to stand.
- Rock Hopping. I recommend walking through the heaps of coastal rocks carefully. But if you need to jump or make long strides, then poke the target with your tripod before rushing ahead. It may be unstable even if it looks like a stone golem.
- Algae. There are a few types of water plants. Green and brownish are OK, just some standard plants, but beware of the black algae. The black water plants are more slippery than a bar of soap! It’s even hard to stand on them, not to mention walk. These colours apply to Australia and may differ in other parts of the world.
- Rogue waves. Some waves could be significantly bigger than the others. So, always keep an eye on the incoming waves and have a safe way to retreat if needed.

Safe Behavior
- Never turn your back to the ocean. Sometimes I have a feeling that the ocean keeps eyeing me, and in a moment I look the other direction hits me with a massive wave! Jokes aside, whatever you do, keep an eye on the surroundings and never turn your back to the ocean. You just can’t fully relax and let it go with such raw power near you.
- Do not carry your camera on the tripod. Please detach the camera from the tripod before changing position. You don’t want to bump it if you suddenly fall or swing your arms.
- Put the lens cap back on. Close the lens and then go. The same thing – you may fall or lose balance and don’t want to bump it accidentally.
- Keep the camera off when not using. If you are not doing photos at the moment, turn your camera off. Not because of the battery, but because it may survive if it gets wet all of a sudden. There may be a rogue wave, or it may fall into a rock pool or whatever. If you think the camera may have water inside, do not turn it on. Take it to the repair shop instead.
- Swell and tide. Check swell and tidal information before you go to know what the sea is up to, what to expect.
- Don’t risk your life. It’s not worth it.
3. Planning Seascape Photography
Tips And Techniques For Planning
Planning is essential. You just cannot overestimate it. The landscape photography planning itself can bring you lots of incredible opportunities and coastal pictures. Proper planning saves time and helps to avoid disappointment. First, you should do your homework and research the site in the comfort of your home.
Use the Internet:
- Google images search using the place name.
- Images on Google maps
- 500px location search
- Any other photo site like Flickr
- Look for great photographers in the area and browse their sites
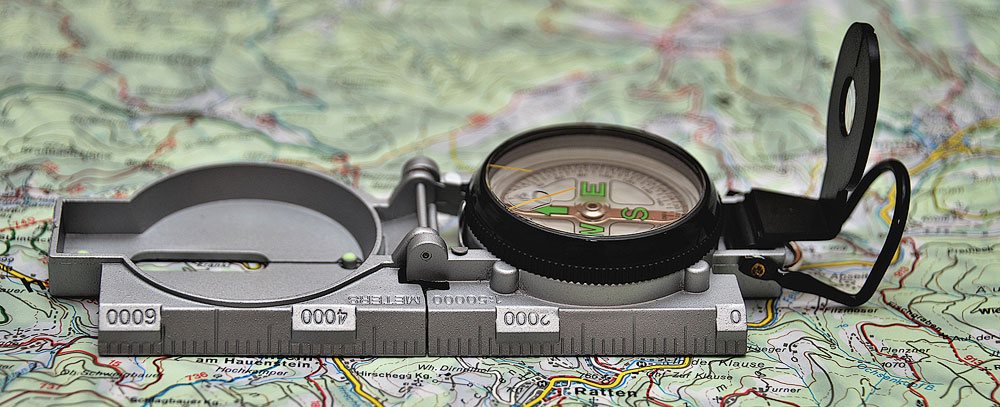
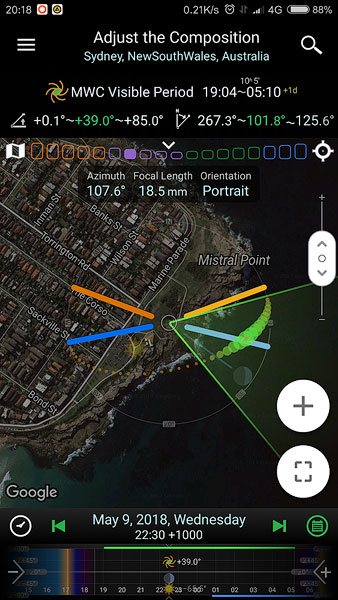
Nothing beats your direct presence. So, if you have an ability, scout the location during the day, make notes of some great spots. Be sure to determine where the Sun will rise or set. I use suncalc.net – it’s handy and quick. If I’m at the site, I use “Planit! For Photographers Pro” (Android | iTunes) to find all the information I need – tides, Sun and Moon positions, Milky Way position and timing and all that in Virtual Reality Mode so that I can make assumptions on my future pictures. There are also other similar applications, but I prefer this one.
When scouting, have a look at the tide and think ahead. Some locations look better at the low tide; some only work during the high tide. Hence, that’s another thing to consider while planning. The same thing applies to the time of day. Consider if the scene works better for the sunrise or the sunset.
Also, have a look at the postcards and local brochures.
Weather Forecast
Be sure to check the cloud cover for the day. I wouldn’t go out if the cloud cover is less than 30%. For the cloud cover forecast, I use AccuWeather.com and SkippySky.com.
The swell and tide information is crucial when you are exploring the coast. The swell means the size of the waves and some wave could be up to twice bigger (rogue wave). Have that in mind and think safety first. Low or high tide information is vital because some locations work better with the particular water level. For the tidal data, I use WillyWeather website.
To photograph the sand beach, I prefer low tide because the angle of the beach is even more level making the water stay longer for the reflections. For the rocky area, it depends on the location itself, and you need to do a little scouting to figure out what works best. The tide is not essential for the cliff-top vistas.
How To Plan Seascape
- Look at the photos of the location
- Photo sites like 500px, Flickr
- Pictures on the Google maps
- Local photographers/tours
- Study maps
- Research on the spot
- Note Sun/Moon/Milky Way position.
- Decide on whether sunrise or sunset works best.
- Decide on whether low or high tide works best.
- Use Virtual Reality apps to preliminary look at your future shots.
- Check the weather forecast
- Cloud cover
- Swell (waves size)
- Tides (high or low)
4. Composition
Why Is Composition Important
Let’s start with the composition. Picture composition is not a topic to “quickly cover.” There are whole courses, books and dedicated articles on this issue. Dozens of rules and examples and yet, every good composition you encounter has something special about it. It is impossible to follow all the rules, and even if someone does it doesn’t mean they’ll make a good picture composition. The art of composing pictures is elusive, requires practice and an intuitive feel of harmony. Therefore, I’ll list my favourite landscape photography composition techniques so that you’ll be able to use them right away and build your vision on top of that. These rules will be just enough to cover the basics. Possibly, I’ll create a separate article to cover more framing aspects.
Basic Composition Rules
The Photo Structure
The photo consists of a background, middle ground, and foreground. For seascapes, the background is typically a distant sea, clouds and possibly distant cliffs. Usually, the main subject is somewhere in the middle ground. And the foreground is either a beach or some rocks. Of course, you need to go creative and try different things out. The coast is full of fascinating things to photograph. Zoom in and use a big wave as a foreground. Go into the water and use the blurred water movement as a foreground. Use a lower point of view and exclude middle ground altogether. You can try many things. Just remember, you need those layers to create a visual perspective, to lead the viewer’s eye into the frame.
In the following sections, you will see many possible compositions and grids. To follow a specific rule, please build your shot in a way where significant lines (horizon, clouds, river, etc.) are near the grid lines, and photographic subjects (human, rock, tree, etc.) are near the intersections.
How To Form A Compositional Line
This chapter is concise but very important. When I say “forming a line” I don’t necessarily mean a straight solid continuous line. All I mean is elements positioned in a particular order where your eyes follow some imaginary line between them. Two or three aligned rocks create just as good composition as a cliff edge going the same direction.
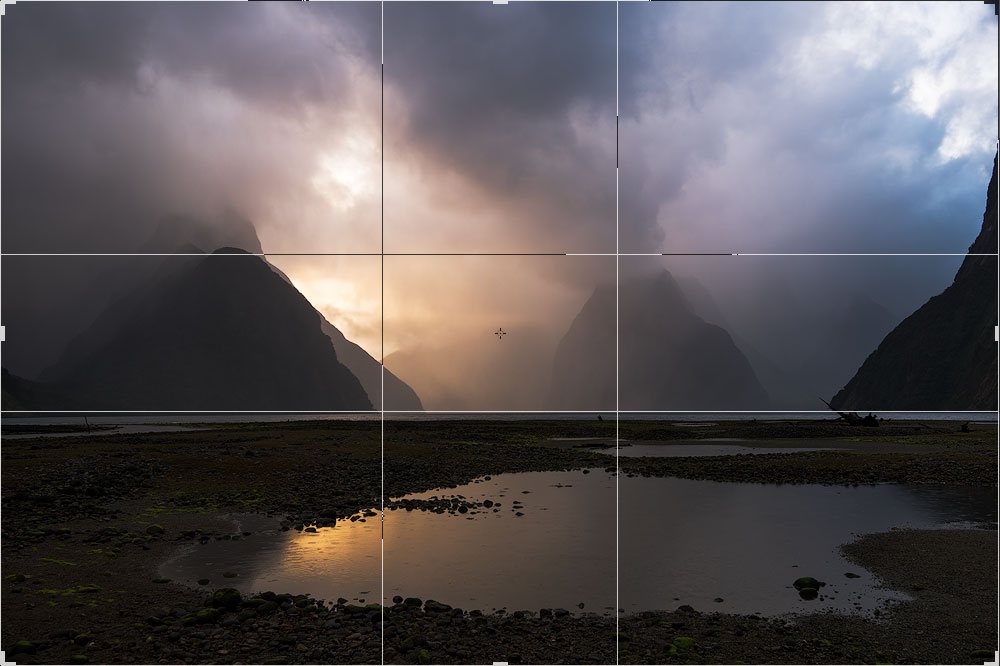
Rule of Thirds
There are many rules and techniques when it comes to framing a photo. The most famous is the Rule of Thirds, which is wrong, to be honest. It is merely a simpler version of the Golden Ratio rule. Anyway, it is straightforward to use, just put essential lines on the thirds of the photo. This rule applies to both vertical and horizontal lines. Most cameras have a built-in frame, which shows in the viewfinder and splits the view into thirds. Turn it on and put horizon or other significant lines you have near one of the grid lines. You also need to place main elements on the grid intersections.

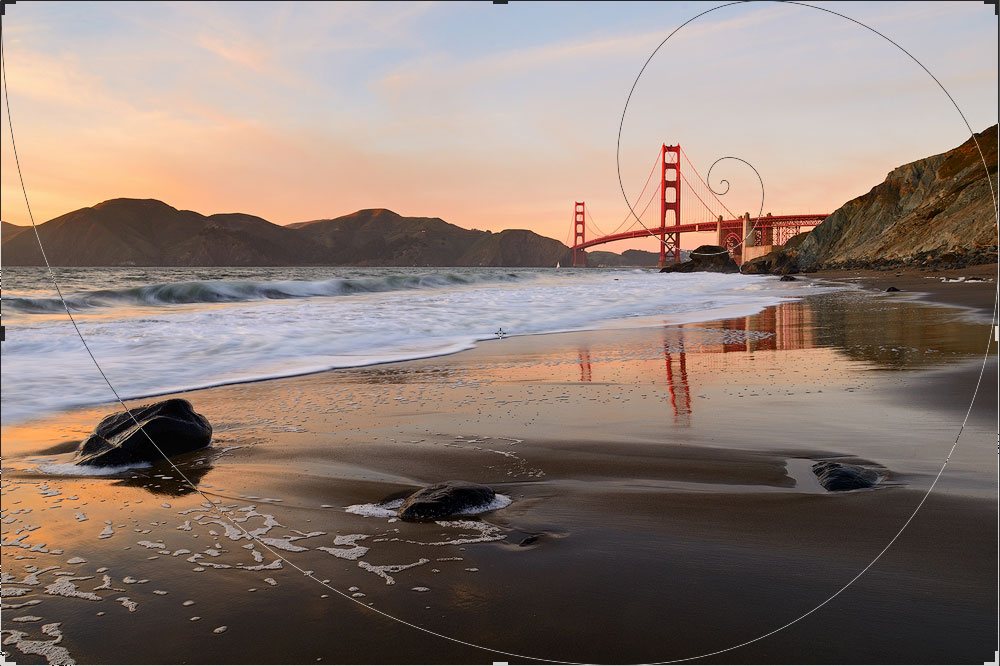
Golden Ratio Rule
Similar to the Rule of Thirds with the difference that the lines are a little closer to the centre and do not split the photo into three equal parts, the central part is a little more narrow. You can find the calculation process in Wikipedia. The rule originates from nature itself; everything in nature is built around the golden ratio, including humans.

We don’t need a lot of theory here; let’s keep it practical. The cameras do not have a built-in function, which respects this rule, so all you need to do is to put your lines a little closer to the centre than the viewfinder shows.
Other Golden Rules
There are also many different rules, originating from the Golden Ratio. They are more advanced than those I have mentioned above, and I’ll cover them later at some point in a separate article.
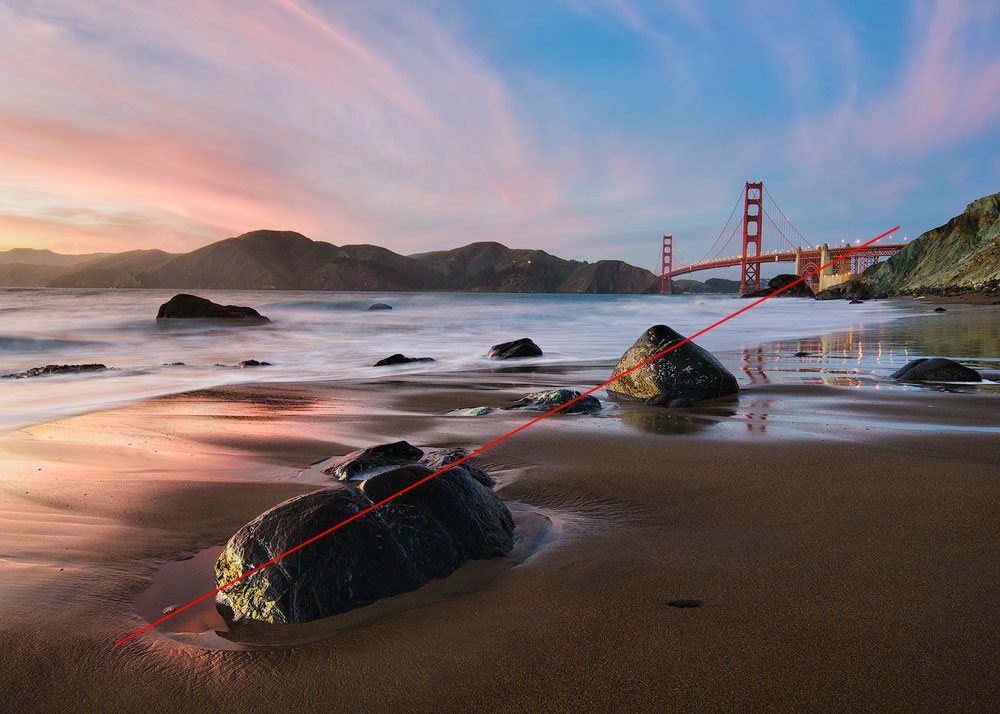
Leading Lines
In my opinion, this one is the most important aspect of composing a photograph. If you ask me to take just one and forget the others, it’s this one. These lines lead the viewer’s eyes into the photo and show important elements, add a lot of power and dynamism.

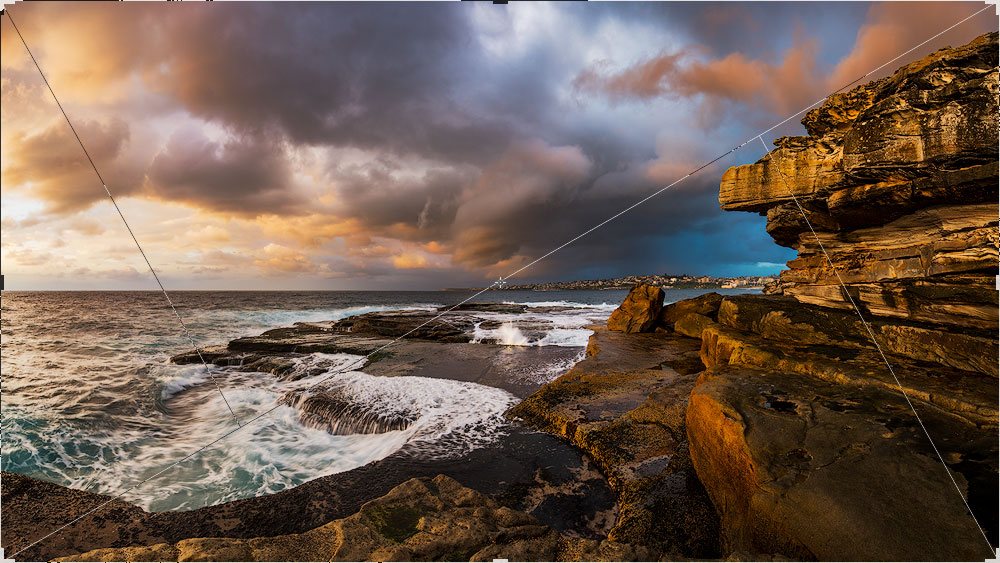
Diagonal Composition
The diagonal is the most straightforward rule to follow. Just pick a leading line and make it a prominent diagonal. Don’t make it unexpectedly end at the border of the photo, make it lead viewer’s into the eternity, into the distance. Make two diagonals if you have enough foreground subjects, make four if the clouds align nicely. The more diagonals, the bigger punch the photo has. The coastline usually makes an excellent diagonal, just don’t cut it with the photo edge.
S-Shape Composition
Possibly, the most natural looking way to compose the picture. Look for the S-shaped curves. Nothing to add here – a very simple and a compelling technique.
Central Composition
The central composition isn’t too popular because it’s more stable rather than dynamic. More balanced rather than dominant. But sometimes it works well and is worth mentioning. You’ll need to put your subject into the middle. You can still have the horizon on thirds or the golden ratio, or you may put it in the middle as well. But watch out – don’t make the halves compete with each other.
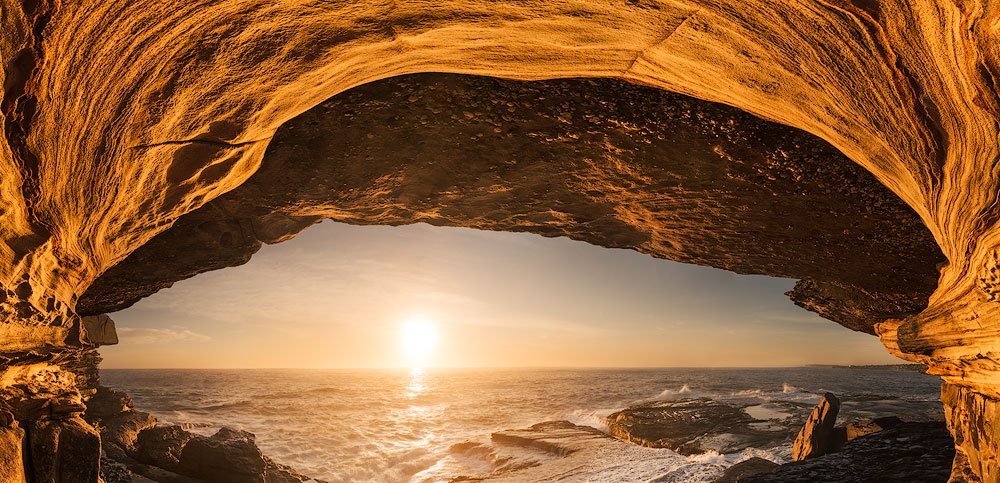
Framing
Another cool technique is framing. You need to find some objects that could frame the main subject. It could be the bushes, tree leaves, rocks, or cliffs.
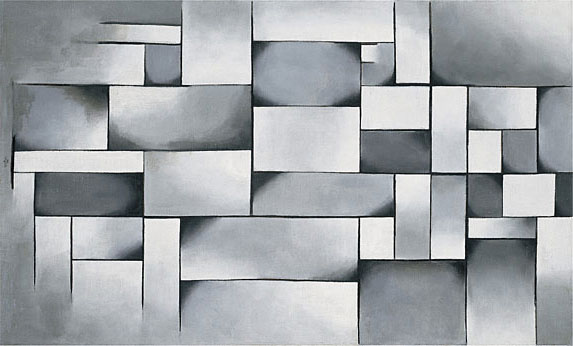
Tonal and Aerial Perspective
Last, but not least, let’s talk a little bit about the perspective. There are some cases when you cannot create any decent leading lines, and you don’t have to. Instead, you can use the perspective, either tonal or aerial.
The tonal perspective is the effect of depth in the photo as a consequence of a gradual change of tones and reduction of contrast while going deeper into the picture.
The aerial perspective is the reduction of clarity and sharpness with distance. Also, distant objects have a blue tint, which also becomes stronger with distance. This effect is caused by the mass of air between the viewer and the object.
How Focal Length Affects Layout
It is not exactly a rule or anything like this, but you can use it to extend your creativity to the unbelievable level. One would think that seascapes need wide-angle lenses. Well, yes, that’s true for the most part. For seascape photography, you can use a lot of lenses. A friend of mine uses 24-105; I use 15-30. But I also use 50mm and even 70-300mm lenses for some specific cases and trust me; there are some situations where you cannot achieve the desired effect at the wide-angle.
If you want some modern style ocean sunrise with moving water around the rocks, water streaks, and all that – use the wide angle. Use at least 50mm get something similar to Ivan Aivazovsky style. If you want just the waves, use the telephoto lens. But I’ll cover it later. The “longer” lens squeezes the perspective, and it does not exaggerate the foreground as wide angle lenses do, they make the elements more balanced with each other. So, try different lenses for the different balance between foreground, mid-ground, and background of your seascape photography.
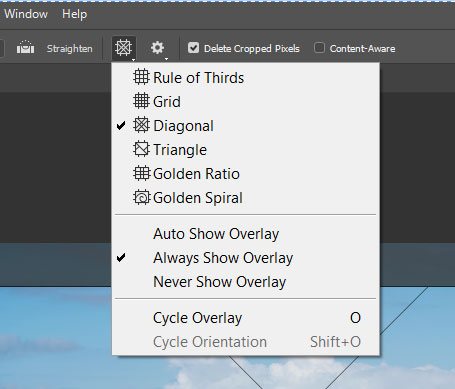
How To Check Composition in Photoshop
Sometimes the composition can be improved during editing. In fact, more often than not, you’ll need to crop the photo a little bit to improve the overall layout of elements. When you select a Crop tool, click the grid button on the top (Photoshop CC) or just press O button multiple times on keyboard. In case of a non-symmetrical framing style, press Ctrl+O to flip it.
5. Seascape Photography Tips: Photography Basics
The light changes significantly – because it’s going from complete darkness to the bright and shiny morning. The properties of light change too and hence our approach to photography. We need to use the light, to work with it, not against it. So in this chapter, you will learn how to compose a shot and how to photograph during various periods of dawn and dusk time. All rules are the same for sunrise and sunset time; they just go in the opposite order.
In this chapter, you’ll learn the techniques, shooting timeline, and camera settings for seascape photography.
Camera Settings For Ocean
I have written an excellent article (I believe so) about the shutter speed. It covers the creation of ocean images as well. Be sure to check it out and possibly print the shutter speed cheat sheets I have created just for you.
In general, for any landscape, you need a vast depth of field. For that, always use at least f/8 with the preference of greater numbers like f/11 up to f/16. The bigger f-numbers let less light in, the smaller ones allow more light in (called open aperture).
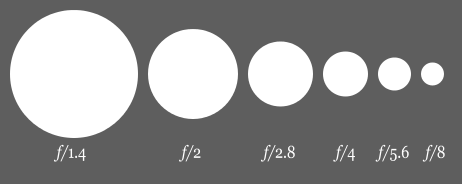
When you close down the aperture, the shutter speed increases, you will need a longer exposure time. If you want to both keep the hole closed and shutter speed not too long, you will need to increase ISO (sensor’s sensitivity). It reduces the shutter speed at the cost of adding noise. Every camera has different levels of noise, so that requires an experiment to determine, which ISO is acceptable. Also, the longer the exposure, the stronger the sound it produces. On my current Nikon D750 camera, I can set ISO 1600 without much losses with ISO 800 barely noticeable. On my previous Nikon D7000 camera, I wouldn’t go higher than ISO 400.
So, use f/8 – f/16, shutter speed following the article mentioned earlier in this chapter and adjust ISO to make the desired shutter speed. I’ll add camera settings separately for each sub-chapter below.
Photography Timeline and 6 Types of Light
In general, there are six types of light that I can think of:
- Total darkness, no light at all. Good for astrophotography.
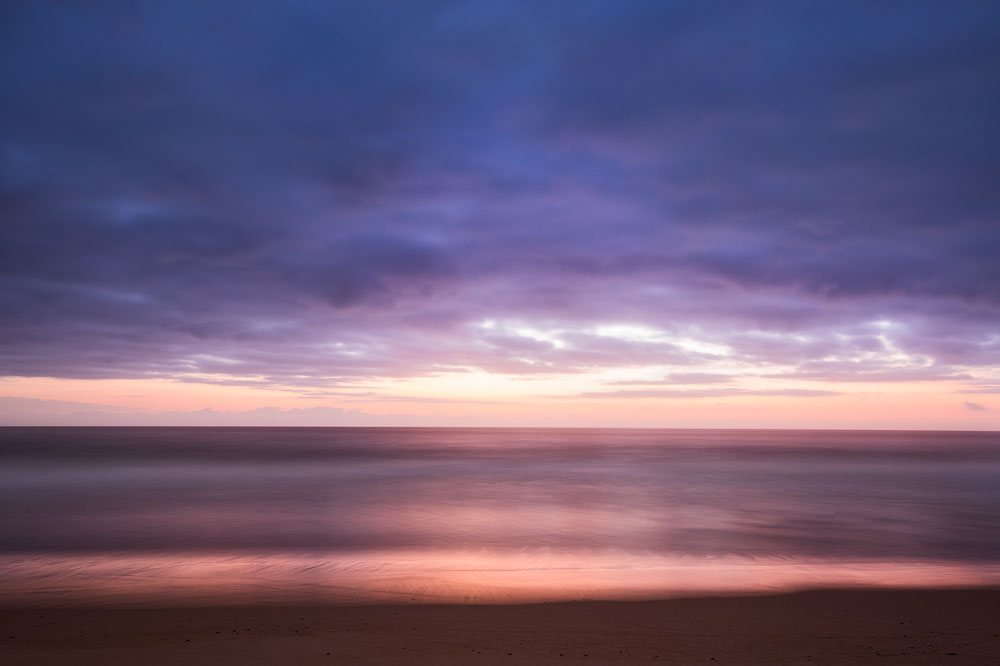
- Pre-dawn skylight (same as post-dusk). The best for long exposures and dreamy effects.
- Dawn light (same as dusk). Warm and bright and still has colour in the clouds.
- Post-dawn (almost the same as pre-dusk). Warm and strong, casting long shadows and revealing all textures.
- Daylight. Too strong and harsh. Limited use for shooting seascapes.
- Bad light. Dull and flat, coming through the thick clouds with no clearing.
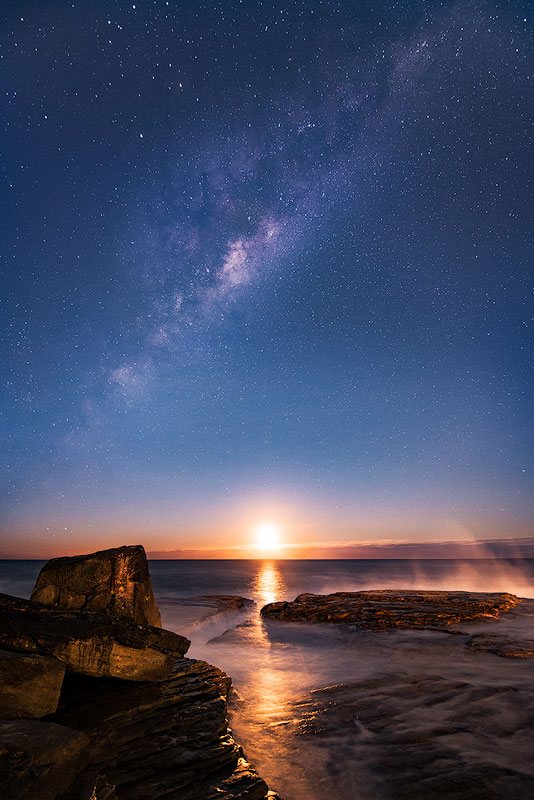
#1 Total Darkness
No or very little light. This kind of environment is only right for astrophotography. I will not cover this genre here but can assure you – there are some places right in Sydney where you can shoot the stars with a decent result.
For astrophotography, you will need an open aperture (whatever your camera can handle), f/2.8 would be the best. The shutter speed is up to 20-30 seconds to keep the stars as dots, not the trails. ISO would depend on the light pollution level. I’ve seen ISO1600 working nicely in a light polluted area, and I’ve seen ISO 6400 barely working in the light pollution free area. Typically, you will need ISO 1600-6400.
For the trails, the exposure time should be at least 30 minutes and can be several hours for the more extended trails. Sometimes people shoot many 30 second shots and then blend them in Photoshop.
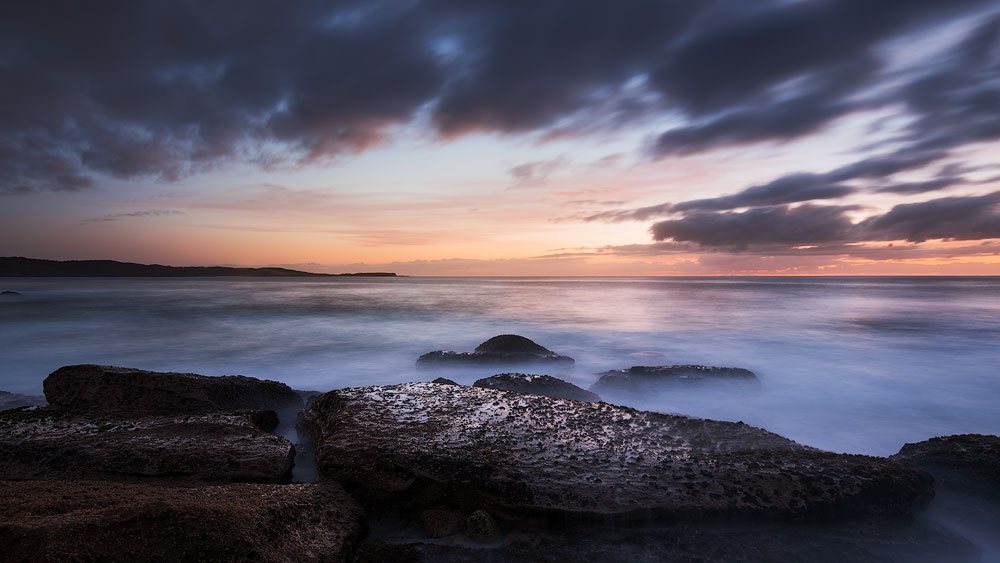
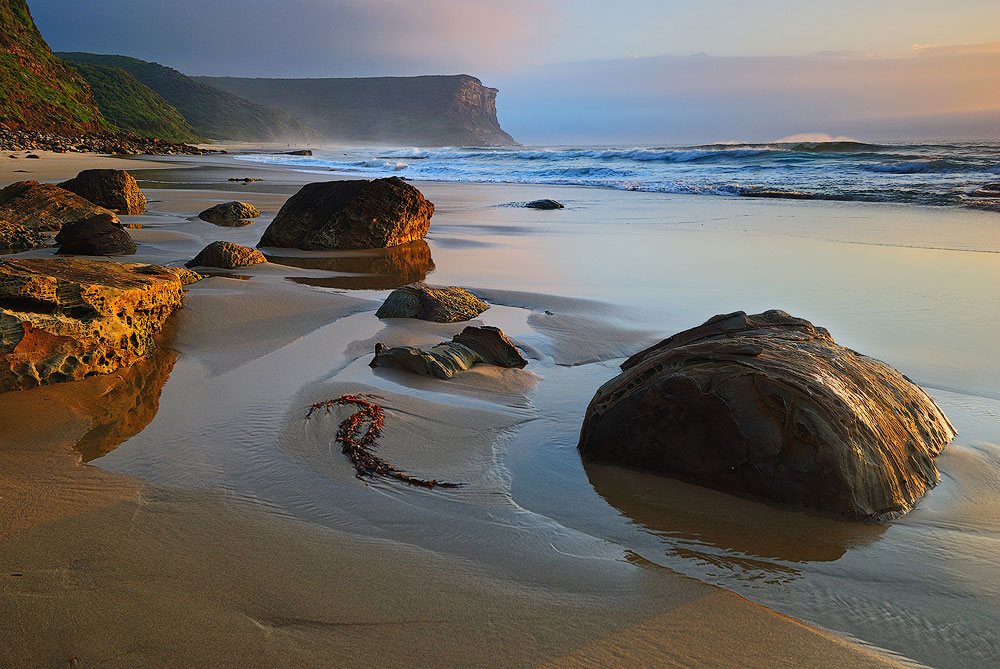
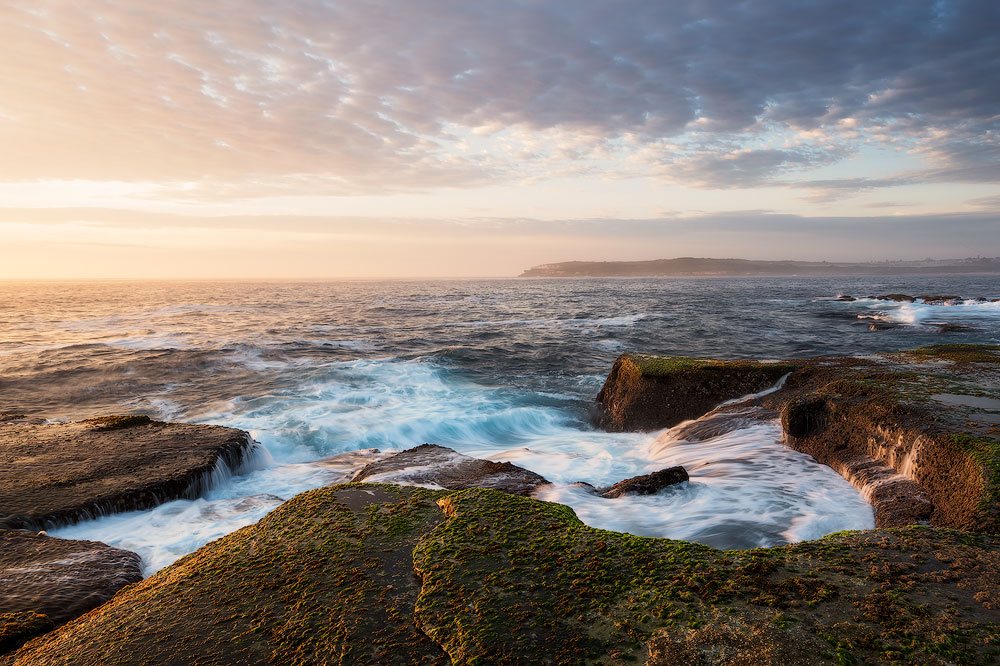
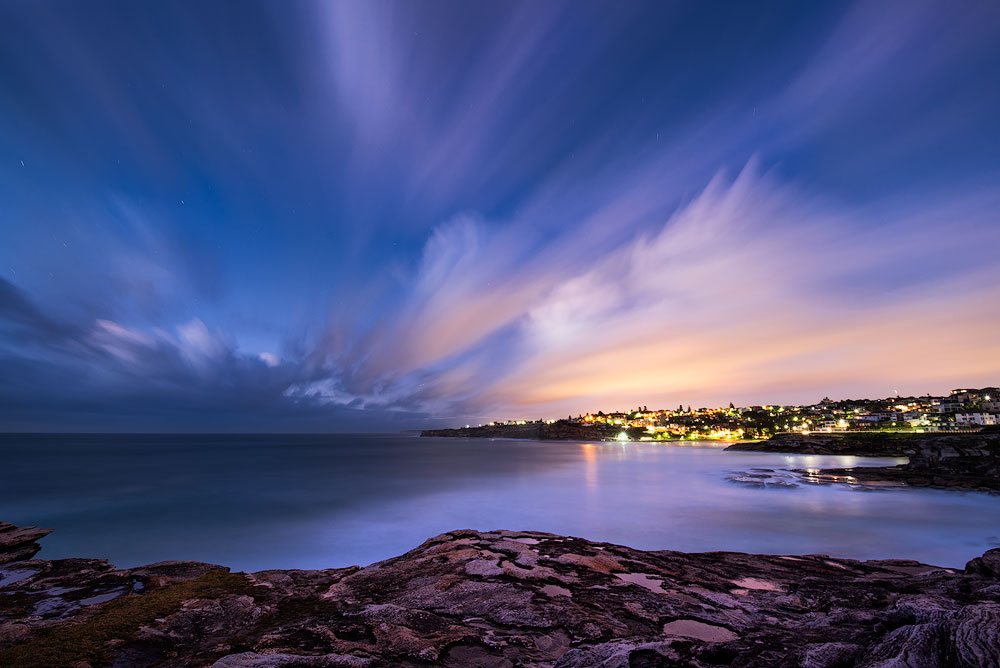
#2 Pre-Sunrise and Post-Sunset
To be honest, this kind of light is my favourite. The skylight is hard to notice at first, but when you know what you are looking for, it becomes pretty apparent. This light is strong enough to reveal all the texture on the rocks and can colour the clouds in great colours. In the end, the photographer is getting a long exposure shot with some lovely patterns on the textured objects and moving clouds. The first light appears typically around 30-40 minutes before sunrise and gets stronger every minute until the Sun comes out. Symmetrically, the last light lasts about 30-40 minutes after sunset. The sky is readable for another 30 minutes, and sometimes the clouds can turn red 1 hour before sunrise.
These conditions offer vast opportunities. The skylight is strong enough to reveal all the structure and texture and yet soft enough not to produce harsh shadows. This light can also have a faint tint depending on the colour of the clouds. Once you know this information, you’ll start to pay attention to the small details. Small details make a big difference in the final seascape photograph.
Pre-dawn light lasts from around 30-40 minutes before sunrise till the sunrise. The darker it is, the more prolonged exposure you will need to perform to create the photo.
Long Exposure Seascapes Settings
As usual, you need at least f/8 – f/11 to keep your photo in focus. At this time of the day, your shutter speed will be anywhere from 30 to 180+ seconds. Some cameras do not support shutter speed longer than 30 seconds. In this case, you will need to raise ISO. Otherwise, the photo will be too dark. There are no strict rules on how to capture cloud movement accurately because it depends on the speed of the clouds. It requires an experiment. Typically, my settings for the first light are f/8, ISO 100, 30-60 seconds. If I need extra depth of field, I go f/10-f/11, ISO 200, 30-180+ seconds. As the lighting level raises, the exposure time decreases gradually.
First/Last Light of the Day
30-40 min before sunrise, 30-40 min after sunset
The exact timing differs every time, and, in fact, you can start shooting 50-60 minutes before sunrise on some occasion, so the time intervals I put in this article are only for reference. The “First Light” period starts approximately 30-40 minutes before sunrise. Use this light to create long exposures. For sunsets, it’s 30-40 minutes after sunset.
Available Foregrounds
- Shapes and forms in the rocks
- Rock pools and puddles. If they are big enough, they can reflect the clouds. Alternatively, they reflect the skylight and look like shiny diamonds surrounded by the dark rocks. Try to get the lower/higher point of view to adjust the reflectiveness level.
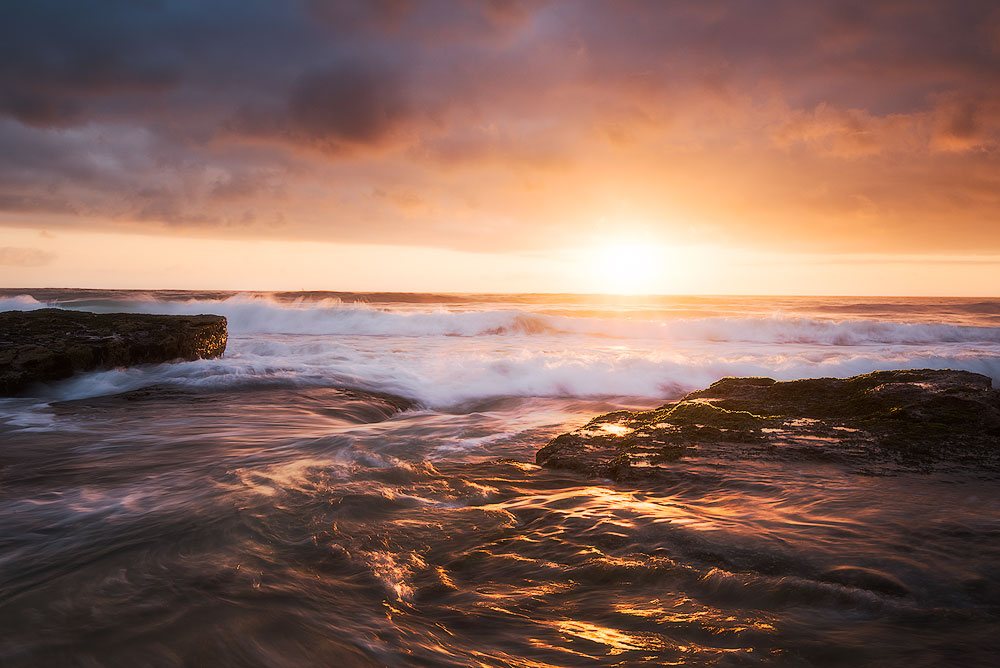
Strong Skylight
10-20 min before sunrise; 10-20 min after sunset
The exposure is significantly shorter now ~10 sec. We still get no texture, but the surface is not entirely smooth. The character and the texture become visible and start to play a role in the overall composition. Also, we can increase ISO and make 1-5 seconds exposure, getting the texture and many new great subjects to photograph, especially in the foreground. Please refer to the next section “Nearly Sunrise” to get more ideas for shorter exposures.
New Foregrounds
- Flowing water. Receding waves work the best; they form beautiful trails. On the level surface, these streams create straight lines. If the water runs around a rock, they form circles. Also, sometimes they can swirl by themselves. The speed of the flowing water is always different, so the exposure time you need also differs. Typically, 2-5 seconds will produce great trails and add a lot of power. I guess this type of foreground is the most popular one for seascape photography.
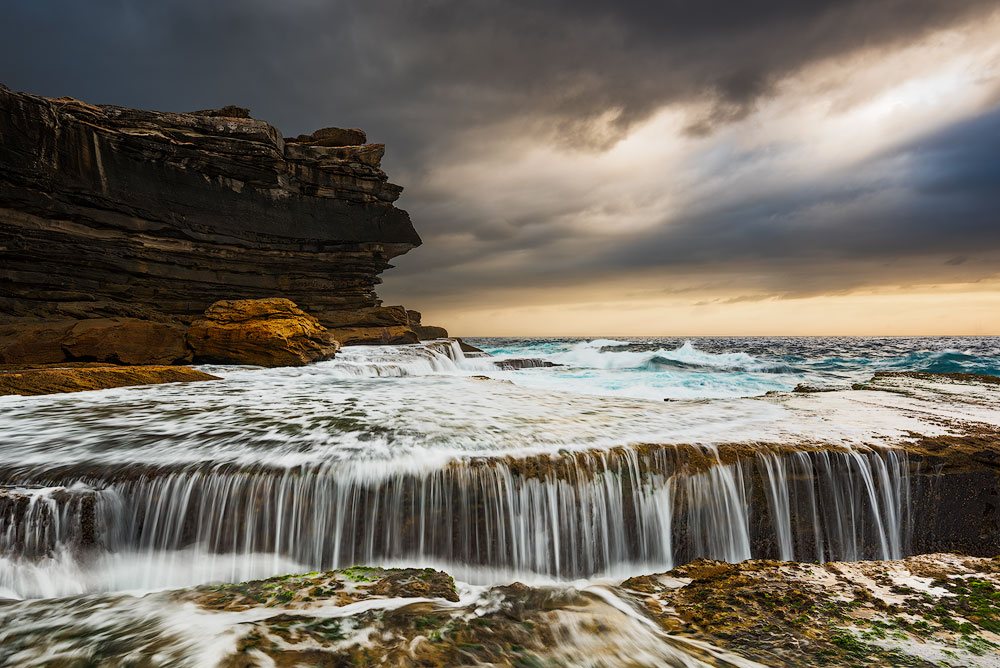
- Rock waterfalls. When the wave comes over the top of the rock, it forms pretty waterfalls. The shutter speed should be at least 1 second to make it look perfect. I don’t recommend to go over 5 seconds.
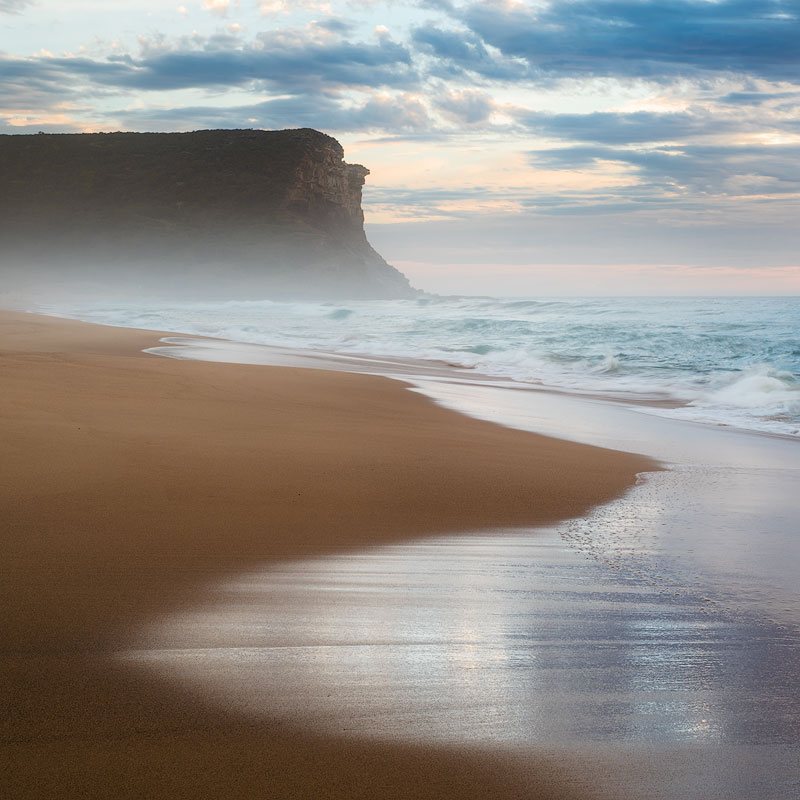
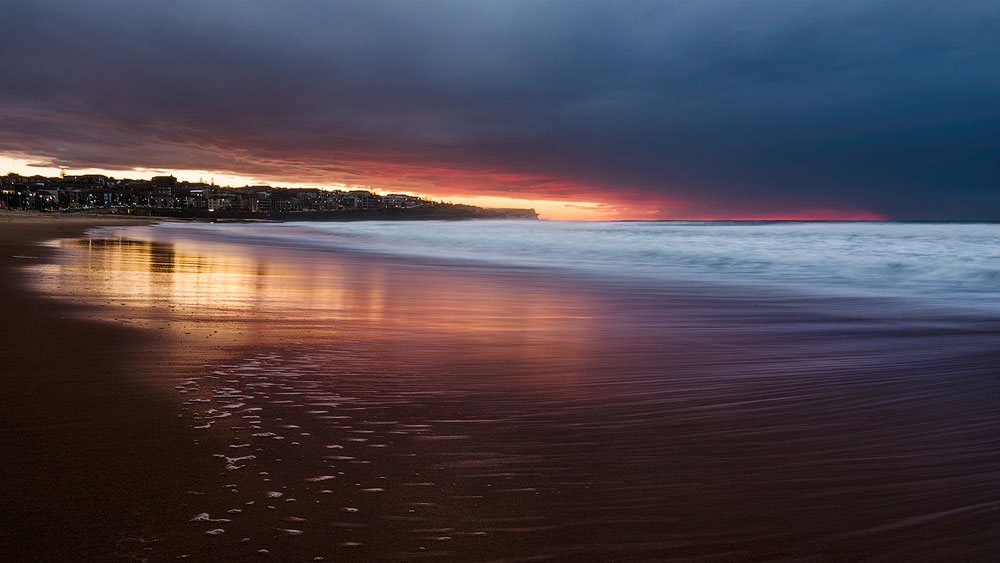
- Reflections on the sand. Sometimes, especially during the low tide, the water recedes slowly from the sand. This kind of movement is perfect for catching the reflections of the clouds. Also, the edge of the water creates a tremendous compositional line with the only drawback – it dissolves quickly. You’ll need to position yourself at the spot where you expect the wave to reach, compose the shot and wait for the proper wave.
Nearly Sunrise
1-5 min before sunrise; 1-5 min after sunset
The skylight peaks, the Sun is almost there. The exposure is the shortest possible for the pre-sunrise conditions. By controlling aperture, you can get shutter speed from 1/10 sec to 2 seconds. This period is relatively short, so you need to use it wisely. These shorter exposures are my favourite as they provide the most dynamism and life to the water (excluding wave photographs).
New Foregrounds
- Boiling water.
- Incoming waves. 1/10 sec – ⅓ sec works for these waves as this movement is faster than receding movement. You may need to raise ISO a little bit to adjust your shutter speed. The waves will not be frozen, but they’ll keep the shapes.
- Receding water. I know, I listed this type of foreground in the previous section, but it is a little different now. We have more light at disposal, so the exposure time is shorter than before. Hence we can reach ½ sec – 1 sec at this time, which allows for the maximum texture and the organic look. The water now looks like a fresh chill real water and yet has a beautiful fluidity.
To get some beautiful water traces, this is inevitable: you need to get into the water. It just doesn’t work as good standing in the safety of the sand; you have to be in the middle of the action. You’ll often get wet, and that’s fine. Just don’t go too deep or you risk to be dragged into the sea. Typically, I don’t go deeper than knee level. Wear shorts and crocs, and you’ll be fine. Alternatively, some people use tall fishing boots.
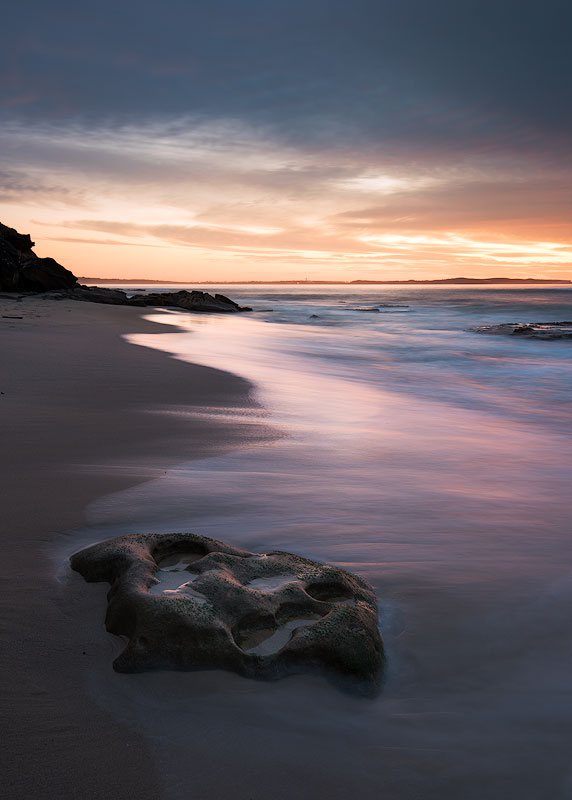
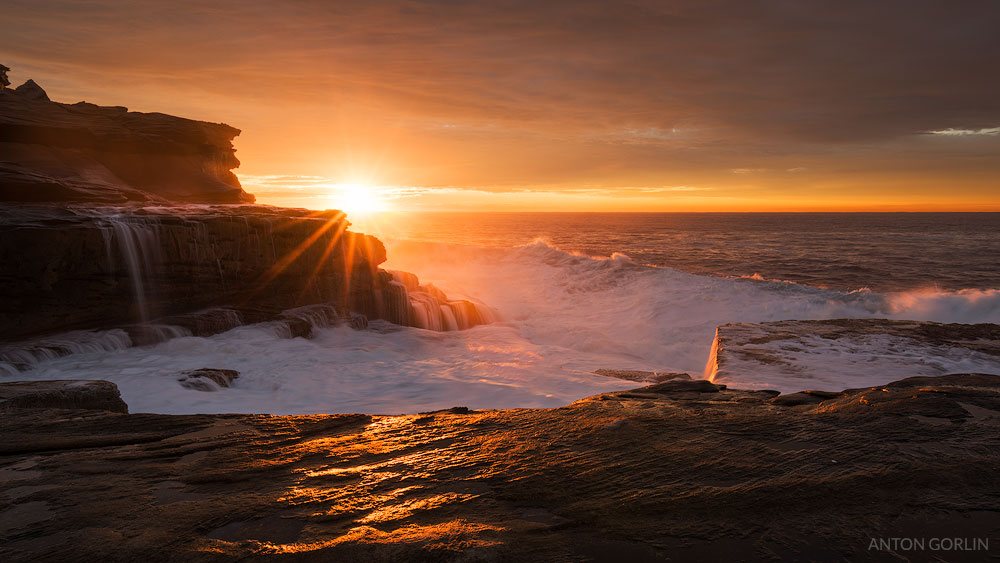
#3 Dawn
Up to 10 minutes after the sunrise; up to 10 minutes before the sunset
Finally, the wait is over! The Sun is coming out, giving its warmth and light and painting the whole world orange and revealing the ocean beauty in all its glory. All the colours pop up and brighten everything around. The warm orange light lightens the rocks and the water plants, plays of the waves and colours the clouds. We can surely use it and create strong colour contrasts (in case it didn’t work before sunrise). For instance, bright orange rocks look amazing against the blue sky, and we can also add green algae into the equation. There are whole libraries out there written about the colour harmony and colour palettes. I’m just going to tell you two important things. Listen carefully.
Sunrise and Sunset Colour Tips
Sometimes, you need to create a palette in your head and adjust the colours accordingly to achieve the best results and the most appealing picture. There are a few things you need to know.
- Windows –> Extensions –> Adobe Colour Themes. This option enables a colour wheel right in your Photoshop CC. Magic, huh?
- For the sunrise, the best palette is an Orange-Blue complementary pair. You can also sometimes add green to form a Triad. For the sunset over the ocean, typically, the air is redder due to the dust particles stirred by the busy day.
Sunrise and Sunset Camera Settings
So the Sun is up for whatever reason (went up after sunrise or still going down during sunset) and we want to make the most of it. Now, as we are getting more light, you can safely increase the F-number to 16 to get the maximum depth of field. Set your ISO to 100 (or even 50 if your camera allows). Typically, the shutter speed will be around 1/20 – 1/10, which is the fastest you can go to get the feel of fluidity in the water. Any shorter shutter speed, like 1/50, for instance, will start “freezing” the water and won’t show the flow dynamism. In this scenario, aperture f/8, for example, will cause the shutter speed to be way too fast (I’m talking about the perfect conditions with lots of light).
There are cases when you would want it to be faster. For example, a crashing wave or the wave barrel with the orange flare on the very top. For these scenarios, you will need to set f/8 and even rise an ISO to photograph the exact moment and state of the water you need. I’ll cover the wave photography in one of the subsequent sections of the article. You are looking for at least 1/250 sec. But do not hesitate to experiment as the final result depends on so many factors.
Starburst Effect
I’m sure you have seen photos of the Sun having a starburst effect, like one of those stars we had drawn in the childhood. The starburst is not particularly hard to get. I have covered this topic in details in one of the articles and infographics: How To Create Starburst Effect. This article teaches basics on how to create these star effects and how to photograph front light in general.
How To Capture Best Light
You must be wondering what light is the best for seascapes? The same type of lighting as for every other landscape type. There are three types of light, depending on the Sun position:
- Sidelight. It appears when the Sun is either on your left or your right.
- Front light. It is called this way when the Sun is in front of you and appears in the photo.
- Backlight. It’s when the sun is behind you.
The best light happens when there is a gap between the horizon and the clouds and the Sun goes through this opening. Sometimes it can hit the gap between the clouds, and it looks breathtaking too.
Sun Behind the Photographer
The worst one for the photography is backlight when the Sun is behind you. This fact is somewhat counter-intuitive because the colours look the most vivid and shiny when you peer in this direction. But have a look at the details – this kind of light has eaten all of them, all shadows and all texture. The picture now looks like a colouring book for kids with no volume. I recommend to avoid such a scenario and focus in other directions.
Sidelight
The sidelight, on the contrary, features and reveals all possible volume and textures. This kind of light is easy to photograph during the early hours of the day because of the long and not particularly dark shadows. Look for unusual objects, like free-standing rocks, trees, cliffs and make their textures part of your photography.
Front Light
For some reason, many photographers try to avoid the front light. It’s the hardest one to photograph but it is the most rewarding. You can get a starburst as I have mentioned earlier, you get the best cloud colours, you get the most vivid and shiny reflections on every surface. The difference between the sky and the foreground can be huge, and to alleviate it, you would need to use either lens filters or do bracketing. I will cover these a little later and for now, let’s get back to the light.
I already gave you a link to the basics of photographing the Sun (starburst). Apart from that, such positioning gives you some of the best colours and tonal contrast. Besides, the Sun positioned above the sea shines through the waves revealing amazing clear cyan and green colours. It also lightens the wave crests and produces glowing orange edges.
#4 Post-Dawn Golden Hour
10+ minutes after sunrise / before sunset;
Post-sunrise is the last period of good light you are going to get. It is also called a Golden Hour – because of the orange-yellow golden light the Sun produces. The actual length of the golden hour varies with seasons. It’s much longer during the winter than the summer.
After the vividness of the sunrise and the fiery colours in the clouds, the golden hour light may seem flat and dull. But don’t fall into that trap, give your eyes a couple of minutes to adjust and see the beauty. After a while, you’ll start to appreciate what’s happening. Similar rules apply here – sidelight, front light, etc. The difference is that the brightness of the Sun grows fast making it harder to photograph front view without the filters or bracketing (read further). When shooting with the sidelight, you can get away with a single shot without the filters or bracketing.
Focus on:
- Colours. The rocks are beaming orange; the algae are vivid green, the sky is blue. So many colours to choose from. Just don’t make it overbaked.
- Textures. Rocks, sand trails, cliffs, colour variations. Just look around!
- Reflections. Look for the rock pool, puddles, slowly receding water on the sand and make use of the water reflections.
- Waves. Backlit waves are the best for their colours and details.
Soon you’ll be able to photograph hand-held without the need to use a tripod.
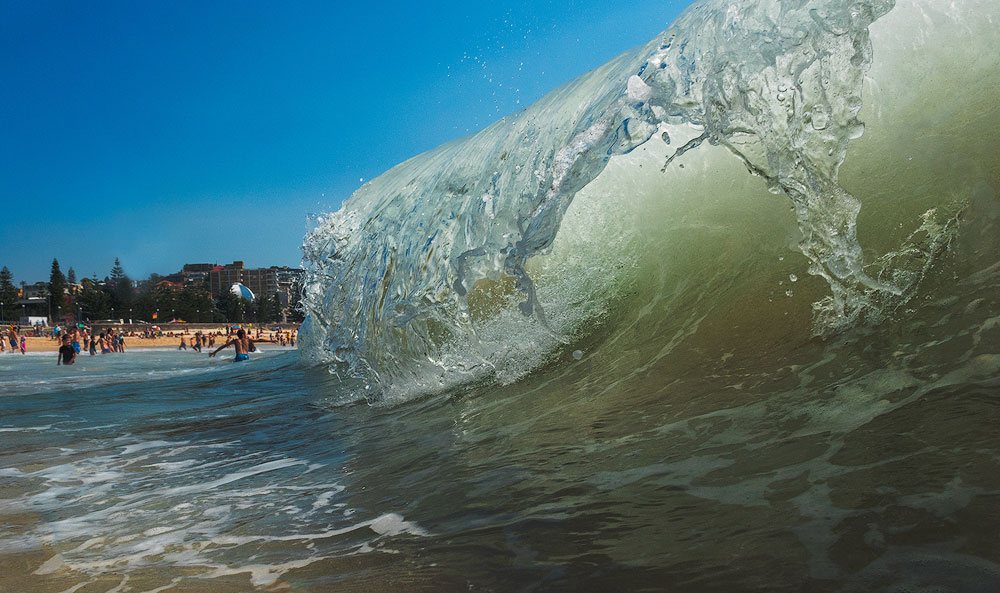
#5 Seascapes at Daylight
Most of the guides out there tell you to chill out and ignore the daylight. Of course, the light isn’t that great, harsh shadows, boring colours… But is there anything we can do? Surely, we still can create pretty seascape photography pictures during the day!
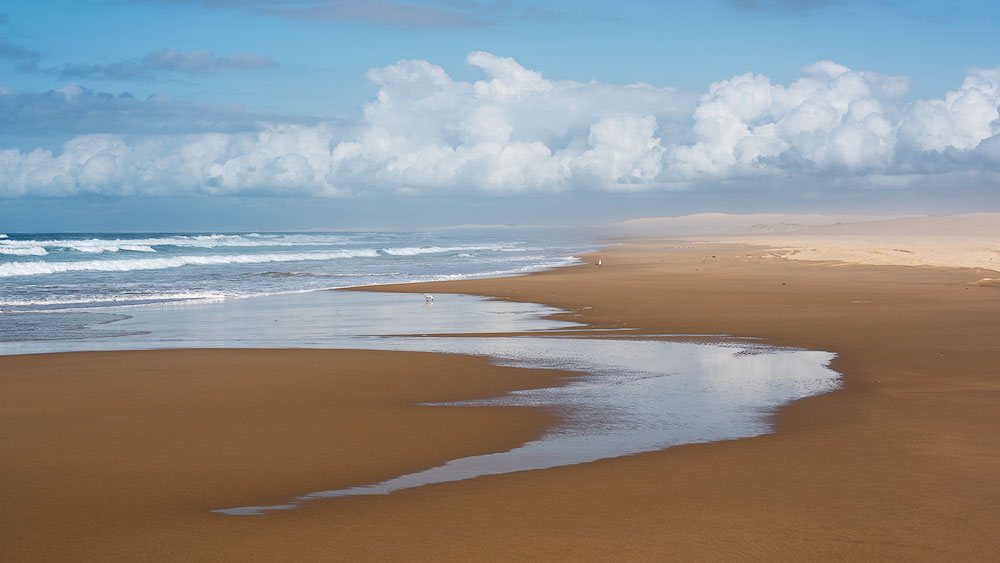
Have you tried to photograph the beach in the morning or evening? I’m sure you did. And you saw the ugly shadows created by the sand humps. The daylight fixes it making the sand nearly flat and bright. So, you can photograph the beach.
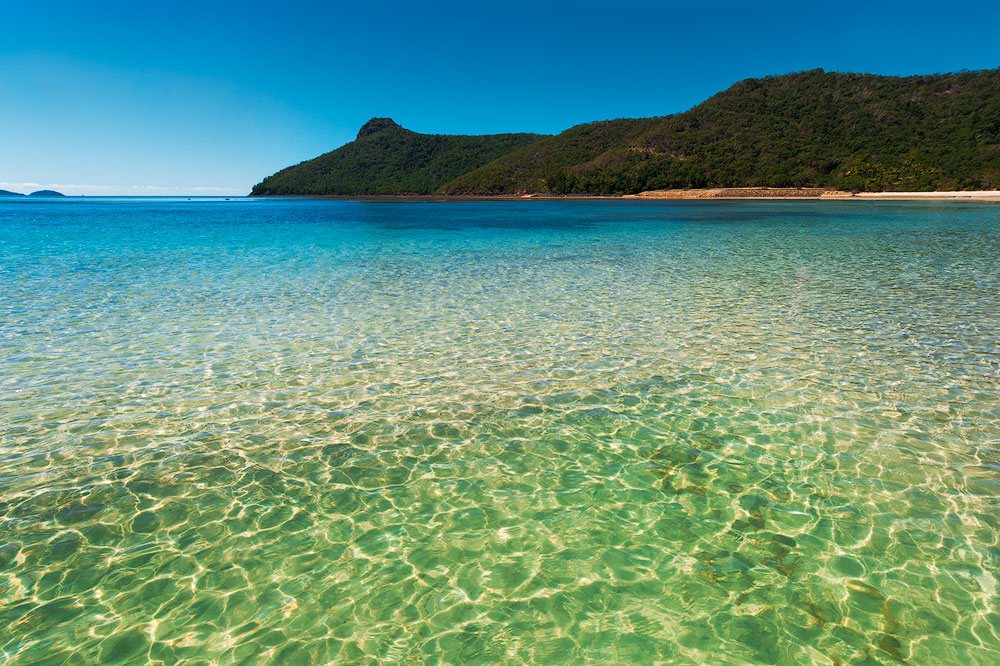
Now let’s talk about the water. Your best bet is the variety of colours and also the dancing highlights on the seabed. Of course, you won’t get any red or orange clouds, but instead, you’ll focus on the water itself. Just try to avoid harsh shadows in the background you choose.
All those “paradise beach” photos use daylight and look mesmerising. Also, aerial images (or just pictures you shoot from some height) look good as they accentuate the colours, not the shadows.
The final option to photograph is a long exposure with some very dark ND filter. Personally, I dislike this type of shots, but some people tend to like it.
Camera Settings
Camera settings are simple – f/8 – f/16, ISO 100, shutter speed – whatever camera decides. If you choose to shoot the foam zoomed in, you’ll need a breakneck shutter speed and may still require raising ISO a bit.
Seascape subjects in daylight
- Shoot the beach to get rid of busy patterns and ugly shadows.
- Photograph dancing highlights on the seabed.
- Focus on the colours.
- Shoot aerial.
- The seafoam on a zoom.
- Long exposure with a dark ND filter.
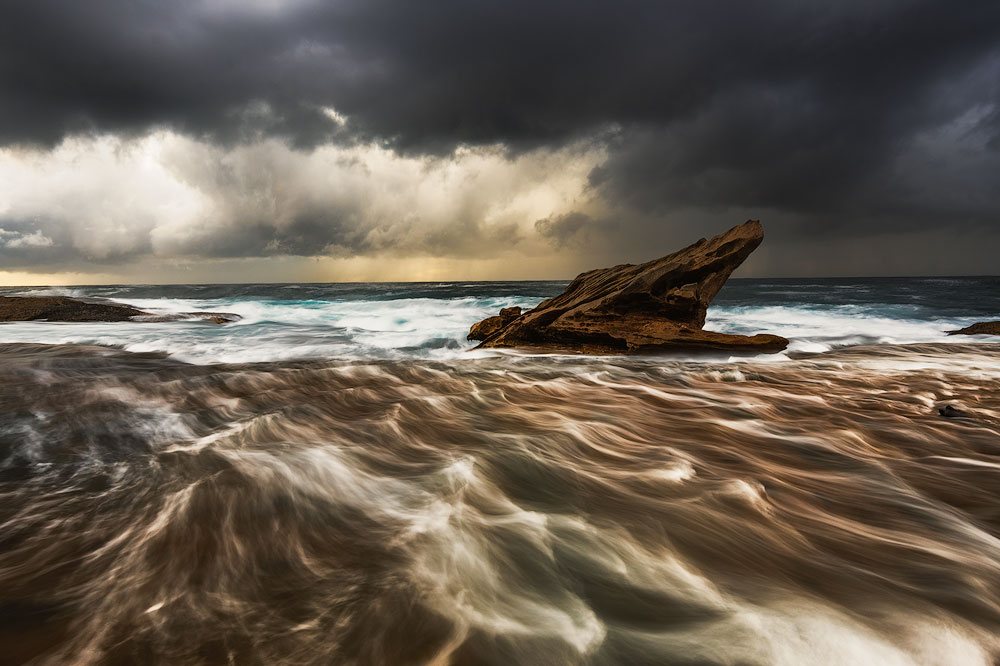
#6 How To Shoot in Bad Weather
Sometimes the weather is cloudy or even overcast, and you start to wonder, like, hey what should I do if there is no Sun? I can assure you; there is a Sun, it’s just not visible. And I’m not trying to play a bad joke here! Because now it all depends on the thickness of the clouds. In case of a high density, you can safely stay at home unless you want something very moody. If the clouds are dense, but not thick enough, then you have a great chance to photograph something spectacular.
You can check the detailed information (for some locations) about the cloud cover using the Skippy Sky site.
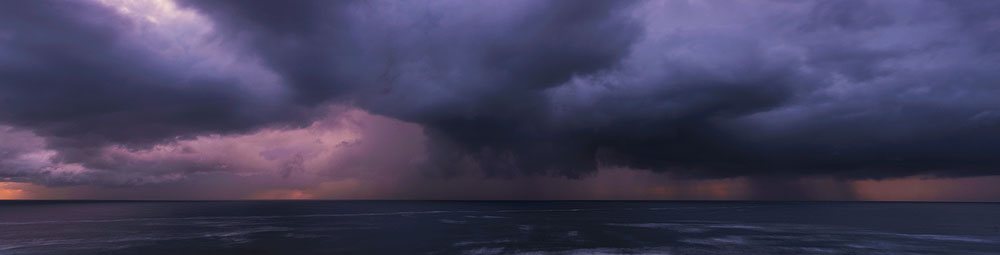
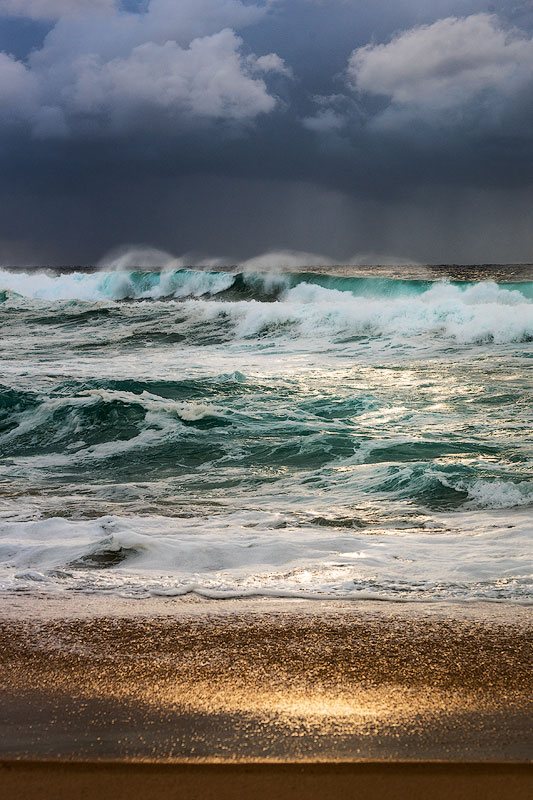
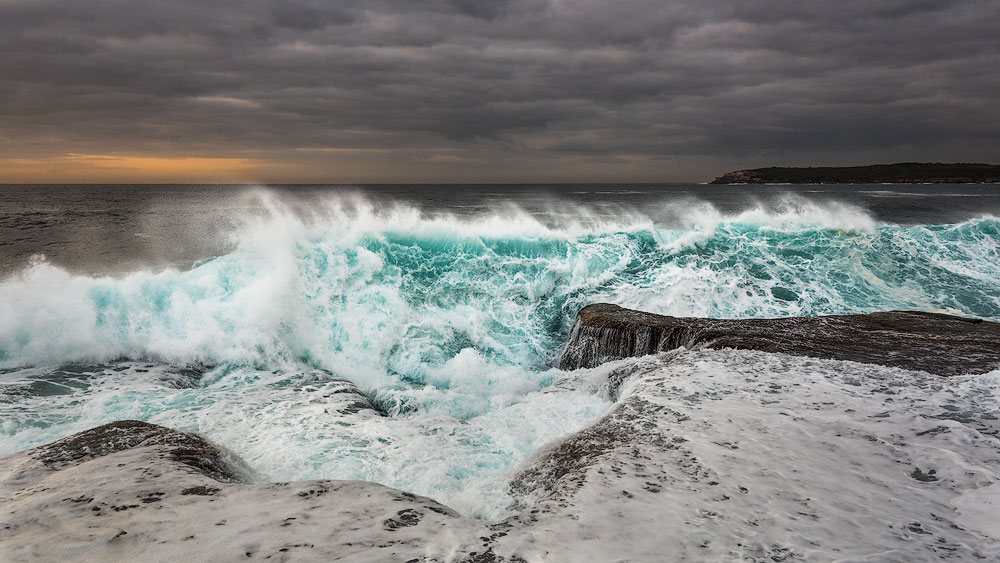
How To Shoot A Moody Seascape
So, we’ve got a cloudy or even rainy sky and no sunlight. That’s not a big deal! In fact, we have a disadvantage of not having direct light, but in turn, we also have some advantages:
- Apparently, it’s darker than it would be, so we don’t need to shoot at fast shutter speeds, which means smoother water and better fluidity
- The sky is dark, and the sea surface is less reflective. This transparency means we can see more of the actual colour of the water, especially around the wave crashes.
- We don’t have any harsh shadows. The contrast is somewhat flat, but we can fix it during editing.
- We still have a chance to photograph the colour drama if the clouds are not overly thick.
I have written an article on this topic: How To Photograph Overcast Weather. It covers both total cloud coverage and the dramatic light in the nearly 100% cloud cover.
Also, there is a great trick. When the sky is pale and overcast and low contrast, get your raw file (you are shooting raw format, right?) into the Photoshop raw converter (ACR), open the Effects tab on the right and shift the Dehaze slider to the right. See the magic?
The story of One Moody Morning
Also, right after the sunrise, the Sun isn’t bright enough yet to get through the clouds. It gets stronger as it raises. So give it 10-15 minutes to get at least 5-10 degrees above the horizon and then hope for the best. Once it was unbelievably dull and grey, and I wanted to leave, but then decided to give it a go and wait for the extra 5 minutes. You won’t believe what kind of light I got! The sky stayed dark, but it did find some gap to lighten the sea and the shore. It was a level 80 drama.
6. Seascape Long Exposure Photography Ideas
[sociallocker]
We all know what the long exposure is doing to the water. It smooths the water out. But there is a difference!
Idea #1: Shooting at the Sea Level
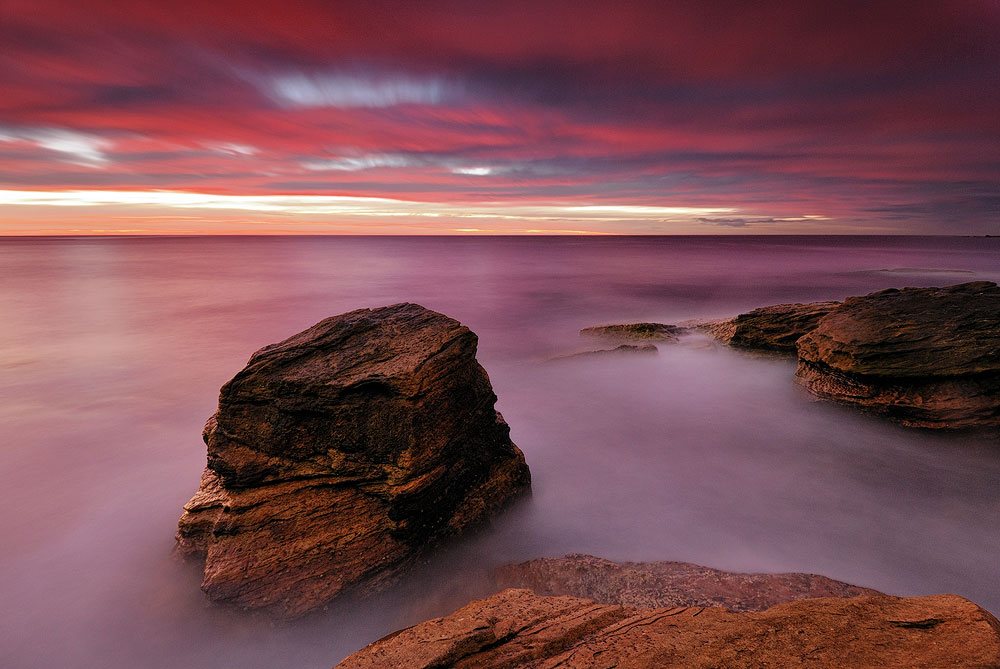
20-240 seconds exposure. If we stay at the beach near the surface level, the unrest sea water turns into some foggy substance. If it were the lake, it would turn into an entirely flat mirror surface, but it isn’t the case with the sea or the ocean. Every wave has a different shape, and a ton of waves blended form some foggy substance. Some people admire it; some don’t. Personally, I don’t like this effect a lot, and I choose another option – the ocean from above. These ocean view pictures provide a great sense of scale too. If there are no waves, then you try those at the sea level.
5-10 seconds exposure. As it’s getting brighter, the shutter speed decreases. And the balance of interest also shifts towards the Sea Level. At these shutter speeds, we can blur the water and keep some texture. It still works from the top position and starts to work from the sea level too. The skylight is bright and contains a lot of colours already, so this period is an excellent compromise between longer exposures and water surface textures.
1-5 seconds exposure. This exposure is my favourite one; we can keep a lot of texture and do so many things. Blurred waves, flowing water traces, boiling sea (without getting too busy). Because each wave is different, this shorter exposure provides the most creative opportunities in seascape photography.
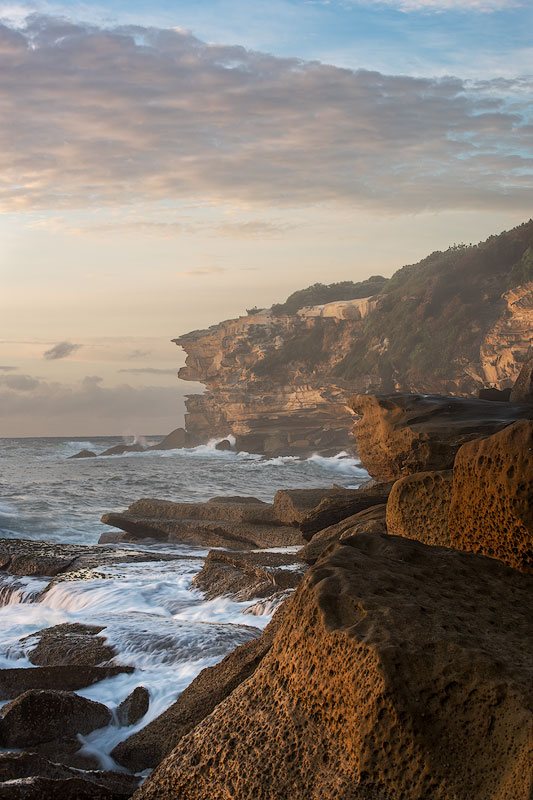
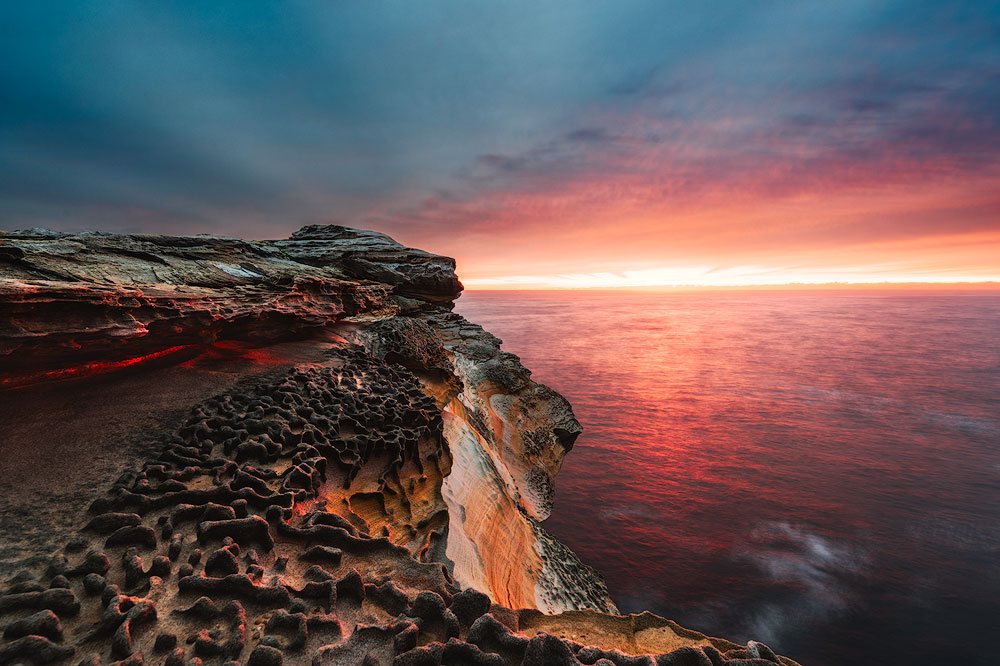
Idea #2: Photographing Ocean From Above
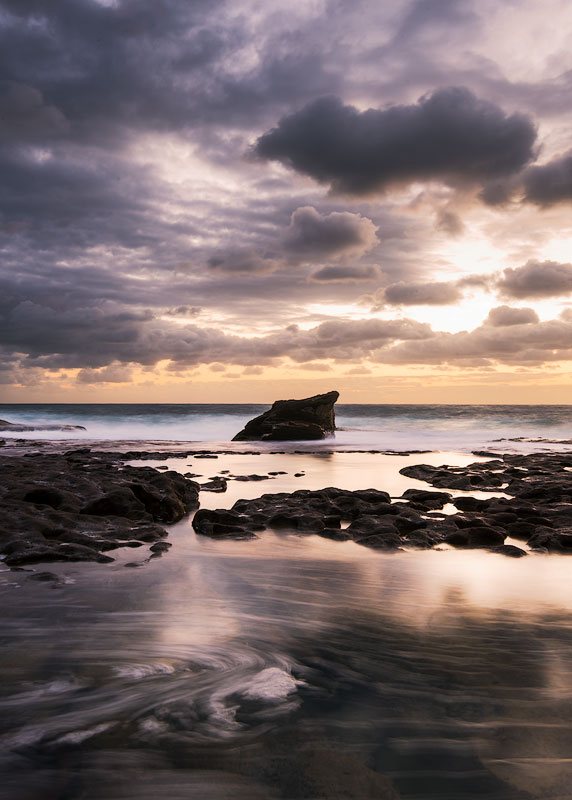
When we climb up the hill, all the waves become smaller and play a minor role in the photo. This perspective allows us to smooth them out evenly and to create a level surface with smooth colour transitions. This smoothing works particularly well when we have some solid and massive cliffs and moving clouds and want to get rid of extra busy action in the frame. Or, for instance, we have a free-standing rock in the water and want to accentuate it. Then we smooth out the water texture and then it compliments the main subject. Also, it’s easy to create a diagonal composition while standing on the cliff-top.
As the shutter speed becomes shorter than before, the water surface becomes too busy and no longer works for the large-scale shots unless these water ripples are the main subject of the photo.
Idea #3: Cloud Movement Long Exposure
The other part of the picture that works well with the long exposure is the clouds. They also blend and smooth and create a sense of movement. The cloud motion can enhance almost any coastal picture.
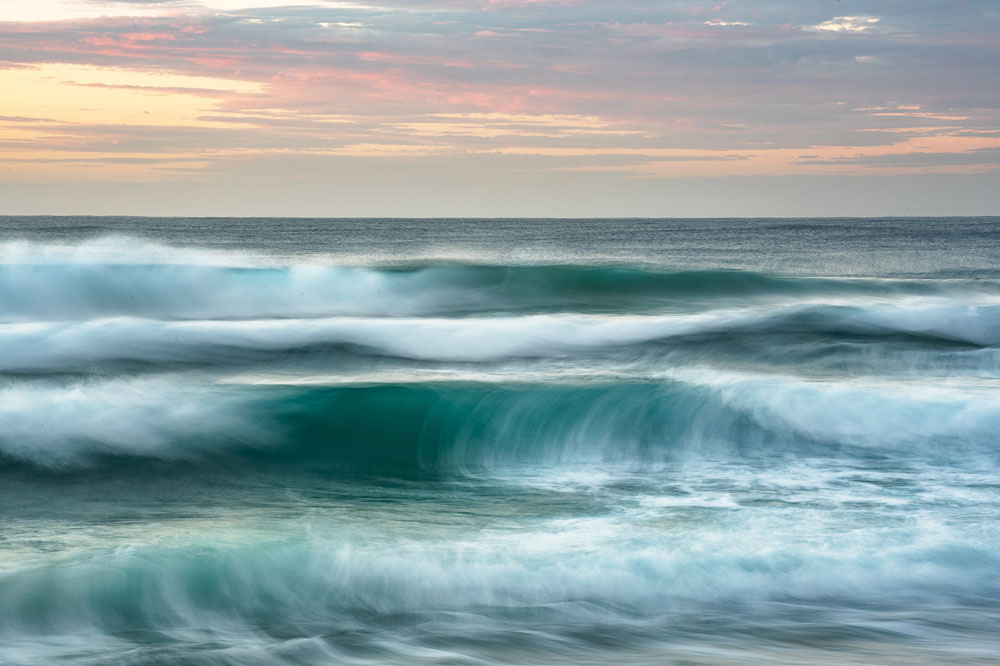
Idea #4 Abstract Seascapes
Abstract seascape photography is trendy these days. Online and offline galleries have a vast variety of such pictures. But the closer look reveals a lot of snapshots pretending to be modern art. Let’s not go this way and give it a thought before commencing a shoot. The difference is apparent for abstract photography.
As a general idea, you need a longer exposure time combined with zoomed in the lens. Focus on the waves. They will blend and smooth out, creating various shapes and colours. The hard part is to avoid total chaos. Look for patterns and beautiful lines. In general, we try to avoid the coast itself.
You may need to shoot many frames and then choose which of them work best. You may want to include the sky and apply normal composition rules, but you don’t have to. The shot without the sky is even more abstract.
Yet another approach for producing abstract seascapes is to use very long shutter speed. For this type of photo, clarity is the main factor. Try to avoid any distractions unless one of them is the main subject of the photo.
[/sociallocker]
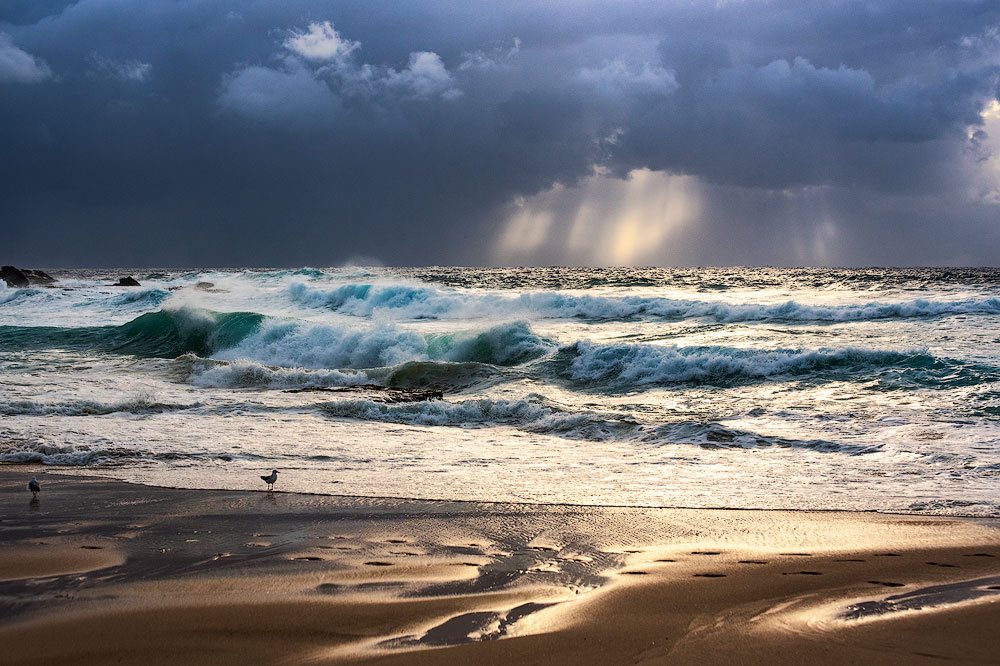
7. How do I Photograph Waves
The waves photography is sometimes treated as an individual genre, a whole new kind of seascape photography. There are a few approaches to photographing waves:
- Stand on the beach, zoom in.
- Include waves as part of the seascape.
- Get into the water, shoot them close using a wide-angle lens.
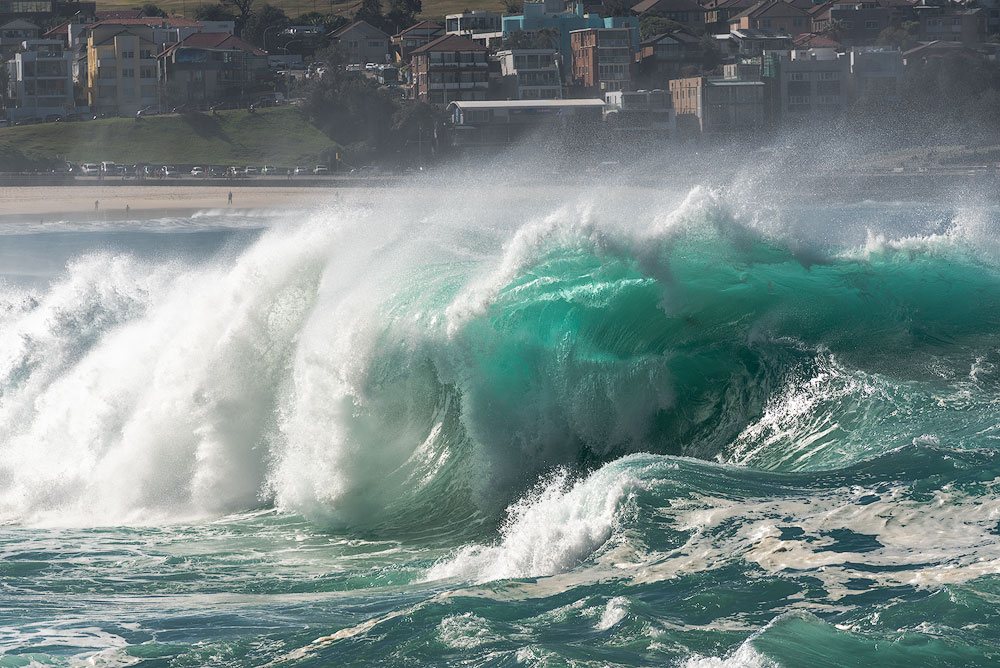
The best light for the waves photography is backlighting. It means the Sun is not behind you, it’s behind the wave and shines through it, revealing the deep greens and majestic cyans with some brilliant splashes at the crest. You need to stand at the sea level, i.e., on the beach.
The next right angle is a little from the side away from the Sun. It brings in more natural colours and perspective. You can also try the same angle from the higher position; I’ve reached some fantastic colours looking that way.
How To Photograph Crashing Waves
With the crashing waves, I recommend to shoot them from a distance using tele lens zoomed in. There are some pros out there, who take all the risks and photograph any waves close up, but I don’t recommend doing that until you gain a lot of experience. For the crashing wave, you need to choose your position so that you are 100% safe. Take a look around, are the rocks/sand around you dry? If they are not, maybe some waves reach here. You should be standing at the lowest point you can near the sea level. When you do so, the waves tower over the horizon bringing in more power and menace.

To photograph the waves close-up, you’ll need a camera housing. The pro version of it costs more than your camera, thousands of dollars. It has all the buttons, comfy handles, and other features. There’s also a budget version housing, which I also own. It’s a rubber bag with a transparent plastic at the front. It’s not as handy to manipulate but is okay. I’ve tried it a couple of times, and it worked for me. However, I was always worried about my camera. Nothing bad had happened. You need to dive under the wave split second before it crashes. Otherwise, it’s dangerous and will likely knock you over.
Wave Photography Camera Settings
In general, the larger is the wave in the photo, the faster shutter speed you need. For instance, if the tide is a part of the landscape and takes approximately 10-20% of the picture, you can get away with 1/250 of a second. If the wave occupies more than 20% of the frame, you’ll need 1/500. And finally, if it takes the majority of the picture, you’ll need 1/800 or even faster.
The aperture settings as not that straightforward, however. Let’s say, you zoom in and want to catch a wave. In this scenario, you need f/8 maximum. This setting means your subject will be in focus, while all foreground and all background will be out of focus. You can go creative and reduce aperture even further to make more blur around; it’s up to you and your vision. If the wave is a part of a landscape, you’ll need to go f/16 to get a more significant depth of field. Same things apply to the close-up wave photography – if you have a camera housing and get into the water, you’ll need f/16 to get the whole wave in focus.
The ISO works to help your shutter speed. Raise it as required to keep up with the light and minimum exposure time for your scenario.
Focusing On The Waves
Very Important! Set your camera to the continuous focus instead of a fixed one. This focus type allows you to press the button halfway down, lock the focus and track the wave. The focus will also update instantly automatically without the need to refocus. The setting is different for every camera, so consult the manuals. By the way, this tracking focus is handy for any moving objects, like kids, for example.
Photographing Waves Long Exposure
There is still a way to shoot the waves using a long exposure. It’s not a very long exposure as you would expect because a very long one will turn all your waves into the fog. We are looking for the perfect balance between smoothing and keeping the wave appearance. First of all, you need to press the button when the wave is about to barrel; it must be at its height. The exposure time should be 1/10-1/2 second, no more than that. The actual value depends on the speed of the wave. This approach will keep the colours and the shape while smoothing it enough to keep the fluidity feel.

8. Exposing Photos Correctly
The exposure is the amount of light reaching the camera sensor. It is affected by the aperture, shutter speed, and scene luminance. Also, in photography, it usually means a single shutter cycle. In other words, one click of the shutter button produces a single exposure, even if it’s a long one.
Correct Exposure Definition
Every camera can record a certain amount of information ranging from black to white. This amount of data is called a dynamic range. So, technically speaking, the correct or optimal exposure would be the one where all scene information has been recorded within this range. A photographer’s intent can also come into play and fix the definition. I.e., a photographer may intentionally underexpose a photo losing some details in the shadows and still get “correct” exposure – just because he wanted it this way.
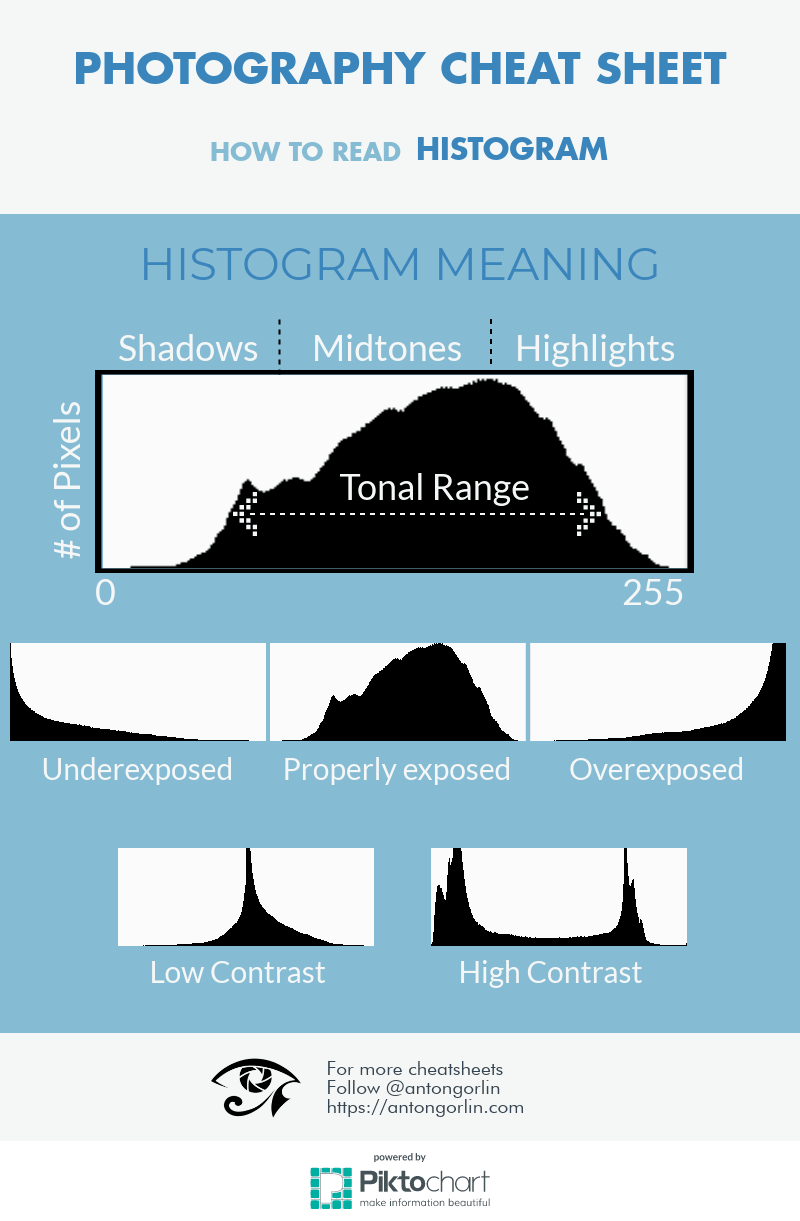
How To Read Histogram
There is a particular chart, which helps us to deal with the exposure and luminance. It’s called a Histogram. The histogram contains multiple vertical bars going from left (black) to the right (white). Every bar shows the number of pixels of a particular shade of grey. So, if you have many black pixels, the first bar will be very high. If you have many white pixels, the last bar will be very high. This graph helps us to understand how close to the correct exposure we are.
This diagram below shows how the histogram correlates with the exposure.
An overexposed image is an image with the majority of the information on the right-hand side of the histogram.
An underexposed image is an image with the majority of the information on the left-hand side of the histogram.
How To Not Overexpose Sky
The issue is that some scenes have a much wider range of light intensities and the camera sensor just technically can’t record all the information within one shot. This scenario is when people say that the sky is too bright or the foreground is too dark. You’ve probably seen it – proper foreground and utterly white sky. Or a beautiful sky with a black underexposed foreground.
There are few ways to deal with these high dynamic range scenes and expose for sky and subject at the same time.
- Lens filters. There is a variety of filters available, which help you balance the exposure in different parts of the frame.
- Bracketing. Bracketing helps you to achieve the same result as with filters, but with more control.
- Underexpose. Sometimes you can get away with just one shot exposing for the brightest parts and then make everything else brighter during editing.
Lens Filters
In this chapter, I’m talking about the graduated filters, which specifically target the exposure issues. The most common filters are GND2, GND4, and GND8. ND stands for the “neutral density,” which implies that the filter changes the light equally for all colours without modifying hues. The number near GND relates to the number of exposure stops it is darker than the transparent part. GND2 = 1 stop, GND4 = 2 stops, GND8 = 3 stops. The exposure stop means that the amount of light the sensor receives doubles or halves, i.e., +1 stop = doubles, -1 stop = halves.

The filters can be a soft edge and hard edge, and they should be used for the different scenes. The other type of graduated filter is a reverse filter. When your photo has a hard edge, like the horizon, the best choice is some hard edge filter. For the mountains, instead, you need to use a soft edge filter. The reverse would be a great idea to mute down the brightest part right above the horizon during the sunrise or the sunset.

Regarding the brand of the filter, I used to use Cokin. They are not overly expensive and have reasonable quality. However, they did create a colour cast when you stack 2+ filters together. I haven’t ever felt the need to upgrade to more expensive filters, like Lee of Nisi.
Previously, I used a lot of filters but gave it up eventually. Read further to find out why.
Bracketing
Bracketing is a technique where the photographer creates several photos quickly one after the other with a different exposure. Like, one picture is exposed for the foreground, the other one for the background. Typically, for a seascape, you’ll need two exposures with around 2-3 stops between them. Sometimes, in complex lighting situations, you may need three exposures. I have never needed more than three. Every DSLR has a bracketing mode; please refer to your camera guide. Typically, you can set a direction (will it increase or decrease the exposure for the subsequent shots), the number of shots, and the number of stops between each shot.
You will need to combine or blend the photos in the Photoshop or Photomatix or any other application.
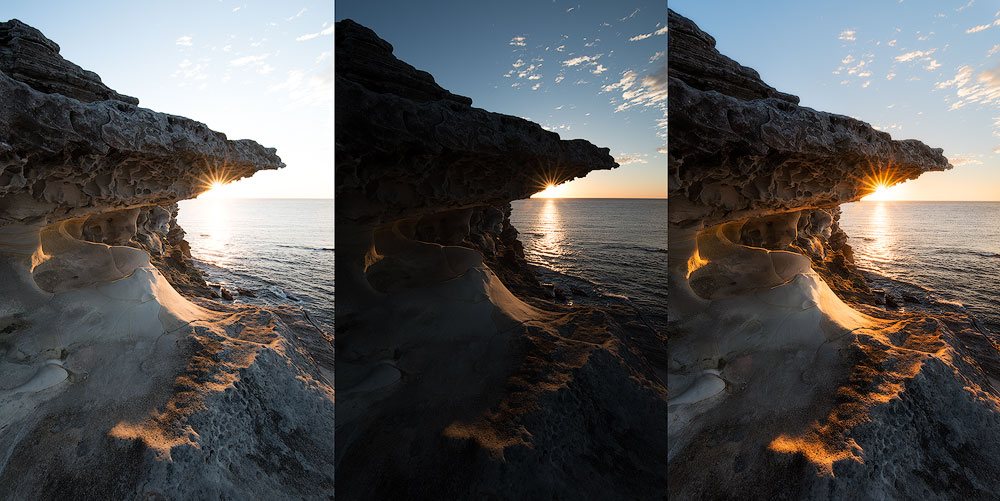
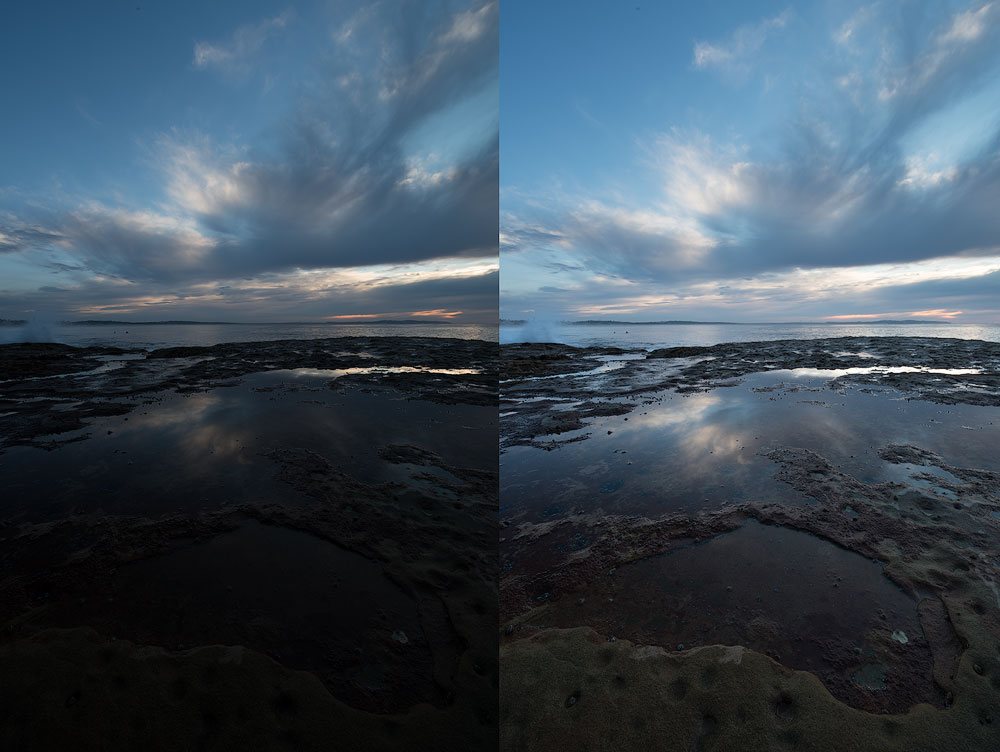
Underexpose
Most modern cameras have a high dynamic range. So, in many cases, you can expose for the highlights and then bring up the shadows during editing. Of course, the quality is a tad worse than a correctly exposed image. The colours and contrast suffer the most. But it is still an option, and I often do it if the lighting allows. Raw is a must have for this opportunity as it won’t work with jpeg. Later on, you can either expose the raw twice and combine or do the editing during the raw conversion.
Same photo, the details recovered from the underexposed area during the raw conversion:
Graduated Filters vs. Bracketing
I’m telling you straight away – there’s no right answer, both approaches work. Some people prefer the filters, while others prefer bracketing.
The best advantage of the filters is that you fix the photo right in the camera and will need less editing later. However, it comes at the cost. I’m not ready to pay such a price. What about you?
Filter issues:
- Filters work best for the level horizon. If there is an object, like a tree or a cliff, the filter will darken it too. And you will need to fix it later in editing.
- You get what you get. Sometimes, you may accidentally over-darken the sky without the ability to restore details or colours later.
- Sometimes you need to change filters as the light changes. And what’s more important, if you choose another direction, you may also need to detach/change a filter. You lose time while doing so and may miss the moment just because of this fuss.
- You need to carry a whole extra bag just for the filters.
Bracketing issues:
- More editing and requires more time.
- More storage.
I found the issues related to the grad filters usage overwhelming, especially issues #2 and #3. I prefer to have more control and thus produce better quality. Although, it comes at the cost of additional editing time.
Other Filters For Seascape Photography
Even though I do not recommend gradual filters, there are different filters worth mentioning. And I do recommend to have them and to use them.
ND filters
Same neutral grey filters but without a gradient. They are just equally grey all over. Photographers use them to reduce the amount of light to create long exposure shots. Some filters are so dark you could use them during the mid-day. In fact, I don’t recommend ND2 and ND4 as you can easily manipulate aperture and ISO to make your shutter speed a little longer (or use a polariser if you have one). You need to have ND8 or even ND400. The former is three stops; the latter is 8 2/3 stops. ND400 looks nearly black and makes your shutter speed very long. You may need to either focus manually or focus, then set your camera to the manual focus mode and then attach the filter.
ND filters landscape usage examples:
- Smooth water motion (any body of water – ocean, waterfall, stream).
- Avoid lens diffraction. When you go too far with the aperture, like f/18 and more, the picture starts to get more blurry instead of sharpening. Physics causes this. Usually, you’d need to stay at f/14-f/16 max.
- Get rid of moving objects. When people or other objects move on the more prolonged exposure, they smooth out so much that could disappear in the final image completely. When shooting a crowded city landscape, try a very long exposure to get rid of all distractions.
- Reach longer exposure time.
- Add motion blur to something, like the wave.
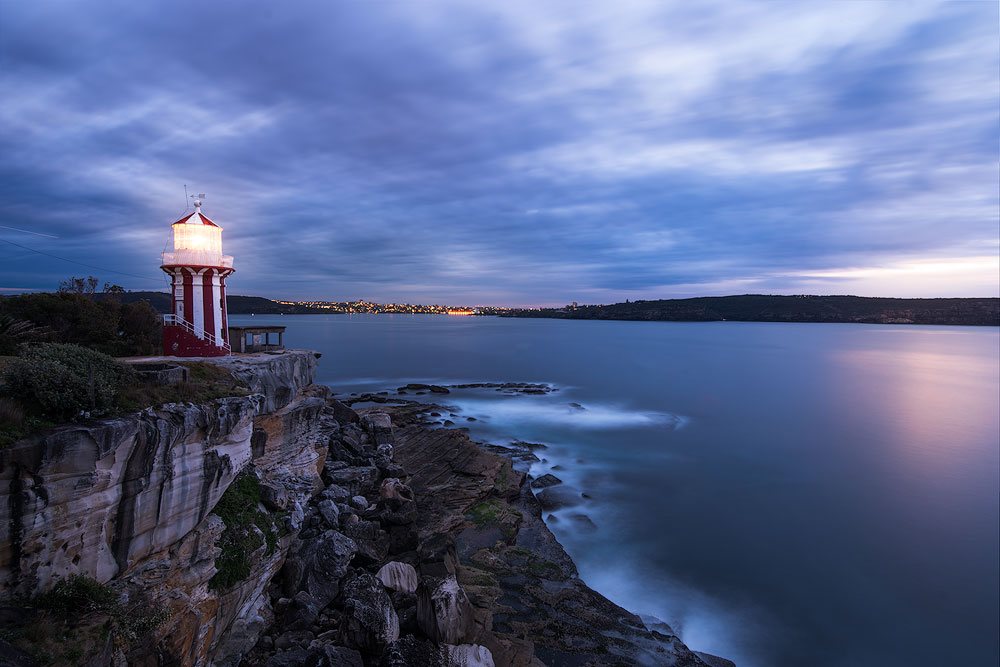
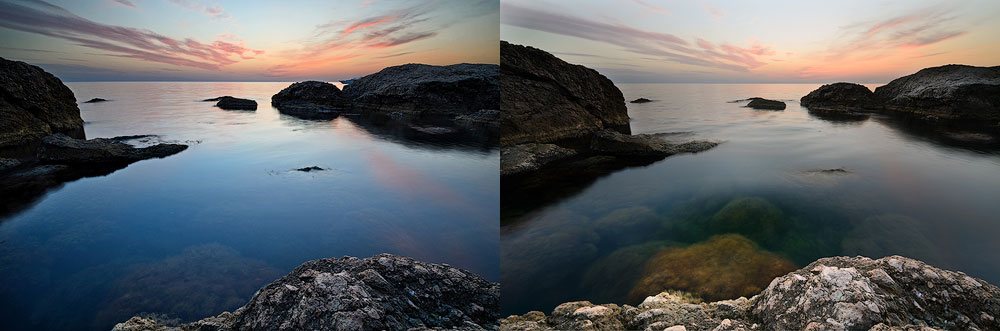
All in all, ND400 is a must-have for a landscape photographer. The image below is not precisely a day photo, but still a very long exposure for the amount of light I had at disposal.

Polariser filter
By removing reflections and glare, this filter boosts the natural saturation of the image and darkens the sky. The polariser filter is often used just to darken the sky. Of course, the darker sky with bright clouds give the photo a bigger punch, but that’s a limited use! After all, you can replicate this effect later during the editing. Also, for the landscapes, we usually use wide angle lenses, and the filter’s effect isn’t big enough to cover all the sky. It causes the sky to be part dark and looks like a mistake (if the clear sky portion is significant enough and not covered with the clouds) rather than an exciting effect.
The other results are unique, and there is no workaround. There’s also a side effect – the filter is dark and works like an ND filter, reducing the light amount by 1-2 stops. The effect strength depends on the filter rotation angle with the most prominent results at 90 degrees. Here is a fantastic article explaining the physics if you really want to learn. In two words, the filter removes polarised light and the reflected light is polarised.
Polariser Filter Usage
The best usages of the polarising filter include:
- Foliage. By removing all little glares, you make the leafs juicy and vibrant and lush. Not really applicable to coastal photography.
- See through the water. If you have a body of water with something visible under the water surface (the rocks, the moss, seabed, etc.), you can adjust the filter to remove the glares and see through clearly. The busier is the water, the less effect the filter will produce because it works better on certain angles and unrest water is a mess of angles.
- Sky darkening. I believe this effect is overrated. Easy to replicate in editing. During the raw editing, just go to the HSL –> Luminance and drag the Blue slider to the left.
The more extended exposure with this filter brings in some pretty colours.

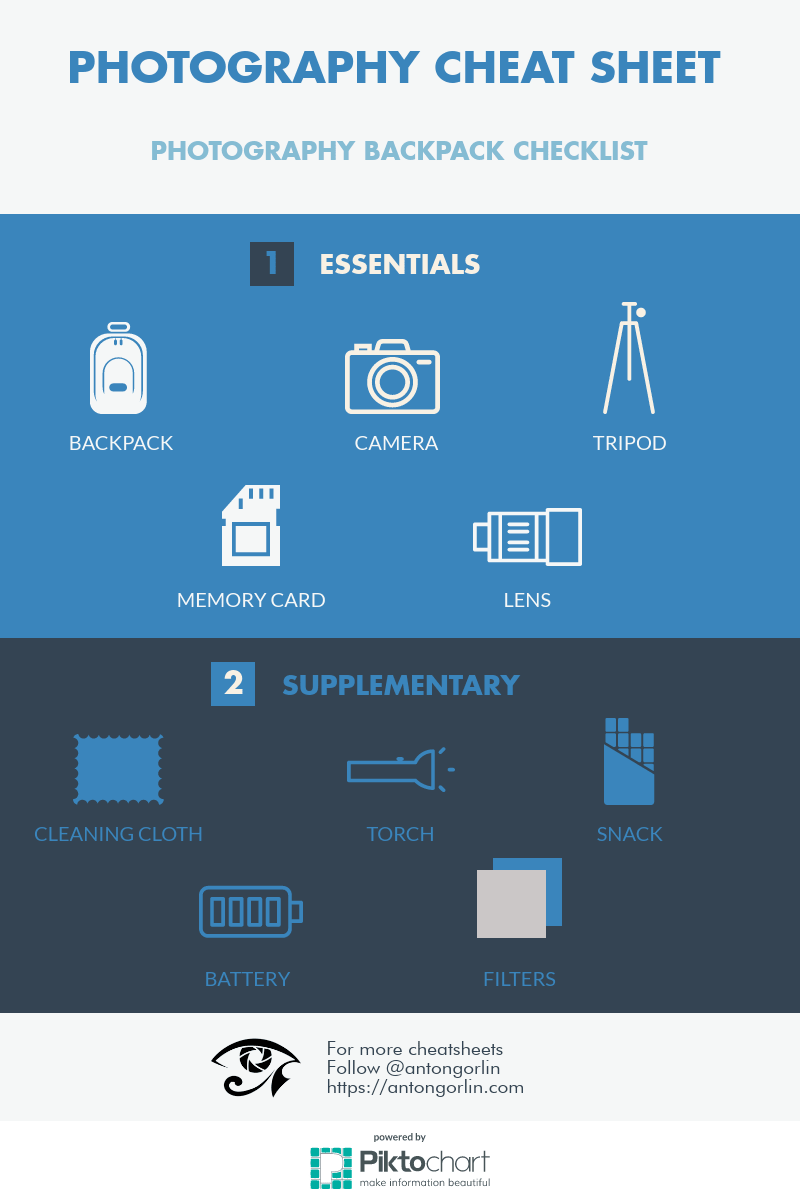
9. Backpack Checklist For Seascape Photography
Every single time I take someone out for sunrise, they are missing something important in their backpacks. So here is a list I send to anyone going out with me either on workshops or just having fun.
Essentials:
- The camera with a charged battery
- A lens suitable for seascapes (either wide or general zoom lens)
- Tripod
- Memory card
Supplementary:
- Torch or headlamp. The only reason it’s not on the essentials list is that you can use your phone for that.
- Extra battery
- Snack
- Cleaning cloth to wipe the splashes out
- Filters
- Extra set of clothes – you may get wet
- Weather-friendly shoes, like crocs
10. Best Lens For Seascape Photography
It’s a very tricky topic to cover. There are many camera systems out there – Nikon, Canon, Olympus, Sony, Fuji to name a few. I will surely name a few who are great for sure, but I’d instead focus on the focal range parameters.
The classic solution for landscapes and seascapes, in particular, is a wide or ultra wide lens. To get the terms out of the way, here is an explanation:
| Ultra-wide | 0-24mm |
| Wide | 24-35mm |
| Normal | 40-58mm |
| Telephoto | 60mm + |
Many photographers, including myself, use an ultra-wide lens. To be specific, I use a Tamron 15-30mm, which is a great lens, and I recommend it to everyone. Other successful photographers that I know use zoom lenses. For instance, Canon 24-105mm, which starts at a wide angle and finishes at the telephoto range. Admittedly, this approach is more flexible but comes at the cost of those essential millimetres. To add even more confusion, I have some fantastic seascape photos that I have created with 50mm (portrait) lens or even with 70-300mm lens.
How To choose Lens For Seascapes
What does it all mean? Every focal range would have some excellent lenses that you could use and make great photos. In the end, it boils down to your preference for the framing and photographic subjects. If you are just starting out, get a generic zoom lens, like Tamron 18-270 or Nikon 18-200 or whatever your manufacturer provides. Make sure to read the recommendations beforehand. Then create several thousand photos. And then browse through the images and have a look which focal length did you use more than the others. Which of the pictures work best for your vision. This approach is how you decide where to focus.
Be sure to calculate your EFL using this article: Effective Focal Length Calculator.
Some photographers think they can get away with those generic 18-200 lenses. I must disappoint you, it works from the start, but once you go serious, you’ll need a better lens. The bigger zoom is, the worse is the quality towards both ends.
Please note! The f-number is only essential if you plan to shoot the stars. In this case, the smaller is this number, the better photos you’ll get. Otherwise, disregard it for seascapes.
Lens Suggestions
If you need some specific recommendations, I can suggest the following lenses for the wide-angle.
Crop:
- AF-S DX NIKKOR 10-24mm F3.5-4.5G ED
- Tokina 11-16mm f/2.8 AT-X Pro DX II
- Canon EF-S 10-22mm f/3.5-4.5 USM
Full Frame:
- Nikon AF-S Nikkor 24-120mm f/4
- Canon EF 16-35mm f/2.8L II USM
- Tamron SP 15-30mm f/2.8 Di VC USD for Nikon, and a similar one for Canon
- Nikon AF-S Nikkor 14-24mm f/2.8G ED
- Canon EF 24-105mm f/4L IS USM
- Sigma 24-105mm f/4 DG OS HSM Art, and another one for Canon
Lens Combos
However, I accentuate it again, I have created some of my best shots with a common Nikon 50mm/1.8D and some excellent photos with Nikon 70-300mm. Once you grow, you want to update. You have a few options.
- Ultra-wide + normal zoom + telephoto
- Normal zoom + telephoto
- Ultra-wide + 50mm + telephoto (my choice)
11. Final Word
I hope you enjoyed this article as I’ve put a lot of time and effort into it. It took me many hours to write, but it’s nothing to compare with the number of hours it took me to learn all this stuff from others as well as trial and error. Let me know if you have any questions or feedback and please rate and share this article if you find it any useful.
Sunrise Sydney Slideshow
A collection of some seascape images created in Sydney, Australia.
12. Downloads
Have a look at the editing handbook I have created for you. I bet it’ll save hours, weeks and months helping to avoid some common pitfalls.
 DOWNLOAD FREE E-BOOK
“10 Post Processing Landscape Photography Tips”
[ddownload id=”3801″]


Karen says
I am heading to the beach next week .. this will help me a lot as I am an enthusiastic amateur
Anton Gorlin says
great to hear Karen, feel free to ask any questions 🙂
Jaime Dormer says
Very good information Anton. Well done
Anton Gorlin says
thanks, Jaime! Appreciate your comment.
Tokanya says
You sir! this is the best guide I’ve ever seen.
I just randomly click on my google news page and I glad I did.
I was so perplex on my food photography class and this gave me the best instght.
hope you don’t mind if I took a few ideas out of this.
Anton Gorlin says
sure, no worries 🙂 cheers
Anton Viberg says
Great article, i rarely leave comments but great work deserves credit.
I like articles that focus more on the artistic part of photography rather than the technical.
Well done!
Anton Gorlin says
thanks, Anton! I tried to make it useful for everyone 🙂
Phil says
Hi, thank you very much for your generosity in sharing your techniques and experiences. I live on an island ( Isle of Man ) and have lots of opportunity for great sites and also lots of dark sky opportunities. We don’t have any big roads and our government are very tight fisted so don’t light up the roads very much. We have great skies, being in the middle of the Irish Sea we don’t have boring blue skies very often and lots of interesting meteorological effects ( well, mainly rain and mist to be fair ) . So, I’ll be out there soon using your ideas for inspiration. Thanks again.
Anton Gorlin says
Isle of Man and Scotland are my dream destinations!! I prefer rugged scenery with cliffs, moody skies, and unrest sea. I’m sure you’ll have a lot of opportunities to try out some of the things I wrote about. In Sydney, the dark sky isn’t very easy to find with some mediocre options available. Good luck with your efforts! 🙂 Thanks for reading and commenting.
Brad Smith says
Wonderfully done with excellent example photos. Congratulations
Anton Gorlin says
thanks, Brad! Glad you like it!
Ross says
This is a wonderful resource that highlights your extensive experience. Detailed information. Example photographs. Links to further information. This is better than most photographic guides.
Anton Gorlin says
Thanks a lot, Ross! Really happy with your comment.
Steve says
This article is put together in an easy to understand format. putting your thoughts on safety are very important as the ocean can be very unpredictable at times.
It,s always nice when you read a tutorial that why and how you do something is explained, you did both in a very easy to understand way.
Beginner as well as advanced photographers will get something from this tutural,
Thanks for sharing
Anton Gorlin says
thanks for reading and for the thoughtful comment, Steve!
Michaelangelo Donatello says
You should have called this article HOW TO TURN NATURE INTO KITSCH.
Jim says
Living near Seattle, I have easy access to salt water. Thank you for an excellent essay.
Anton Gorlin says
thanks, Jim!
Mark Rustad says
Anton, many of your shots are simply beautiful Art. I was especially moved by your One Moody Morning and the Grandeur of your Crashing Wave. I have been shooting Seascapes, Landscapes and Portraits for many years and I never fail to learn if I remain open minded and willing. Your technical explanations are very clearly presented and have helped me consider how better to approach several situations. You are to be commended for your best efforts. Respect, Mark
Anton Gorlin says
it’s super valuable to get such a comment from someone, who shoots for many years. Thanks a lot, Mark!
Mark says
I have to echo others comments in that this is a very well put together and insightful article. I clicked on it because I thought it would be interesting read about techniques regarding seascapes and what I found was a great article on general photography. I really liked your comments on composition, particularly the one about it not a topic to quickly cover. I liked this article so much that I’ve forwarded a link to several of my friends to read it. Thanks!
Anton Gorlin says
many thanks, Mark! It’s great to realize the article is useful 🙂 You’ve got some great photos on your flickr feed! Thanks for forwarding it to your friends, appreciate that
Thomas Inglis says
Terrific article, really well covered. Your work is superb, well done.
Anton Gorlin says
thank you, Thomas!
Eugene Braack says
Wow. What an awesome tutorial. And amazing photography too. You sir, know what you are doing 🙂
Anton Gorlin says
thanks, Eugene!
Christine E Dickenson says
…stumbled upon your article this morning and the gorgeous seascape pics (especially like the first one)! I am an amateur photographer and especially love nature photography. Your work is absolutely breathtaking and I can’t stop looking at the pictures. My husband and I are going to California to visit my daughter and her boyfriend, and we will be near Carmel and Point Lobos – these tips are perfectly timed and I look forward to some sunrise pics. Have you been to Banff, Canada? If not, you should try to go there – we’ve been twice and the photographic opportunities are endless. Keep up the great work!
Anton Gorlin says
thank you, Christine. Good luck with your sunrise efforts 🙂
I’ve never been to Canada. Just googled Banff and I’m impressed, this place is so gorgeous!
Paul B says
That is a superb document and fabulous examples throughout. Before I looked through it I had this idea ok here we go usual cliche shots, but absolutely not. Extremely inspiring and maximum respect. Pictures this good don’t casually come, you have to work to get them and well done.
Anton Gorlin says
“Inspiring” is the best feedback to get, thanks a lot!
mark says
Thanks for the compliments Anton. Have you ever considered offering workshops? Many people (myself included) are always looking for a new photo workshop to hone our skills, especially when we see a photographer who’s style we enjoy.
Anton Gorlin says
I’m working on it right now and I guess I’ll start this year. I did a bunch of free pilot workshops for my colleagues and around 7 paid ones in the last few months. What format would you enjoy the most? Currently, I’m doing sunrise workshops, but sometimes it’s hard when people need help with basic camera settings. So, I’m thinking about few types:
1) basic workshop for the settings and getting to know the camera
2) sunrise/sunset workshops. This will need some basic knowledge – what is a shutter speed, how aperture affects the final photo, etc.
3) full day hikes in Royal National Park maybe with an overnight stay. This one is way harder as I would need to get some license for the national parks.
4) online editing workshops. I’m doing it in Russian now (my first language) with some good feedback. So I need to start this as well.
cayatte says
Splendid désire to share with the others its knowledges.
George Murray says
Thank you for the time and effort you put into this article and for your generosity in sharing your considerable experience. I will revisit what I’ve learned here the next time I’m near the sea. Also, outstanding photos!
Cheers
Anton Gorlin says
thanks, George! Cheers
Matt Schlotzhauer says
Anton, what a great article! Your attention to detail while keeping the explanations simple was very good.
One nit: you might want to consider a re-edit of the paragraph below:
“When you close down the aperture, the shutter speed increases, you will need a longer exposure time. If you want to both keep the hole closed and shutter speed not too long, you will need to increase ISO (sensor’s sensitivity). It reduces the shutter speed at the cost of adding noise.”
Closing down the aperture (going from open 1.4 to 8.0 for example) requires one to DECREASE the shutter speed in order to allow the same amount of light for a proper exposure. Second: increasing ISO allows one to INCREASE shutter speed at the cost of adding noise.
Anton Gorlin says
hi Matt, thanks, I’ll re-visit this paragraph!
Richard Bledsoe says
Thanks so much, you are very generous. it’s a wonderful guide and has inspired me.
Anton Gorlin says
no worries, Richard 🙂 Good luck with your newly gained inspiration!
Pierre Laurin says
Incredible knowledge and generosity (and, of course talent)! To be shown to anybody who thinks photography is simple…
Thank you!
Pierre Laurin, Québec, Canada
p.s. If you ever come to see beautiful Banff, you might as well also fly 3000 miles east to Québec City. Wonderful photo ops here!
Anton Gorlin says
thanks a lot, Pierre! It always amazes me how some people think that the professions they know nothing about are simple 🙂 Some time ago I had a conversation with someone who claimed that real estate photography is simple and basic and anyone can easily do it. I didn’t win the argument, haha. You guys keep tempting me with Canada… I know it’s amazing!! I will surely travel there one day! I didn’t know however Canada is that big, 3000 miles across.
David Qiao says
Thank Anton for the detailed seascape article. I am glad you like planit. I am the author of the app.
Anton Gorlin says
wow, that’s totally unexpected 🙂 Thanks for the great app!
Gary Eyring says
As a resident of Kauai and a photographer surrounded by the ocean, I can say that this is an excellent and comprehensive guide. I always emphasize safety safety safety. Never underestimate the power of the ocean. A good starting point is to spend at least 5 minutes observing the surroundings before venturing forth. 10 minutes is better!
Anton Gorlin says
thanks, Gary! I really like how you structured the galleries on your site, the sky, the earth, the sea. Looks very authentic.
shane Rozario says
Anton, A pleasure to have met you. Your detailed guide is very generous and your attitude of sharing knowledge is good for creative thinkers. Looking forward to seeing where your photography and your adventurous spirit will lead the rest of us !:)
keep up the good work.
Anton Gorlin says
thanks, mate. Looking forward to it too 🙂
george petrovsky says
Thanks for a very detailed and comprehensive guide, Anton. Seems like I’ve “missed the boat” to some extent, having moved from the Southern Highlands to the Mid North Coast, Myall Lakes area. In your very comprehensive galleries, there are places familiar to me – and better captured than I’ve managed to! Must dust off my D7000 and go down to the seaside, not far from here, with your ideas in mind. Online editing workshops in Russian? That would be interesting – I could read them! You have some excellent pictures from your winter visits to Europe. You want deserts? Try a visit to South Australia, the Flinders Ranges and beyond! There are some options of going there I could recommend, if you’re interested, having done a trip there last year.
🙂 george
Anton Gorlin says
Hi George, thanks for the comment. Plenty of opportunities here in Sydney 🙂 Is Myall Lakes area any good for photos?
Let me know once you tried something from the article 🙂
Here is a recent free online intro video: https://school.1photo.tv/lesson/95. The recording might still be available. I’d like to get recommendations about Flinders Range and beyond! Btw, my backup camera is also D7000.
Jean-Luc Coulon says
Thanks for this comprehensive guide. What a work!
I would add something about the polarising filter in seascapes. It has also a great effect on the wet rocks near the sea. By adjusting it correctly, you suppress all the glare on the rock et bring back its structure.
Jean-Luc
Anton Gorlin says
Good idea, Jean-Luc, I’ll add that! Thanks.
Click and Learn Photography says
Fantastic and comprehensive guide – I especially commend your section on safety. Far too many photographers ignore how dangerous the ocean can be.
One thing I personally like doing with seascape photography is choosing one composition and spending some time experimenting with shutter speed and timing to find the perfect balance between portraying both movement and drama.
[link removed]
David Reynell says
Anton, I’ve been carrying cameras around since I was 18, I am now 77. This article is the finest I have ever read on the topic of composition. Your images are simply “jaw-dropping”
Thank you
Dave
Anton Gorlin says
That’s a really high mark to receive. Thanks a lot, Dave!
Pierre Laurin says
I took a guess…it’s rather like 2000 miles!
Fred Ross says
I love how comprehensive your little guide book is – great work!
george petrovsky says
Having recently arrived here and setting up home, no time for photo trips yet – any day now. I’ll send you some info on outback/desert trips rather than take up space here. Learning new fotki lingo from your video! 🙂
Simon Maney says
Thanks for all the hard work in putting together the article.
One note to the less experienced: Don’t be surprised if you don’t (immediately) get results like Anton’s. A lot of the examples show nice light, and in particular, good technique (like the covered bracketing) and very good post processing skills (a necessity I find to get the best out of your files).
I like the high contrast details and high DR without looking overdone Anton – Awesome results! (Looks like a nice combo that D750 and Tamron 15 – 30!)
Anton Gorlin says
You are welcome, Simon!
Yes, you are right, there are many conditions that should meet together to make a good photo. Editing, for instance, has always been the hardest part for me.
Thanks for your comment!
Hany J. says
Hello Anton; Just want to send you a “HUGE” thank you for the info presented in your guide. Very valuable guide and tips for all photographers. Many thanks from Canada. Cheers.
Anton Gorlin says
hi Hany, a huge welcome to you 🙂 Thanks for taking time to comment.
Cathy Martindale says
I found this article at just the right time as we are heading to the South Carolina coast next week. My knowledge of seascape photography is woefully small being that we live in the High Plains of Texas. (Cactus photography? I’m your expert!) I look forward to checking out more on your site.
What I especially like is that the photos you use to illustrate your points (besides being knock-out beautiful) have all the info about lens, EXIF data. This is so helpful to someone like me. Really helps understand why a certain shutter speed is good for one thing but not so much for another. Thank you!
One little criticism: Your copy has some grammatical and structural problems and inconsistencies that, in places, made it a little hard to follow, required reading twice or more to figure out exactly what you wanted to say. As a retired newspaper person, I tend to “copy edit” everything from stories to cereal boxes! If you want some examples, just msg. me and I’ll email to you. (Old copy editors never die; we just critique our own obituaries!)
Anton Gorlin says
thanks a lot, Cathy! Happy it’s useful for you. I’d love to photograph a huge cactus one day. Going to message you now.
Scott Duffy says
What a great site mate. Full of brilliant information. I am really not into landscape photography but certainly appreciate it and some of your work is outstanding. Can i just ask if you were going to buy a filter or two what would be your first choice? I was thinking of adding a 6 stop and polariser to my kit bag for those days when i’m around the seafront.
Anton Gorlin says
thanks, Scott. The first two filters would be the polarizer and some strong ND filter. Like, ND10.
Viktor says
Hello! Very useful blog! I as a beginner photography read a lot of interesting information.
Anton Gorlin says
thanks, Viktor! Appreciate your comment.
Alex says
Thanks a lot for the turorial, Anton! Can you recommend a ND filter, that doesn’t produce color cast on film during long time exposures?
Anton Gorlin says
you are welcome, Alex. I’ve tried Hoya, Cokin, Zomei. Zomei filters are not good, strong colour cast. Cokin filters are average, they make a strong colour cast if you combine filters. Hoya (round) filters are good. The more expensive filters (Nisi or Lee) should be better but I haven’t tried them.