I spent the weekend working on the bathroom up in the studio (that little space above our garage) sprucing up the narrow bathroom. There was an old fashioned mirror hanging in there and I wasn’t crazy about it anymore, so I changed the mirror and repainted the walls.
I didn’t want to spend a ton of money and I remembered I had some leftover mosaic tile from our master shower project. That box of mosaic tile was collecting dust bunnies and daddy long leg spiders on a shelf for four years so I decided to use a few of the leftover sheets of it to create a mosaic tile framed mirror on the bathroom wall above the vanity.
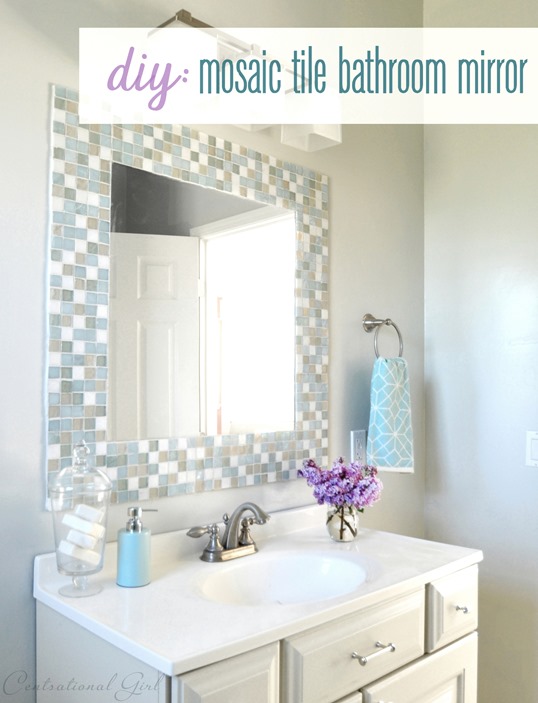
Years later, I still love this mosaic tile blend for its sand and sea palette and iridescent sparkle when it catches the sun in the daylight.

I combined a few sheets of this leftover mosaic tile and an inexpensive piece of cut mirror that I purchased at Lowes. It adds some decorative tile to a space that was lacking before. Creating your own DIY version of a mosaic tile framed bathroom mirror isn’t complicated – here is the step by step:
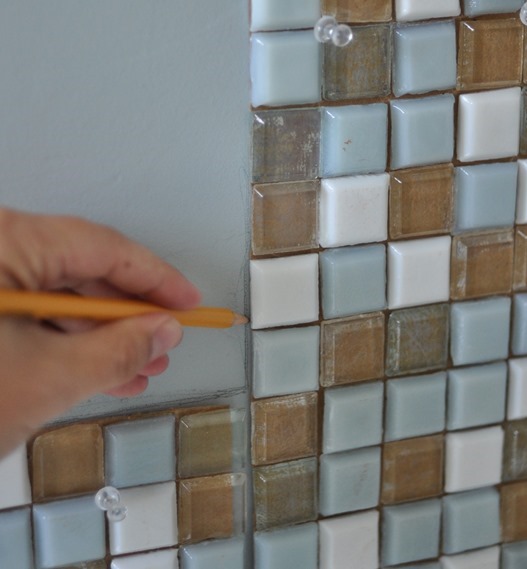
Before you have a mirror cut, figure out the size of your tile frame first. I trimmed the mosaic tile sheets in 5 piece strips and used push pins to hold it on the wall to form a template and then marked the outline of where the mirror would go with a pencil.
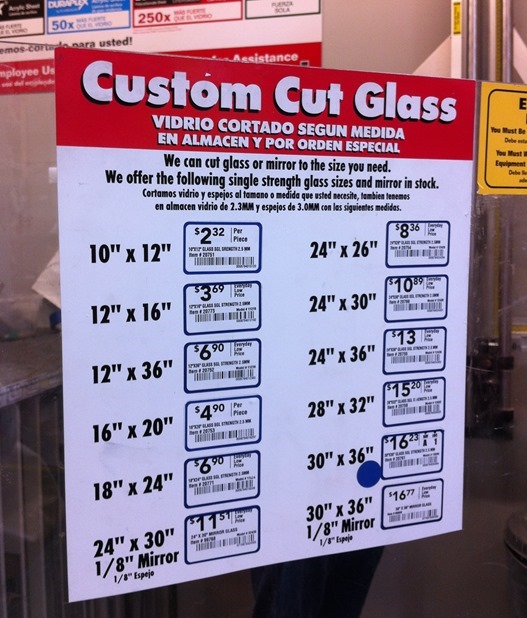
Once I knew the size of mirror I needed, I had the piece of mirror cut at Lowes at 24.5” x 23.5” for less than $12 – they will cut glass and mirror for you with what they have in stock.
To support the mirror, I secured some scrap wood leftover from last week’s planter project as a base, making sure it was level.

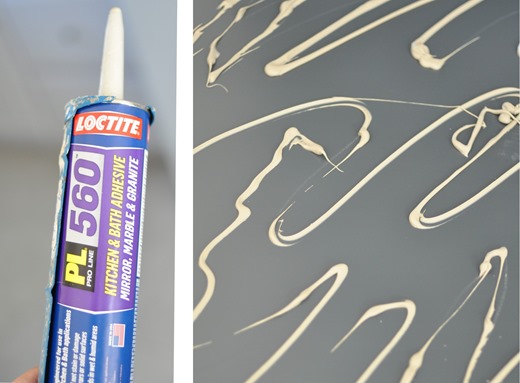
Construction adhesive designed for glass secured it to the wall, it was dry in a few hours. Note: this was a thin piece of 1/8” thick mirror and somewhat small so the adhesive alone was sufficient. If you’re doing this on a larger scale, it’s safer to use mirror clips secured to wall studs to support heavier and larger pieces of mirror.

24 hours later, I used a white thin-set mortar (leftover from this window box planter project) to secure the tile to the wall to form the frame. When you’re working with transparent glass tile make sure the mortar is applied smoothly instead of a rough trowel because it will show through the tile underneath (also check to ensure the mortar is the color you want it to be as well!) I used the same wood pieces to support the bottom sections of tile (spackle the holes later and touch up with paint).

This particular brand of tile is manufactured with the front covered by paper which is removed by soaking it with water and peeling it away after the mortar has dried.

For smaller projects I prefer putty knife instead of a grout float to apply the grout in between the sections of tile.
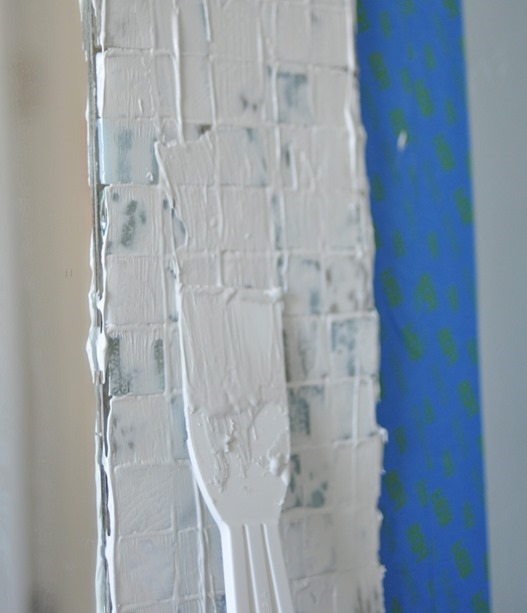
I chose Bright White for the grout, it has a partner caulk in the same color (both are available at Home Depot) which comes in handy at the end.

Use a grout sponge to wipe away any residue left on top of the tile.

You can frame the mirror with molding or trim, I just used a bead of caulk and a caulking tool to finish the edges, and then repainted for a clean edge.
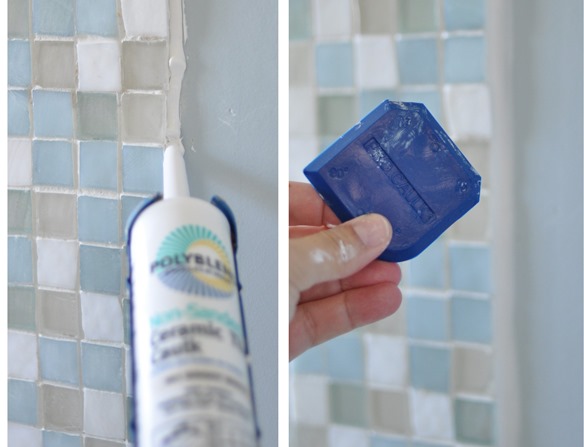
The new wall color is ‘Oyster Bay’ by Glidden, the same color I used in the Alma Project bathroom remodel and in the kids’ study space.
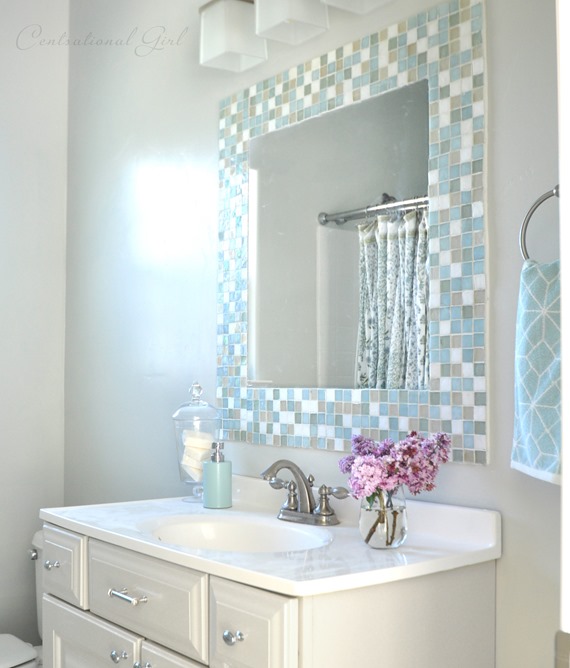
The tile is a custom mosaic blend from Oceanside Glass Tile that I purchased five years ago. I recall it’s a blend of of White, Clear, Oxygen, and Moonstone, in both iridescent and non-iridescent finishes.

I have more work to do, like making a window treatment and including some artwork on the freshly painted walls, but the new mosaic tile mirror is a great start! I’ll share more on the studio transformation in the weeks to come.
.

That’s beautiful. It looks so expensive!
I love this look, especially the iridescence of the glass tile. I have 3 large mirrors in our master bath, with the silvering coming off some edges. I’m wondering of the small tile can be applied directly to the mirror to create a frame, thereby achieving two goals…hiding the areas where the silvering has come off, and ? adding some interest to what is rather a plain room.
A while ago, we added trim to the plain white laminate cabinet doors, making them look paneled. That made a huge difference. A few years later, I hotglued some seaglass left over from party table decorations just inside the trim. It was way too much, and I removed it. This would achieve exactly the look I was trying for.
That is so pretty. The colors blend beautifully together and I really like the clean edge of the mirror too.
What a stunning use of leftover materials.
Absolutely gorgeous! Great job and thanks for sharing your tutorial!
Pretty as always! Saundra, another option if what I did. I adhered wood trim right to the window that had a flat portion to it. On that flat portion is where I adhered the mosaic tile. I took the easy route, thanx to a youtube video and just used double stick tape. I’ve had maybe three tiles pop off in two years, but you just stick them back on! :)
My apartment came with a huge mirror in the bathroom that ran the entire length of the vanity, toilet and part of the wall. I removed it and had a double doored mirrored medicine cabinet installed in its place. I’ve taken that mirror and placed it over the couch in the living room. It opened the living room up considerable but I just hate how boring it is. I would like to know if you have had any experience tiling mirror directly? I had it installed on a track instead of the ugly plastic clips so it has an edge that isn’t raw glass. I’ve toyed with the idea of using a colorful Duct Tape to give the edge a pop of color but I do so LOVE that tiled look much better! You bathroom mirror is gorgeous!!!
Thanks Pyrogirl. I haven’t tiled over glass, I’m not sure mortar will stick! You wouldn’t want it all to come crumbling down, but perhaps an internet search will lead to project where someone made it work. One other thought is to fashion some sort of wood frame that covers part of the mirror but is anchored to the wall, you could tile on top of that. There is also a company called MirrorMate which will customized a mirror frame for you in several different styles and finishes.
Kate
love it!
Pretty!
This looks much easier to do than I would have expected.
Lisa, thanks for the great idea! Before sticking them on the tape, did you cut the individual tiles off the netting and butt them so you wouldn’t have to grout or otherwise fill the spaces between them if they were left on the netting?
I was just getting back into my genealogy stuff, but that will have to be put aside (again!) for this project…I’m excited to get started!
Thanks for the mirror cutting tip! I didn’t know that Lowe’s would do that! Great post.
Great job!
Saundra – I immediately had the same question about sticking tile to the mirror and did a Google search and found this link http://ext.homedepot.com/community/blog/how-to-create-a-mirror-frame-with-tile/ and downloadable instructions are included. Thank you, Kate, for the inspiration! Kim
Thank you so much for sharing. It looks great.
Hi, thanks for sharing, I love it !!!!, There is a new brand called Water Wheel which have great ideas handmade. I’m starting my new mirror right now!
Beautiful!
Very, very pretty!
I love Oceanside Glass. I used tile from their outlet store to surround my fireplace and incorporate the nearby kitchen with little squares of that same tile in the kitchen backsplash. Their tile is exquisite! We also used it for decorative trim in our master bathroom.
love the color of these tiles and how well you have matched to the rest of the toilet. Fantastic worl!
Love the mirror – great job! Where is your bathroom light fixture from? Do you remember what the style/brand name is?
Hi Allison, that’s a Martha Stewart fixture from Home Depot. :)
It looks gorgeous-just like all of your projects! Thanks for the mirror info at Lowes, I had no idea that the custom cut mirrors!
Wow wow wow … what a fabulous job :)
GREAT job, looks so pretty! Love the colors you’ve chosen.
Blessings,
Cindy
That looks incredible, Kate! I had no idea you could purchase cut mirror at Lowe’s for such a reasonable price… cool!
I recently did a similar project using rectangular glass tiles. I mounted them directly on the mirror edge using loctite glue. I actually read and followed the instructions for the glue! Helpful! I pulled the tiles off the mesh backing and abutted them so I wouldn’t have to use grout. I ran 2 rows around the mirror staggering the second row. We love it, I’d recommend this as a very easy project
I just love the pallet you used in this bath – how serene! Would you mind telling us what the paint color is of your vanity cabinet? It looks like a wonderful soft gray in your pictures.
Hi Lorna, it’s actually an off white color, but I think the reflection of the wall color might be giving it a gray tone. I didn’t paint it, I special ordered it from Kemper five years ago to be narrow, it’s only 19″ deep.
Kate
What a beautiful, custom piece! Thanks for sharing the step-by-step. :)
Great demonstration and I love how it turned out. I saw this style with little mirror tiles all around. Very dramatic.
Beautiful! Just beautiful!
LOVE this. What a fun way to upgrade a mirror :)
Great piece!!! I’d love to try it on some sort of board so I can move it around. I’m fickle!
Is that a TRINA TURK hand towel, lurking in the background?
Ha, I wish Polly! That one is from Kohls :)
Oooh, I’ve been in love with mosaic tiles forEVAH, but I just haven’t had a project yet where I could use them. You’ve just given me motivation to go FIND a project so I can do me some tilin’ :) Great job!
Serena
Thrift Diving
So, on a scale from 1-10 how hard was this? This looks like so much fun and looks like something I can by myself!!! I need some spice in my bathroom! :0
Hi Tawny, if you’ve tiled before it’s easy peasy. If not, I’d give yourself more time, but it’s not a difficult project since there is no tile cutting involved. Just adhesive, mortar, and grout!
Kate
Did not know that Lowes cuts mirrors, so awesome to find that out! A glass pencil welt tile would be another option to finish off the edges of the tiles. But yours looks beautiful just the way it is too!
This is such an awesome project – you make it look so easy, and I think that’s the most inspiring thing about it – anyone can do it.
You motivated me. Beautiful work.
Is there nothing that you won’t try..you never cease to amaze me with your talents and determination to Do-it-Yourself! Now when do you want to come to my house and do some projects here or show me how? LOL! I wished you were for hire!
Next question, did you have to paint your vanity or was that a new vanity? Did you change out or replace the vanity fixtures? I just love the seaglass mirror. It is beautiful and gives the bath such a serene look.. I’ve been following you for several years and your blog never disappoints me. Keep up the good work!
Not a new vanity Betty, we ordered it years ago in white when we added that studio over our house, I think I got it from Kemper and used a Lowes or Home Depot standard sink top and faucet, it’s only 18″ deep which is nice in a narrow bathroom. Thanks so much for reading and the sweet compliments!
Kate