1. Before you begin
In this codelab, you'll learn how to integrate a simple Dialogflow Essentials (ES) text and voice bot into a Flutter app. Dialogflow ES is a development suite for building conversational UIs. Thus chatbots, voice bots, phone gateways. You can all build it with the same tool, and you can even support multiple channels in over 20 different languages. Dialogflow integrates with many popular conversation platforms like Google Assistant, Slack, and Facebook Messenger. If you want to build an agent for one of these platforms, you should use one of the many integrations options. However, to create a chatbot for mobile devices, you'll have to create a custom integration. You'll create intents by specifying training phrases to train an underlying machine learning model.
This lab is ordered to reflect a common cloud developer experience:
- Environment Setup
- Dialogflow: Create a new Dialogflow ES agent
- Dialogflow: Configure Dialogflow
- Google Cloud: Create a service account
- Flutter: Building a chat application
- Creating a Flutter project
- Configuring the settings and permissions
- Adding the dependencies
- Linking to the service account.
- Running the application on a virtual device or physical device
- Flutter: Building the chat interface with Speech to Text support
- Creating the chat interface
- Linking the chat interface
- Integrating the Dialogflow gRPC package into the app
- Dialogflow: Modeling the Dialogflow agent
- Configure the welcome & fallback intents
- Make use of an FAQ knowledge base
Prerequisite
- Basic Dart/Flutter experience
- Basic Google Cloud Platform experience
- Basic experience with Dialogflow ES
What you'll build
This codelab will show you how to build a mobile FAQ bot, which can answer most common questions about the tool Dialogflow. End-users can interact with the text interface or stream a voice via the built-in microphone of a mobile device to get answers. |
|
What you'll learn
- How to create a chatbot with Dialogflow Essentials
- How to integrate Dialogflow into a Flutter app with the Dialogflow gRPC package
- How to detect text intents with Dialogflow
- How to stream a voice via the microphone to Dialogflow
- How to make use of the knowledge base connector to import public FAQ
- Test the chatbot through the text and voice interface in a virtual or physical device
What you'll need
- You'll need a Google Identity / Gmail address to create a Dialogflow agent.
- You'll need access to Google Cloud Platform, in order to download a service account
- A Flutter dev environment
Set up your Flutter dev environment
- Select the operating system on which you are installing Flutter.
- macOS Users: https://flutter.dev/docs/get-started/install/macos
- Windows: https://flutter.dev/docs/get-started/install/windows
- Linux: https://flutter.dev/docs/get-started/install/linux
- ChromeOS: https://flutter.dev/docs/get-started/install/chromeos
- You can build apps with Flutter using any text editor combined with our command-line tools. However, this workshop will make use of Android Studio. The Flutter and Dart plugins for Android Studio provide you with code completion, syntax highlighting, widget editing assists, run & debug support, and more. Follow the steps on https://flutter.dev/docs/get-started/editor
2. Environment Setup
Dialogflow: Create a new Dialogflow ES agent
- Open
- In the left bar, right under the logo, select "Create New Agent" in the dropdown. (Note, don't click on the dropdown that says "Global", we will need a Dialogflow instance that's Global to make use of the FAQ knowledge base.)
- Specify an agent name
yourname-dialogflow(use your own name) - As the default language, choose English - en.
- As the default time zone, choose the time zone that's the closest to you.
- Do not select Mega Agent. (With this feature you can create an overarching agent, which can orchestrate between "sub" agents. We do not need this now.)
- Click Create.
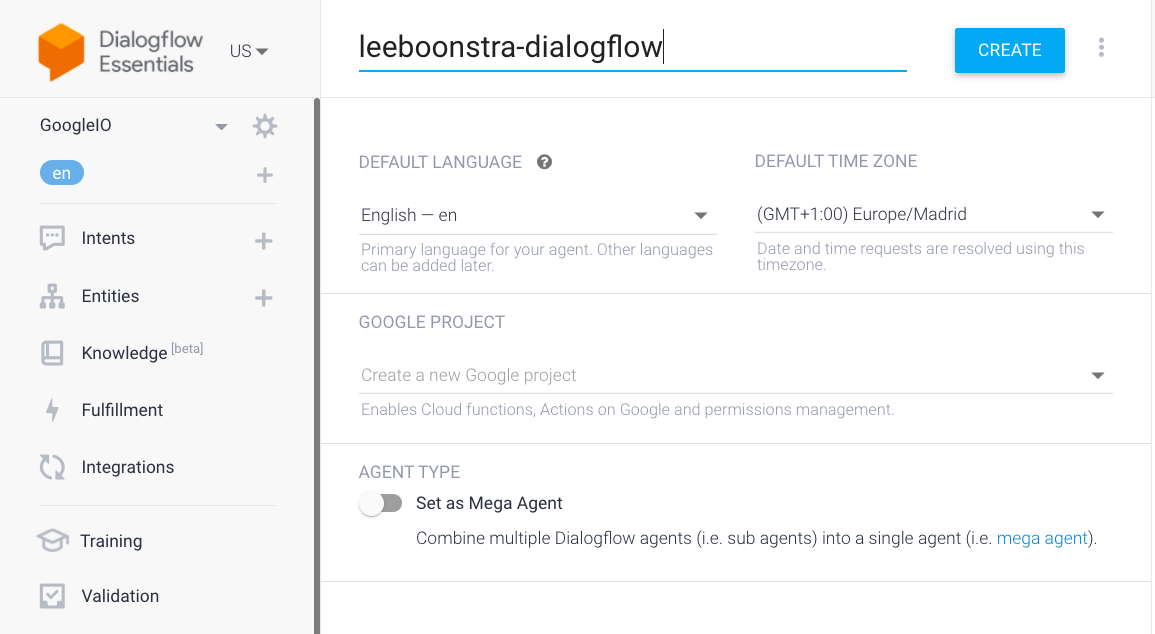
Configure Dialogflow
- Click on the gear icon, in the left menu, next to your project name.

- Enter the following agent description: Dialogflow FAQ Chatbot
- Enable the beta features, flip the switch.

- Click on the Speech tab, and make sure that the box Auto Speech Adaptation is active.
- Optionally, you could also flip the first switch, this will improve the Speech Model, but it's only available when you upgrade the Dialogflow trial.
- Click Save
Google Cloud: Get a service account
After creating an agent in Dialogflow, a Google Cloud project should be created in the Google Cloud console.
- Open the Google Cloud Console:
- Make sure you are logged in with the same Google account as on Dialogflow and select project:
yourname-dialogflowin the top blue bar. - Next, search for
Dialogflow APIin the top toolbar and click on the Dialogflow API result in the dropdown.

- Click the blue Manage button, and click on Credentials in the left menu bar. (When Dialogflow is not enabled yet, hit Enable first)
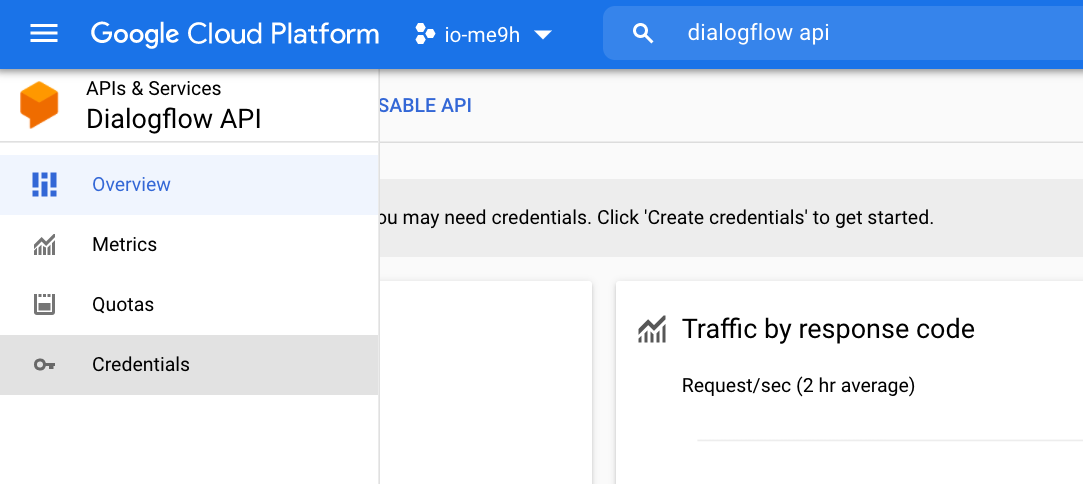
- Click on Create credentials (at the top of your screen) and choose Service account.
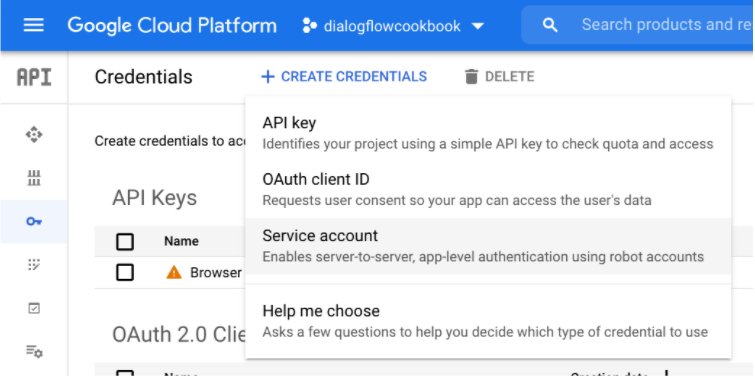
- Specify a service account name:
flutter_dialogflow, id and description, and hit Create.

- In step 2, you will need to select the role:
Dialogflow API Admin, click Continue, and Done. - Click on
flutter_dialogflowservice account, click the Keys tab and hit Add Key > Create new key

- Create a JSON key. Rename it to
credentials.jsonand store it somewhere on a secure location of your hard drive. We will use it later.

Perfect, all the tools we need are correctly set up. We can now start with integrating Dialogflow in our app!
3. Flutter: Building the Chat Application
Create the Boilerplate App
- Open Android Studio and select Start a new Flutter project.
- Select Flutter Application as the project type. Then click Next.
- Verify the Flutter SDK path specifies the SDK's location (select Install SDK... if the text field is blank).
- Enter a project name (for example,
flutter_dialogflow_agent). Then click Next. - Modify the package name and click Finish.

This will create a sample application with Material Components.
Wait for Android Studio to install the SDK and create the project.
Settings & Permissions
- The audio recorder library sound_stream that we will use, requires a minSdk of at least 21. So let's change this in android/app/build.gradle in the defaultConfig block. (Note, there are 2 build.gradle files in the android folder, but the one in the app folder is the right one.)
defaultConfig {
   applicationId "com.myname.flutter_dialogflow_agent"
   minSdkVersion 21
   targetSdkVersion 30
   versionCode flutterVersionCode.toInteger()
   versionName flutterVersionName
}
- To give permissions to the microphone and also to let the app reach out to the Dialogflow agent which runs in the cloud, we will have to add the INTERNET and RECORD_AUDIO permissions to the app/src/main/AndroidManifest.xml file. There are multiple AndroidManifest.xml files in your Flutter project, but you will need the one in the main folder. You can add the lines right inside the manifest tags.
<uses-permission android:name="android.permission.INTERNET"/>
<uses-permission android:name="android.permission.RECORD_AUDIO" />
Adding the dependencies
We will make use of the sound_stream, rxdart and dialogflow_grpc packages.
- Add the
sound_streamdependency
$ flutter pub add sound_stream
Resolving dependencies...
  async 2.8.1 (2.8.2 available)
  characters 1.1.0 (1.2.0 available)
  matcher 0.12.10 (0.12.11 available)
+ sound_stream 0.3.0
  test_api 0.4.2 (0.4.5 available)
  vector_math 2.1.0 (2.1.1 available)
Downloading sound_stream 0.3.0...
Changed 1 dependency!
- Add the
dialogflow_grpcdependency
flutter pub add dialogflow_grpc
Resolving dependencies...
+ archive 3.1.5
  async 2.8.1 (2.8.2 available)
  characters 1.1.0 (1.2.0 available)
+ crypto 3.0.1
+ dialogflow_grpc 0.2.9
+ fixnum 1.0.0
+ googleapis_auth 1.1.0
+ grpc 3.0.2
+ http 0.13.4
+ http2 2.0.0
+ http_parser 4.0.0
  matcher 0.12.10 (0.12.11 available)
+ protobuf 2.0.0
  test_api 0.4.2 (0.4.5 available)
+ uuid 3.0.4
  vector_math 2.1.0 (2.1.1 available)
Downloading dialogflow_grpc 0.2.9...
Downloading grpc 3.0.2...
Downloading http 0.13.4...
Downloading archive 3.1.5...
Changed 11 dependencies!
- Add the
rxdartdependency
$ flutter pub add rxdart
Resolving dependencies...
  async 2.8.1 (2.8.2 available)
  characters 1.1.0 (1.2.0 available)
  matcher 0.12.10 (0.12.11 available)
+ rxdart 0.27.2
  test_api 0.4.2 (0.4.5 available)
  vector_math 2.1.0 (2.1.1 available)
Downloading rxdart 0.27.2...
Changed 1 dependency!
Loading the service account and Google Cloud project information
- In your project create a directory and name it:
assets. - Move the credentials.json file which you downloaded from Google Cloud console into the assets folder.
- Open pubspec.yaml and add the service account to the flutter block.
flutter:
  uses-material-design: true
  assets:
    - assets/credentials.json
Running the application on a physical device
When you have an Android device, you can plug in your phone via a USB cable and debug on the device. Follow these steps, to set this up via the Developer Options screen on your Android device.
Running the application on a virtual device
In case you want to run the application on a virtual device, use the following steps:
- Click Tools> AVD Manager. (Or select the AVD Manager from the top toolbar, in the below figure it's pink highlighted)

- We will create a target Android virtual device, so we can test our application without a physical device. For details, see Managing AVDs. Once you have selected a new virtual device, you can double click it, to start it.
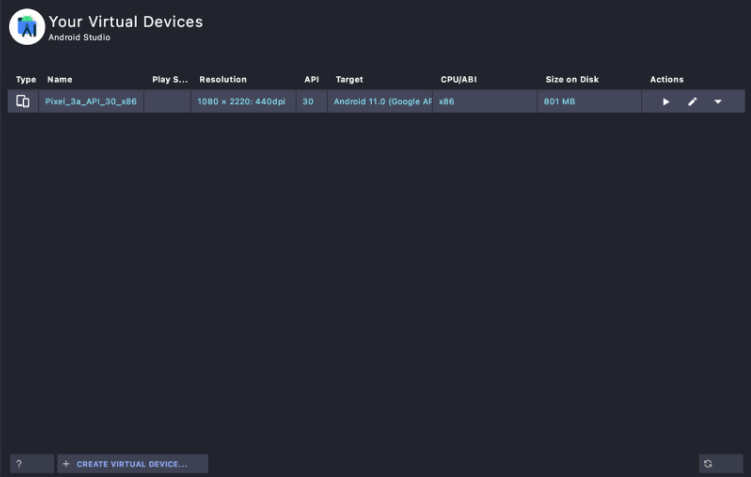

- In the main Android Studio toolbar, select an Android device as target, via the dropdown and make sure main.dart is selected. Then press the Run button (green triangle).
At the bottom of the IDE, you will see the logs in the console. You will notice that it's installing Android and your starter Flutter app. This will take a minute, once the virtual device is ready, making changes will be super fast. When you are all done, it will open the starter Flutter app.
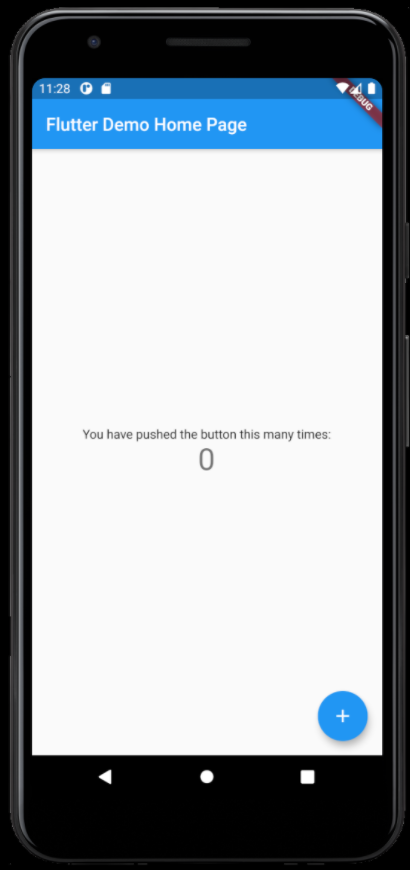
- Let's enable the microphone for our chatbot app. Click the options button of the virtual device, to open the options. In the Microphone tab, enable all the 3 switches.

- Let's try out Hot Reload, to demonstrate how fast changes can be made.
In, lib/main.dart, change the MyHomePage title in the MyApp class to: Flutter Dialogflow Agent. And change the primarySwatch to Colors.orange.

Save the file, or click the bolt icon in the Android Studio Toolbar. You should see the change directly made in the virtual device.
4. Flutter: Building the Chat interface with STT support
Creating the chat interface
- Create a new Flutter widget file in the lib folder. (right-click lib folder, New > Flutter Widget > Stateful widget), call this file:
chat.dart
Paste the following code into this file. This dart file creates the chat interface. Dialogflow won't work yet, it's just the layout of all the components, and the integration of the microphone component to allow streams. The comments in the file, will point out, where we later will integrate Dialogflow.
// Copyright 2021 Google LLC
//
// Licensed under the Apache License, Version 2.0 (the "License");
// you may not use this file except in compliance with the License.
// You may obtain a copy of the License at
//
// http://www.apache.org/licenses/LICENSE-2.0
//
// Unless required by applicable law or agreed to in writing, software
// distributed under the License is distributed on an "AS IS" BASIS,
// WITHOUT WARRANTIES OR CONDITIONS OF ANY KIND, either express or implied.
// See the License for the specific language governing permissions and
// limitations under the License.

import 'dart:async';
import 'package:flutter/material.dart';
import 'package:flutter/services.dart';
import 'package:rxdart/rxdart.dart';
import 'package:sound_stream/sound_stream.dart';

// TODO import Dialogflow


class Chat extends StatefulWidget {
  Chat({Key key}) : super(key: key);

  @override
  _ChatState createState() => _ChatState();
}

class _ChatState extends State<Chat> {
  final List<ChatMessage> _messages = <ChatMessage>[];
  final TextEditingController _textController = TextEditingController();

  bool _isRecording = false;

  RecorderStream _recorder = RecorderStream();
  StreamSubscription _recorderStatus;
  StreamSubscription<List<int>> _audioStreamSubscription;
  BehaviorSubject<List<int>> _audioStream;

  // TODO DialogflowGrpc class instance

  @override
  void initState() {
    super.initState();
    initPlugin();
  }

  @override
  void dispose() {
    _recorderStatus?.cancel();
    _audioStreamSubscription?.cancel();
    super.dispose();
  }

  // Platform messages are asynchronous, so we initialize in an async method.
  Future<void> initPlugin() async {
    _recorderStatus = _recorder.status.listen((status) {
      if (mounted)
        setState(() {
          _isRecording = status == SoundStreamStatus.Playing;
        });
    });

    await Future.wait([
      _recorder.initialize()
    ]);


    // TODO Get a Service account

  }

  void stopStream() async {
    await _recorder.stop();
    await _audioStreamSubscription?.cancel();
    await _audioStream?.close();
  }

  void handleSubmitted(text) async {
    print(text);
    _textController.clear();

    //TODO Dialogflow Code

  }

  void handleStream() async {
    _recorder.start();

    _audioStream = BehaviorSubject<List<int>>();
    _audioStreamSubscription = _recorder.audioStream.listen((data) {
      print(data);
      _audioStream.add(data);
    });


    // TODO Create SpeechContexts
    // Create an audio InputConfig

    // TODO Make the streamingDetectIntent call, with the InputConfig and the audioStream
    // TODO Get the transcript and detectedIntent and show on screen

  }

  // The chat interface
  //
  //------------------------------------------------------------------------------------
  @override
  Widget build(BuildContext context) {
    return Column(children: <Widget>[
      Flexible(
          child: ListView.builder(
            padding: EdgeInsets.all(8.0),
            reverse: true,
            itemBuilder: (_, int index) => _messages[index],
            itemCount: _messages.length,
          )),
      Divider(height: 1.0),
      Container(
          decoration: BoxDecoration(color: Theme.of(context).cardColor),
          child: IconTheme(
            data: IconThemeData(color: Theme.of(context).accentColor),
            child: Container(
              margin: const EdgeInsets.symmetric(horizontal: 8.0),
              child: Row(
                children: <Widget>[
                  Flexible(
                    child: TextField(
                      controller: _textController,
                      onSubmitted: handleSubmitted,
                      decoration: InputDecoration.collapsed(hintText: "Send a message"),
                    ),
                  ),
                  Container(
                    margin: EdgeInsets.symmetric(horizontal: 4.0),
                    child: IconButton(
                      icon: Icon(Icons.send),
                      onPressed: () => handleSubmitted(_textController.text),
                    ),
                  ),
                  IconButton(
                    iconSize: 30.0,
                    icon: Icon(_isRecording ? Icons.mic_off : Icons.mic),
                    onPressed: _isRecording ? stopStream : handleStream,
                  ),
                ],
              ),
            ),
          )
      ),
    ]);
  }
}


//------------------------------------------------------------------------------------
// The chat message balloon
//
//------------------------------------------------------------------------------------
class ChatMessage extends StatelessWidget {
  ChatMessage({this.text, this.name, this.type});

  final String text;
  final String name;
  final bool type;

  List<Widget> otherMessage(context) {
    return <Widget>[
      new Container(
        margin: const EdgeInsets.only(right: 16.0),
        child: CircleAvatar(child: new Text('B')),
      ),
      new Expanded(
        child: Column(
          crossAxisAlignment: CrossAxisAlignment.start,
          children: <Widget>[
            Text(this.name,
                style: TextStyle(fontWeight: FontWeight.bold)),
            Container(
              margin: const EdgeInsets.only(top: 5.0),
              child: Text(text),
            ),
          ],
        ),
      ),
    ];
  }

  List<Widget> myMessage(context) {
    return <Widget>[
      Expanded(
        child: Column(
          crossAxisAlignment: CrossAxisAlignment.end,
          children: <Widget>[
            Text(this.name, style: Theme.of(context).textTheme.subtitle1),
            Container(
              margin: const EdgeInsets.only(top: 5.0),
              child: Text(text),
            ),
          ],
        ),
      ),
      Container(
        margin: const EdgeInsets.only(left: 16.0),
        child: CircleAvatar(
            child: Text(
              this.name[0],
              style: TextStyle(fontWeight: FontWeight.bold),
            )),
      ),
    ];
  }

  @override
  Widget build(BuildContext context) {
    return Container(
      margin: const EdgeInsets.symmetric(vertical: 10.0),
      child: Row(
        crossAxisAlignment: CrossAxisAlignment.start,
        children: this.type ? myMessage(context) : otherMessage(context),
      ),
    );
  }
}
Search in the chat.dart file for Widget build This builds the chatbot interface, which contains:
- ListView which contains all the chat balloons from the user and the chatbot. It makes use of the ChatMessage class, which creates chat messages with an avatar and text.
- TextField for entering text queries
- IconButton with the send icon, for sending text queries to Dialogflow
- IconButton with a microphone for sending audio streams to Dialogflow, which changes the state once it's pressed.
Linking the chat interface
- Open main.dart and change the
Widget build, so it only instantiates theChat()interface. All the other demo codes can be removed.
import 'package:flutter/material.dart';
import 'chat.dart';

void main() {
  runApp(MyApp());
}

class MyApp extends StatelessWidget {
  // This widget is the root of your application.
  @override
  Widget build(BuildContext context) {
    return MaterialApp(
      title: 'Flutter Demo',
      theme: ThemeData(
        // This is the theme of your application.
        //
        // Try running your application with "flutter run". You'll see the
        // application has a blue toolbar. Then, without quitting the app, try
        // changing the primarySwatch below to Colors.green and then invoke
        // "hot reload" (press "r" in the console where you ran "flutter run",
        // or simply save your changes to "hot reload" in a Flutter IDE).
        // Notice that the counter didn't reset back to zero; the application
        // is not restarted.
        primarySwatch: Colors.orange,
      ),
      home: MyHomePage(title: 'Flutter Dialogflow Agent'),
    );
  }
}

class MyHomePage extends StatefulWidget {
  MyHomePage({Key key, this.title}) : super(key: key);

  // This widget is the home page of your application. It is stateful, meaning
  // that it has a State object (defined below) that contains fields that affect
  // how it looks.

  // This class is the configuration for the state. It holds the values (in this
  // case the title) provided by the parent (in this case the App widget) and
  // used by the build method of the State. Fields in a Widget subclass are
  // always marked "final".

  final String title;

  @override
  _MyHomePageState createState() => _MyHomePageState();
}

class _MyHomePageState extends State<MyHomePage> {
  @override
  Widget build(BuildContext context) {
    // This method is rerun every time setState is called, for instance as done
    // by the _incrementCounter method above.
    //
    // The Flutter framework has been optimized to make rerunning build methods
    // fast, so that you can just rebuild anything that needs updating rather
    // than having to individually change instances of widgets.
    return Scaffold(
      appBar: AppBar(
        // Here we take the value from the MyHomePage object that was created by
        // the App.build method, and use it to set our appbar title.
        title: Text(widget.title),
      ),
      body: Center(
        // Center is a layout widget. It takes a single child and positions it
        // in the middle of the parent.
        child: Chat())
    );
  }
}
- Run the application. (If the app was started before. Stop the virtual device, and re-run main.dart). When you run your app with the chat interface for the first time. You will get a permission pop-up, asking if you want to allow the microphone. Click: While using the app.
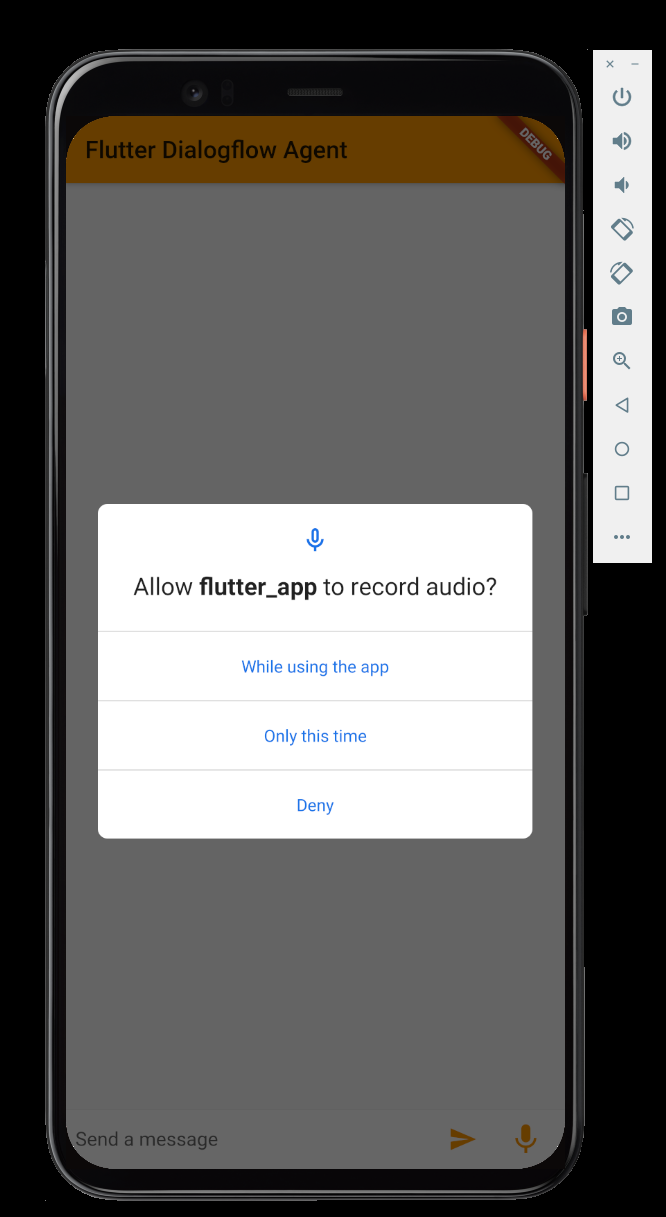
- Play with the text area and buttons. When you type a text query and hit enter, or tap the send button, you will see the text query logged in the Run tab of Android Studio. When you tap the microphone button and stop it, you will see the audio stream logged in the Run tab.

Great, we are now ready to integrate the application with Dialogflow!
Integrating Your Flutter App With Dialogflow_gRPC
- Open chat.dart and add the following imports:
import 'package:dialogflow_grpc/dialogflow_grpc.dart';
import 'package:dialogflow_grpc/generated/google/cloud/dialogflow/v2beta1/session.pb.dart';
- In the top of the file, right under the
// TODO DialogflowGrpcV2Beta1 class instanceadd the following line, to hold the Dialogflow class instance:
DialogflowGrpcV2Beta1 dialogflow;
- Search for the initPlugin() method, and add the following code, right under the TODO comment:
    // Get a Service account
    final serviceAccount = ServiceAccount.fromString(
        '${(await rootBundle.loadString('assets/credentials.json'))}');
    // Create a DialogflowGrpc Instance
    dialogflow = DialogflowGrpcV2Beta1.viaServiceAccount(serviceAccount);
This will create a Dialogflow instance authorized to your Google Cloud project with the service account. (Make sure that you have the credentials.json in the assets folder!)
Again, for demo purposes on how to work with Dialogflow gRPC this is ok, but for production apps, you do not want to store the credentials.json file in the assets folder, as this is not considered secure.
Making a detectIntent call
- Now find the
handleSubmitted()method, here's where the magic comes in. Right under the TODO comment, add the following code.This code will add the user's typed message to the ListView:
ChatMessage message = ChatMessage(
 text: text,
 name: "You",
 type: true,
);

setState(() {
 _messages.insert(0, message);
});
- Now, right underneath the previous code, we will make the detectIntent call, we pass in the text from the input, and a languageCode. - The result (within
data.queryResult.fulfillment) will be printed in the ListView:
DetectIntentResponse data = await dialogflow.detectIntent(text, 'en-US');
String fulfillmentText = data.queryResult.fulfillmentText;
if(fulfillmentText.isNotEmpty) {
  ChatMessage botMessage = ChatMessage(
    text: fulfillmentText,
    name: "Bot",
    type: false,
  );

  setState(() {
    _messages.insert(0, botMessage);
  });
}
- Start the virtual device, and test the detect intent call. Type:
hi. It should greet you with the default welcome message. When you type something else, it will return the default fallback to you.
Making a streamingDetectIntent call
- Now find the
handleStream()method, here's where the magic comes in for audio streaming. First right under the first TODO, create an audio InputConfigV2beta1 with a biasList to bias the voice model. Since we are making use of a phone (virtual device), the sampleHertz will be 16000 and the encoding will be Linear 16. It does depend on your machine hardware / microphone you are using. For my internal Macbook mic, 16000 was good. (See the info of the https://pub.dev/packages/sound_stream package)
var biasList = SpeechContextV2Beta1(
    phrases: [
      'Dialogflow CX',
      'Dialogflow Essentials',
      'Action Builder',
      'HIPAA'
    ],
    boost: 20.0
);

    // See: https://cloud.google.com/dialogflow/es/docs/reference/rpc/google.cloud.dialogflow.v2#google.cloud.dialogflow.v2.InputAudioConfig
var config = InputConfigV2beta1(
    encoding: 'AUDIO_ENCODING_LINEAR_16',
    languageCode: 'en-US',
    sampleRateHertz: 16000,
    singleUtterance: false,
    speechContexts: [biasList]
);
- Next, we will call the
streamingDetectIntentmethod on thedialogflowobject, which holds our Dialogflow session:
final responseStream = dialogflow.streamingDetectIntent(config, _audioStream);
- With the responseStream, we can finally listen to the incoming transcript, the detected user query, and the detected matched intent response. We will print this in a
ChatMessageon the screen:
// Get the transcript and detectedIntent and show on screen
responseStream.listen((data) {
  //print('----');
  setState(() {
    //print(data);
    String transcript = data.recognitionResult.transcript;
    String queryText = data.queryResult.queryText;
    String fulfillmentText = data.queryResult.fulfillmentText;

    if(fulfillmentText.isNotEmpty) {

      ChatMessage message = new ChatMessage(
        text: queryText,
        name: "You",
        type: true,
      );

      ChatMessage botMessage = new ChatMessage(
        text: fulfillmentText,
        name: "Bot",
        type: false,
      );

      _messages.insert(0, message);
      _textController.clear();
      _messages.insert(0, botMessage);

    }
    if(transcript.isNotEmpty) {
      _textController.text = transcript;
    }

  });
},onError: (e){
  //print(e);
},onDone: () {
  //print('done');
});
That's it, start your application, and test it on the virtual device, press the microphone button, and Say: "Hello".
This will trigger the Dialogflow default welcome intent. The results will be printed on the screen. Now that Flutter works great with the Dialogflow integration, we can start working on our chatbot conversation.
5. Dialogflow: Modeling the Dialogflow agent
Dialogflow Essentials is a development suite for building conversational UIs. Thus chatbots, voice bots, phone gateways. You can all build it with the same tool, and you can even support multiple channels in over 20 different languages. Dialogflow UX designers (agent modelers, linguists) or developers create intents by specifying training phrases to train an underlying machine learning model.
An intent categorizes a user's intention. For each Dialogflow ES agent, you can define many intents, where your combined intents can handle a complete conversation. Each intent can contain parameters and responses.
Matching an intent is also known as intent classification or intent matching. This is the main concept in Dialogflow ES. Once an intent is matched it can return a response, gather parameters (entity extraction) or trigger webhook code (fulfillment), for example, to fetch data from a database.
When an end-user writes or says something in a chatbot, referred to as a user expression or utterance, Dialogflow ES matches the expression to your Dialogflow agent's best intent, based on the training phrases. The under the hood Dialogflow ES Machine Learning model was trained on those training phrases.
Dialogflow ES works with a concept called context. Just like a human, Dialogflow ES can remember the context in a 2nd and 3rd turn-taking turn. This is how it can keep track of previous user utterances.
Here's more information on Dialogflow Intents.
Modifying the Default Welcome Intent
When you create a new Dialogflow agent, two default intents will be created automatically. The Default Welcome Intent, is the first flow you get to when you start a conversation with the agent. The Default Fallback Intent, is the flow you'll get once the agent can't understand you or can not match an intent with what you just said.
Here's the welcome message for the Default Welcome Intent:
User | Agent |
Hey there | "Hi, I am the Dialogflow FAQ bot, I can answer questions on Dialogflow." |
- Click Intents > Default Welcome Intent
- Scroll down to Responses.
- Clear all Text Responses.
- In the default tab, create the following 2 responses:
- Hi, I am the Dialogflow FAQ bot, I can answer questions on Dialogflow. What would you like to know?
- Howdy, I am the Dialogflow FAQ bot, do you have questions about Dialogflow? How can I help?
The configuration should be similar to this screenshot.

- Click Save
- Let's test this intent. First, we can test it in the Dialogflow Simulator.Type: Hello. It should return one of these messages:
- Hi, I am the Dialogflow FAQ bot, I can answer questions on Dialogflow. What would you like to know?
- Howdy, I am the Dialogflow FAQ bot, do you have questions about Dialogflow? How can I help?
Modifying the Default Fallback Intent
- Click Intents > Default Fallback Intent
- Scroll down to Responses.
- Clear all Text Responses.
- In the default tab, create the following response:
- Unfortunately I don't know the answer to this question. Have you checked our website? http://www.dialogflow.com?
- Click Save
Connecting to an online Knowledge Base
Knowledge connectors complement defined intents. They parse knowledge documents to find automated responses. (for example, FAQs or articles from CSV files, online websites,or even PDF files!) To configure them, you define one or more knowledge bases, which are collections of knowledge documents.
Read more about Knowledge Connectors.
Let's try this out.
- Select Knowledge (beta) in the menu.

- Click the right blue button: Create Knowledge Base
- Type as a Knowledge Base name; Dialogflow FAQ and hit save.
- Click Create the first one link

- This will open a window.
Use the following config:
Document Name: DialogflowFAQ Knowledge Type: FAQ Mime Type: text/html
- The URL where we load the data from is:
https://www.leeboonstra.dev/faqs/
- Click Create
A knowledge base has been created:

- Scroll down to the Responses section and click Add Response
Create the following answers and hit save.
$Knowledge.Answer[1]
- Click View Detail

- Select Enable Automatic Reload to automatically fetch changes when the FAQ webpage gets updated, and hit save.
This will display all the FAQs you have implemented in Dialogflow.That's easy!
Know that you could also point to an online HTML website with FAQs to import FAQs to your agent. It's even possible to upload a PDF with a block of text, and Dialogflow will come up with questions itself.
Now FAQs should be seen as ‘extras' to add to your agents, next to your intent flows. Knowledge Base FAQs can't train the model. So asking questions in a completely different way, might not get a match because it makes no use of Natural Language Understanding (Machine Learning models). This is why sometimes it's worth converting your FAQs to intents.
- Test the questions in the simulator on the right.
- When it all works, go back to your Flutter app, and test your chat and voice bot with this new content! Ask the questions that you loaded into Dialogflow.

6. Congratulations
Congratulations, you've successfully created your first Flutter app with a Dialogflow chatbot integration, well done!
What we've covered
- How to create a chatbot with Dialogflow Essentials
- How to integrate Dialogflow into a Flutter app
- How to detect text intents with Dialogflow
- How to stream a voice via the microphone to Dialogflow
- How to make use of the knowledge base connector
What's next?
Enjoyed this code lab? Have a look into these great Dialogflow labs!
- Integrating Dialogflow with Google Assistant
- Integrating Dialogflow with Google Chat
- Build Actions for the Google Assistant with Dialogflow (level 1)
- Understanding fulfillment by integrating Dialogflow with Google Calendar +. Build your First Flutter App
Interested in how I've built the Dialogflow gRPC package for Dart/Flutter?
- Check out my blog article The Hidden Manual for working with the Google Cloud gRPC APIs
