This step by step woodworking project is about how to build a patio cover – free diy plans. I had a lot of fun designing this covered patio structure, because if you are like me you appreciate some shade during the hot summer days. This structure is heavy duty and it features a roof with a 5 degree slope, but please follow the building codes and hire a professional contractor if you don’t have the right skills to undertake the project on your own.
We recommend you to invest in the best materials you could afford. Therefore, you should buy weather-resistant lumber, such as pressure-treated lumber, cedar or redwood. If you use regular pine, I recommend you to apply the appropriate products to enhance its durability. Always take accurate measurements before adjusting the size of the components at the proper size. Drill pilot holes trough the components before inserting the wood screws, to prevent the wood from splitting. See all my Premium Plans HERE.
Made from this plan
Patio Cover – Free DIY Plans
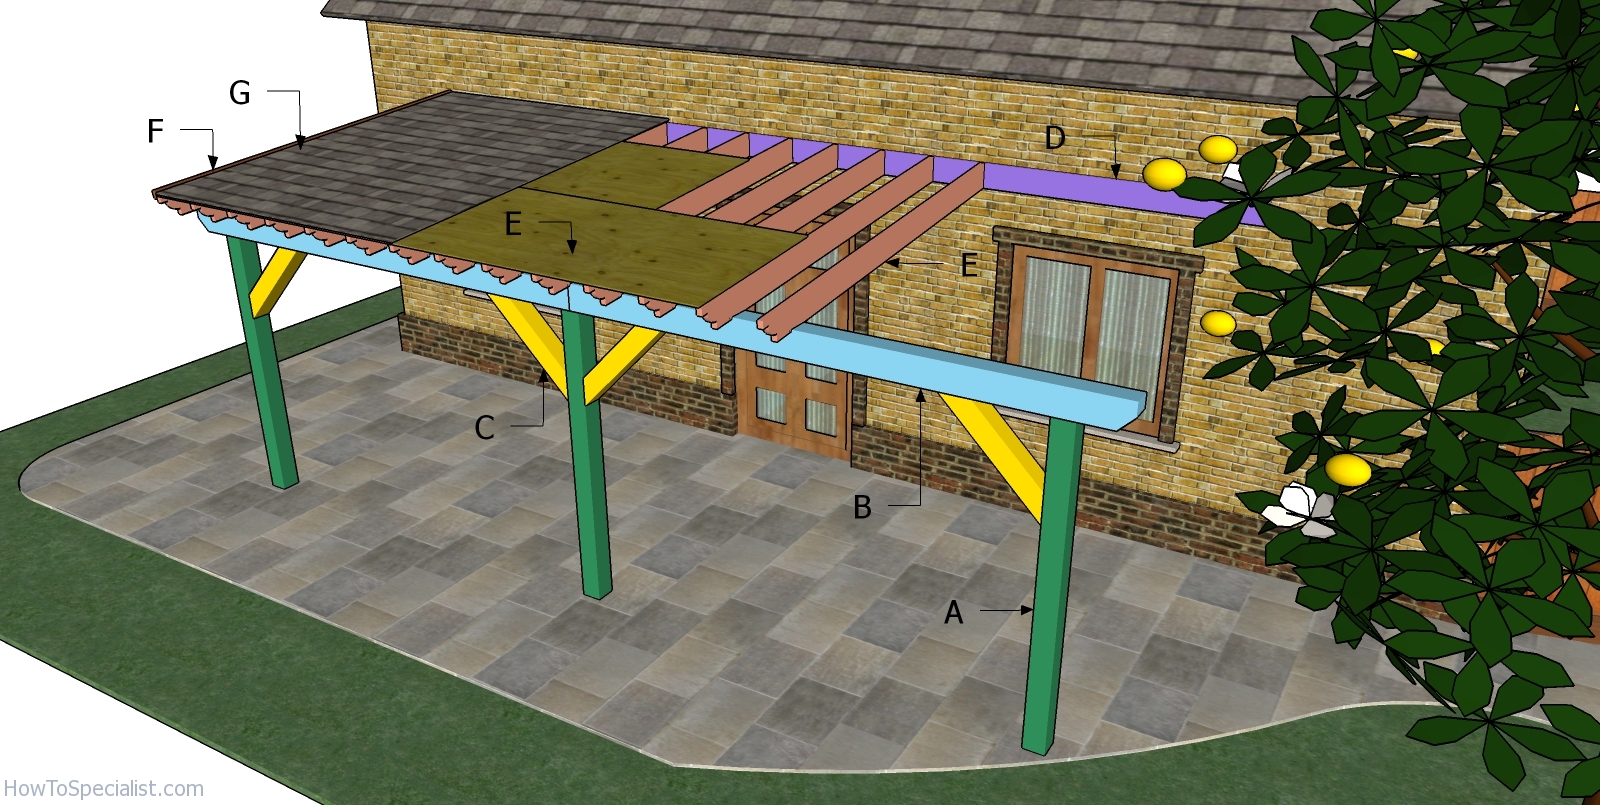
Building a patio pergola
Materials
- A – 3 pieces of 6×6 lumber – 84″ long POSTS
- B – 2 pieces of 6×8 lumber – 144″ long TOP BEAMS
- C – 4 pieces of 6×6 lumber – 36″ long BRACES
- D – 2 pieces of 2×8 lumber – 144″ long LEDGER BOARDS
- E – 19 pieces of 2×8 lumber – 120″ long RAFTERS
- E – 5 pieces of 1/2″ plywood – 4’x8′ long, 2 pieces – 4’x4′ long, 3 pieces – 2’x8′ long ROOF
- F – 300 sq ft of tar paper, 300 sq ft of asphalt shingles ROOFING
- F – 2 pieces of 1×2 lumber – 121 1/2″ long TRIMS
- 3 pieces of 6×6 lumber – 8 ft
- 3 pieces of 6×8 lumber – 12 ft
- 2 pieces of 2×8 lumber – 12 ft
- 19 pieces of 2×8 lumber – 10 ft
- 8 pieces of 1/2″ plywood – 4’x8′
- 300 sq ft of tar paper, 300 sq ft of asphalt shingles
- 2 pieces of 1×2 lumber – 12 ft
- 1 5/8″ screws
- 5″ lag screws
- concrete form tube
- 4 post anchors
- 20 pieces of 5″ screws
- post to beam connector
- rafter ties
- rafter hangers
- Screws for Strong ties
- wood glue, stain/paint
Tools
- Safety gloves, glasses
- Miter saw, jigsaw
- Chalk line, tape measure, spirit level, carpentry pencil
- Drill machinery and drill bits
Time
- One Week
How to build a patio cover
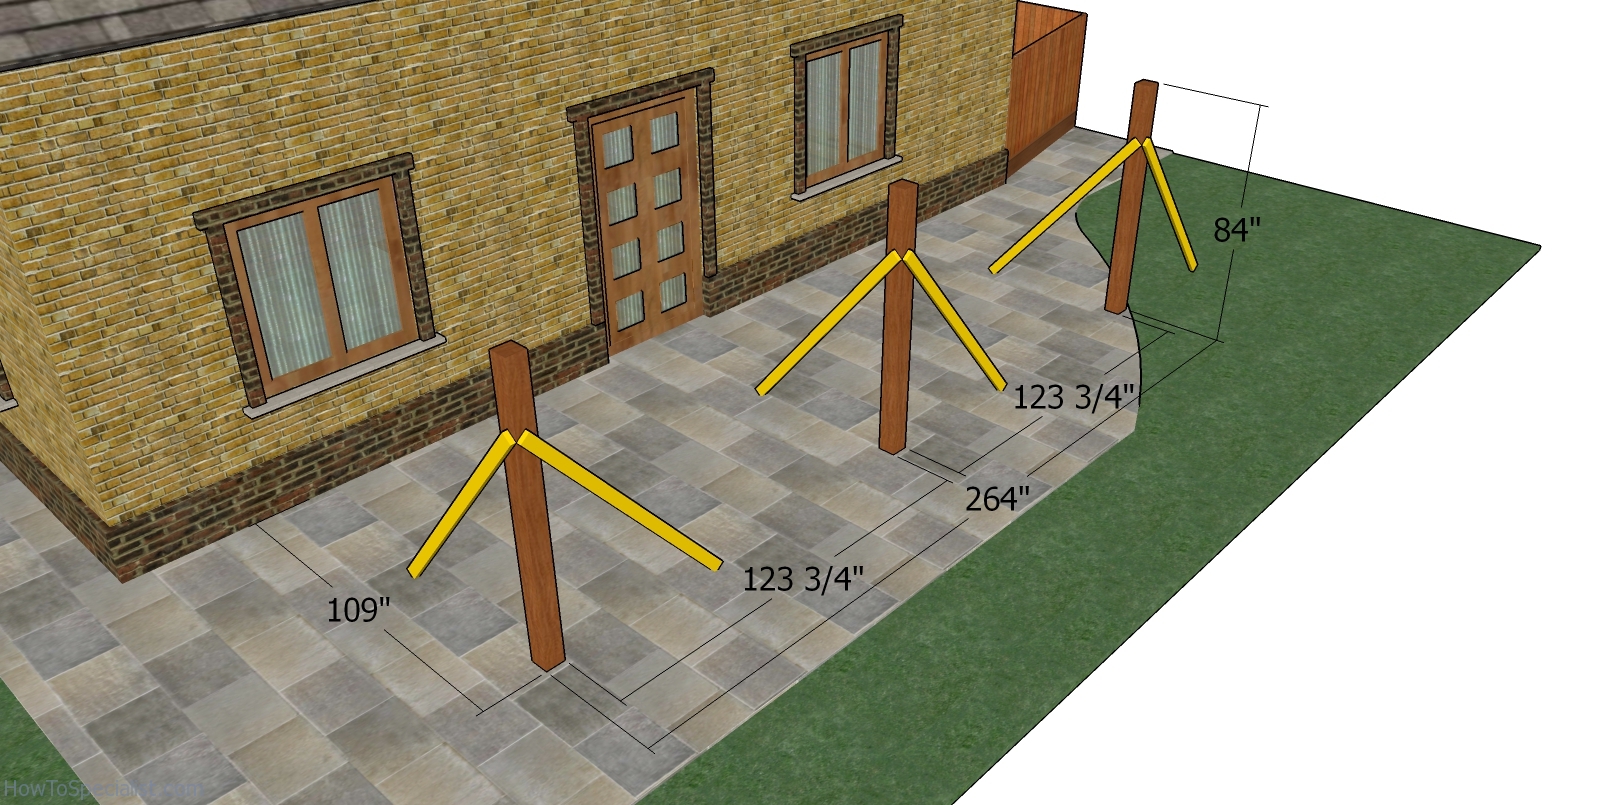
Laying out the posts – patio pergola
The first step of the project is to layout the patio cover posts. Therefore, select the location and level the surface with attention. Make sure you remove the vegetation layer and even out the surface. Use batter boards and string to layout the location of the legs. Apply the 3′-4′-5′ rule to each corners, so you make sure they are square. Measure the diagonals and make adjustments so they are equal.
You should know this patio cover plan is just an example so you can understand the techniques required for the job. However, you can adjust the size of the structure to suit your needs. You can change the height of the posts, the angle of the roof and size of the footprint.
Setting the posts
After marking the location of the posts, you need to dig 3′ deep holes in the ground, using a post hole digger. Install tube forms and fit the posts into place, making sure they are perfectly plumb. Fill the forms with concrete and install the anchors. Use string and batter boards to align the anchors.
Please read the local codes so you determine the RIGHT depth for the footings. In addition, in some areas you might need to set the posts to concrete. That is why it’s essential to read the local codes, because the front line depth differs according to your location.
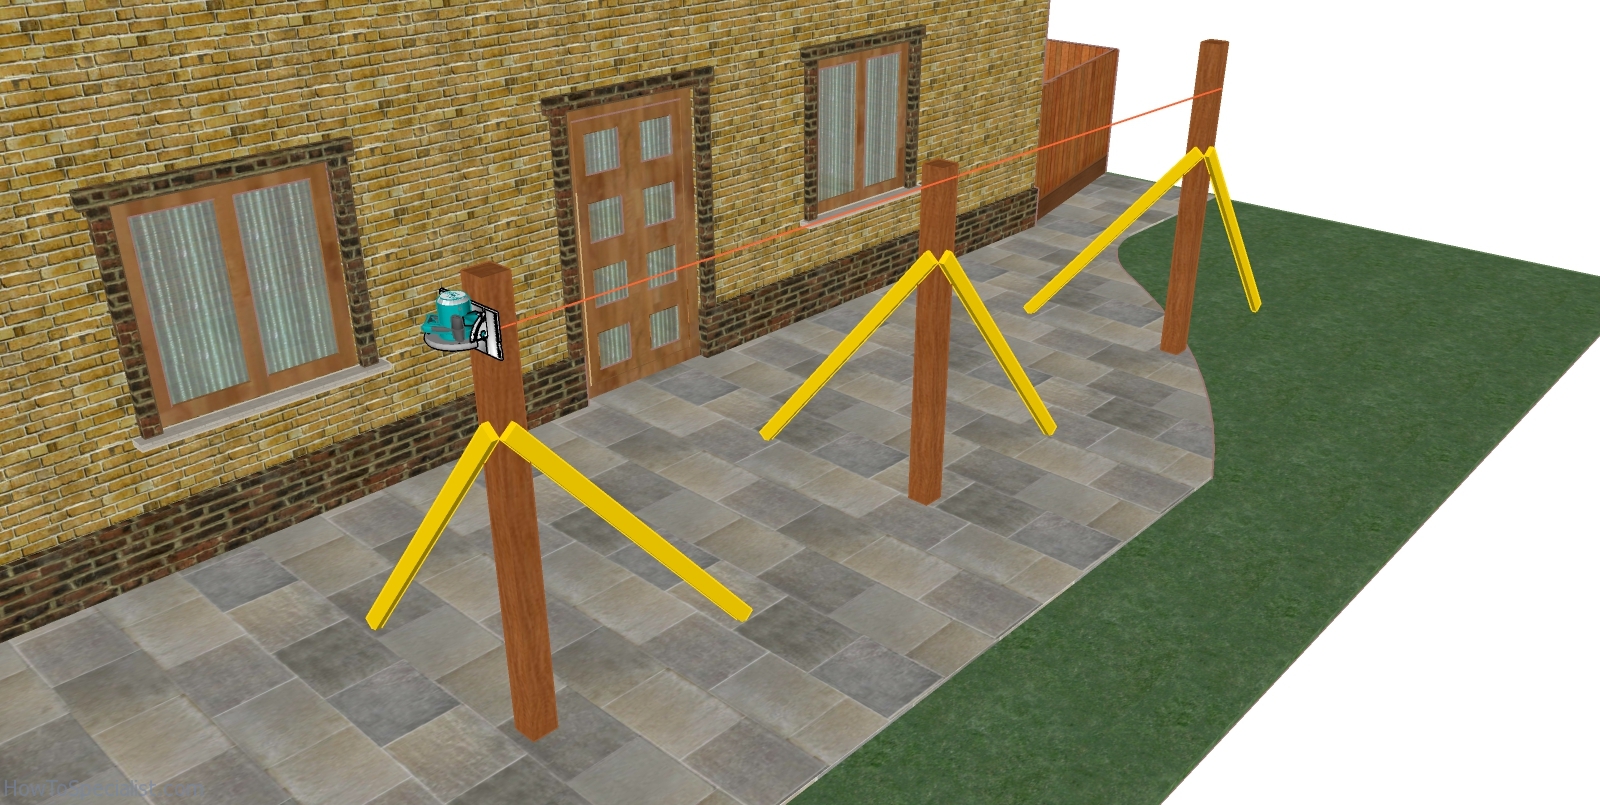
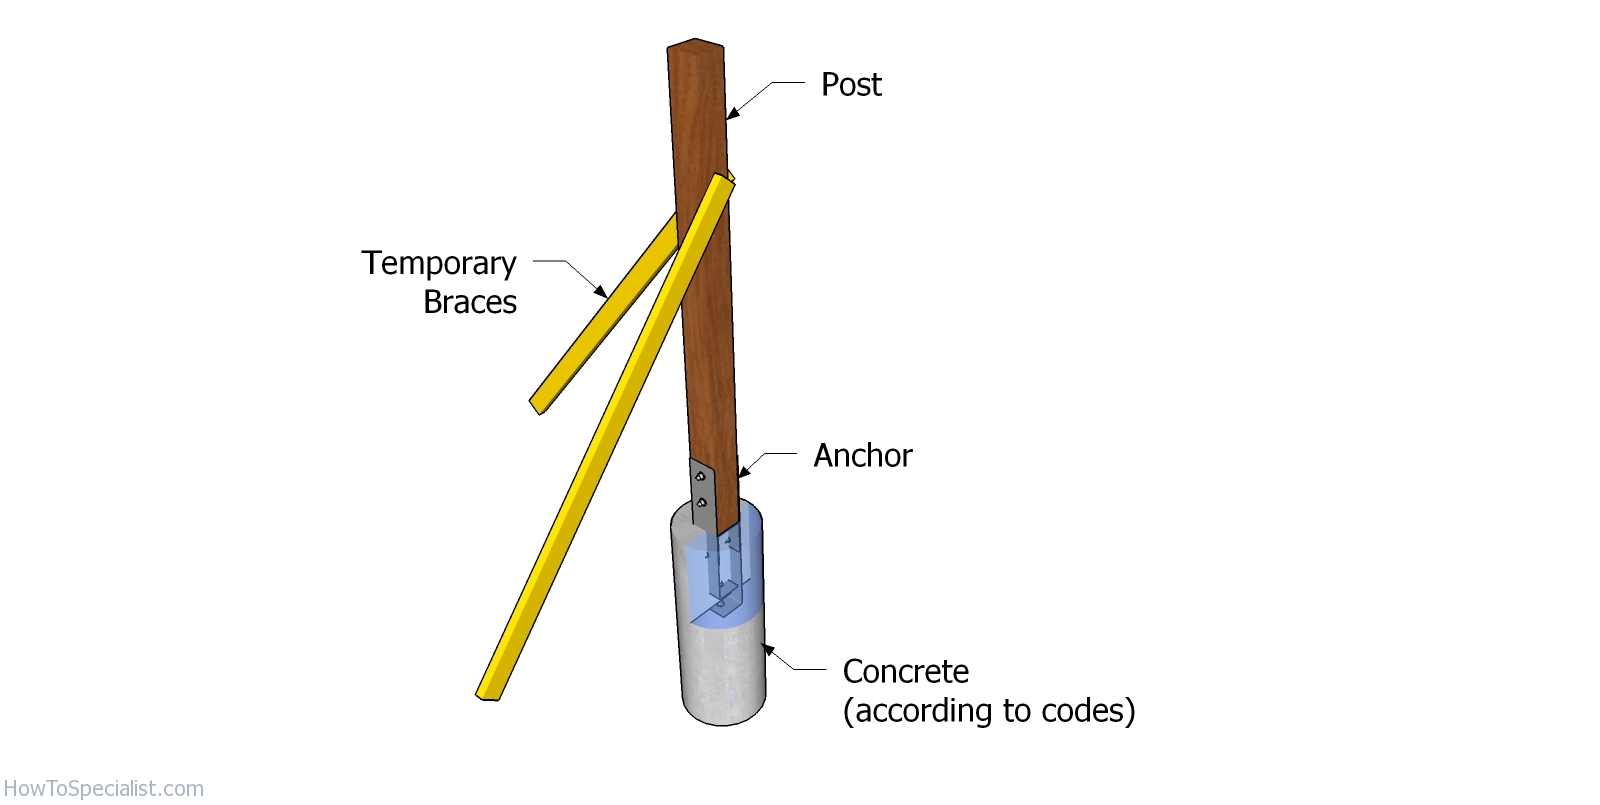
Cutting the top of the posts
Use temporarily braces to secure the 6×6 posts to the anchors. Plumb the posts with a spirit level. Use chalk line to make the top of the posts, so they are perfectly level one with another. Use a circular saw to cut the top of the posts.
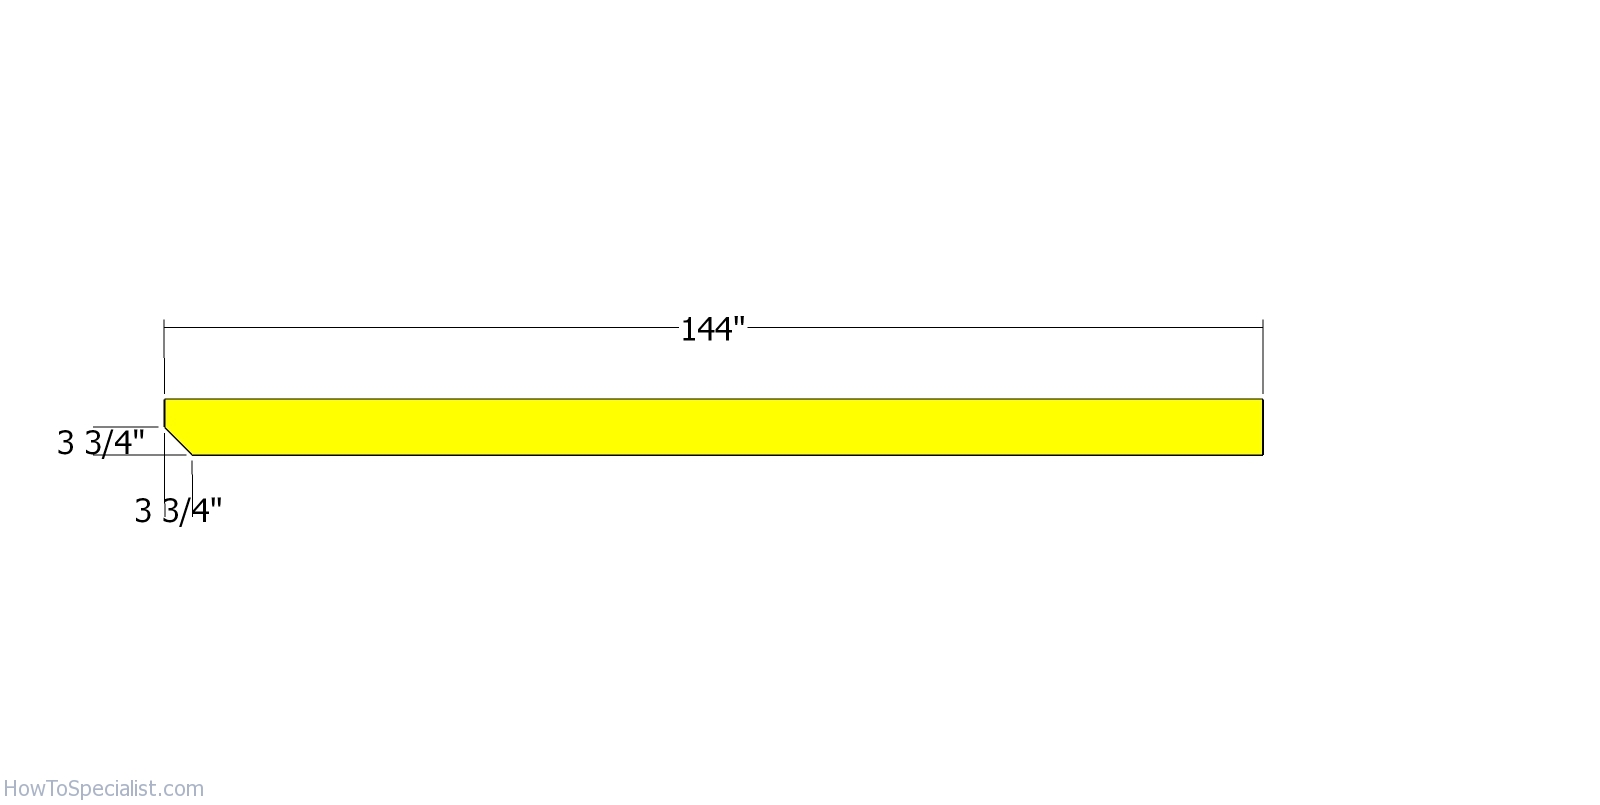
Beam – patio cover
Use 6×8 lumber for the support beams. Make 45 degree cuts to one end of the beams, to make it look more decorative. You can go creative and make round cuts, as well.
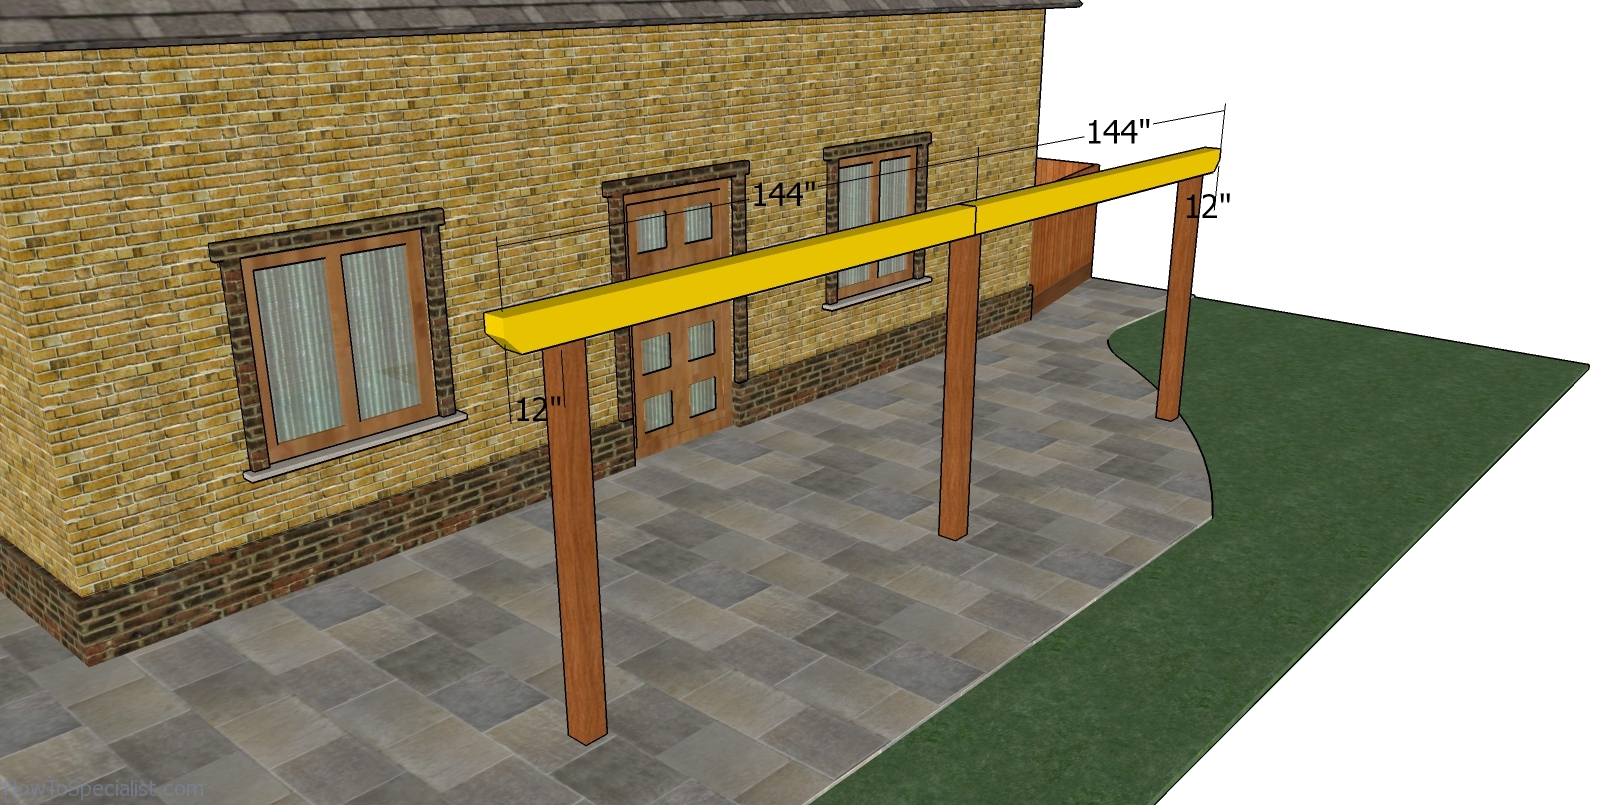
Fitting the beams – covered patio
Fit the beams to the top of the posts and plumb them vertically. Use post to beam connectors to lock them together tightly.
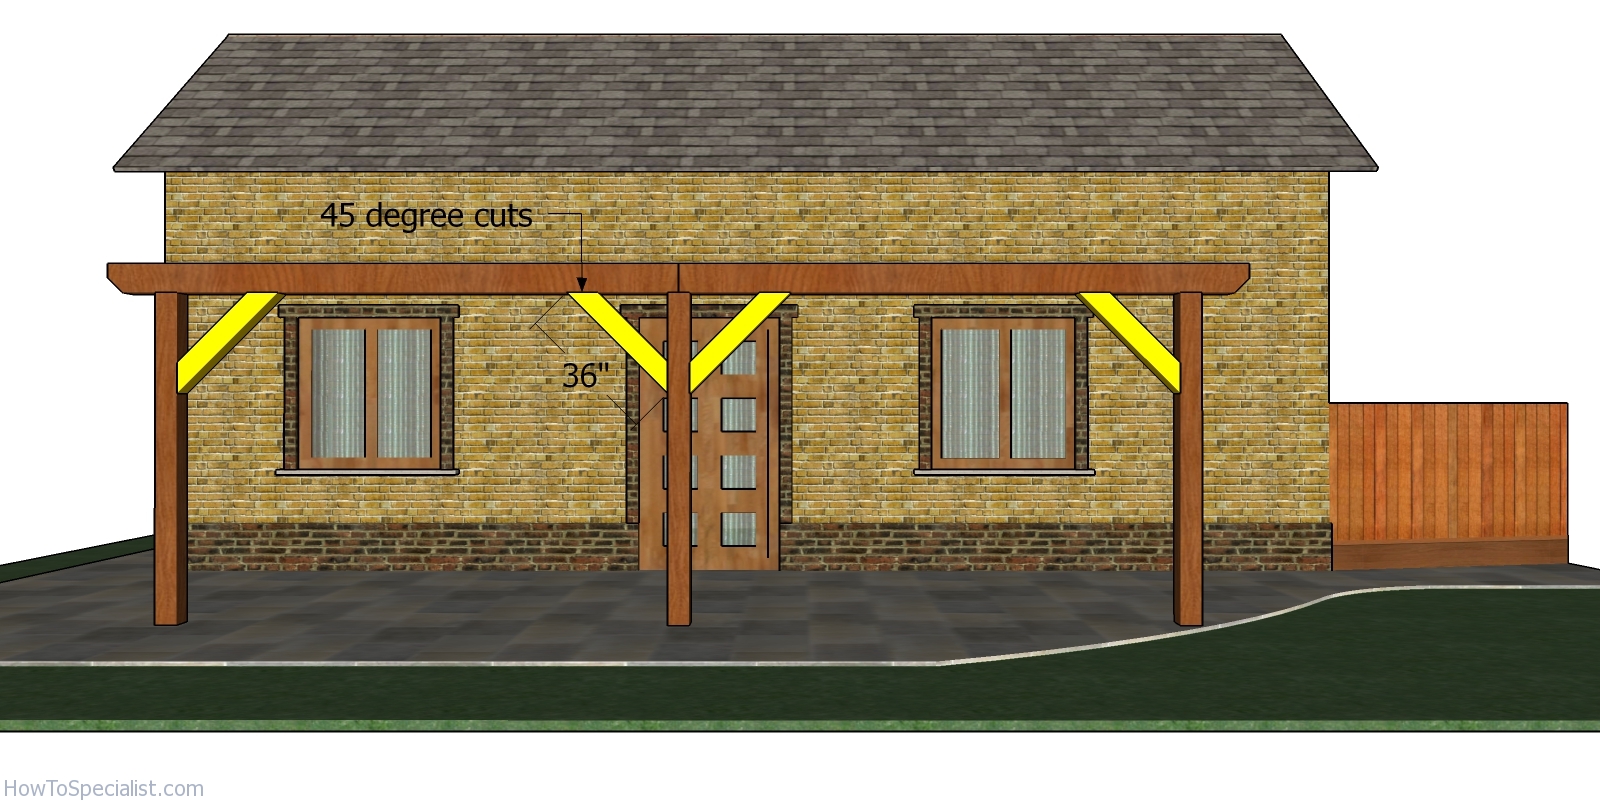
Braces – covered patio
Use 6×6 lumber for the braces. Use a miter saw to make 45 degree cuts to both ends of the braces. Check if the posts are plumb and if the top beams are perfectly horizontal before attaching the braces. Drill pilot holes and insert 5″ screws to lock the braces to the frame.
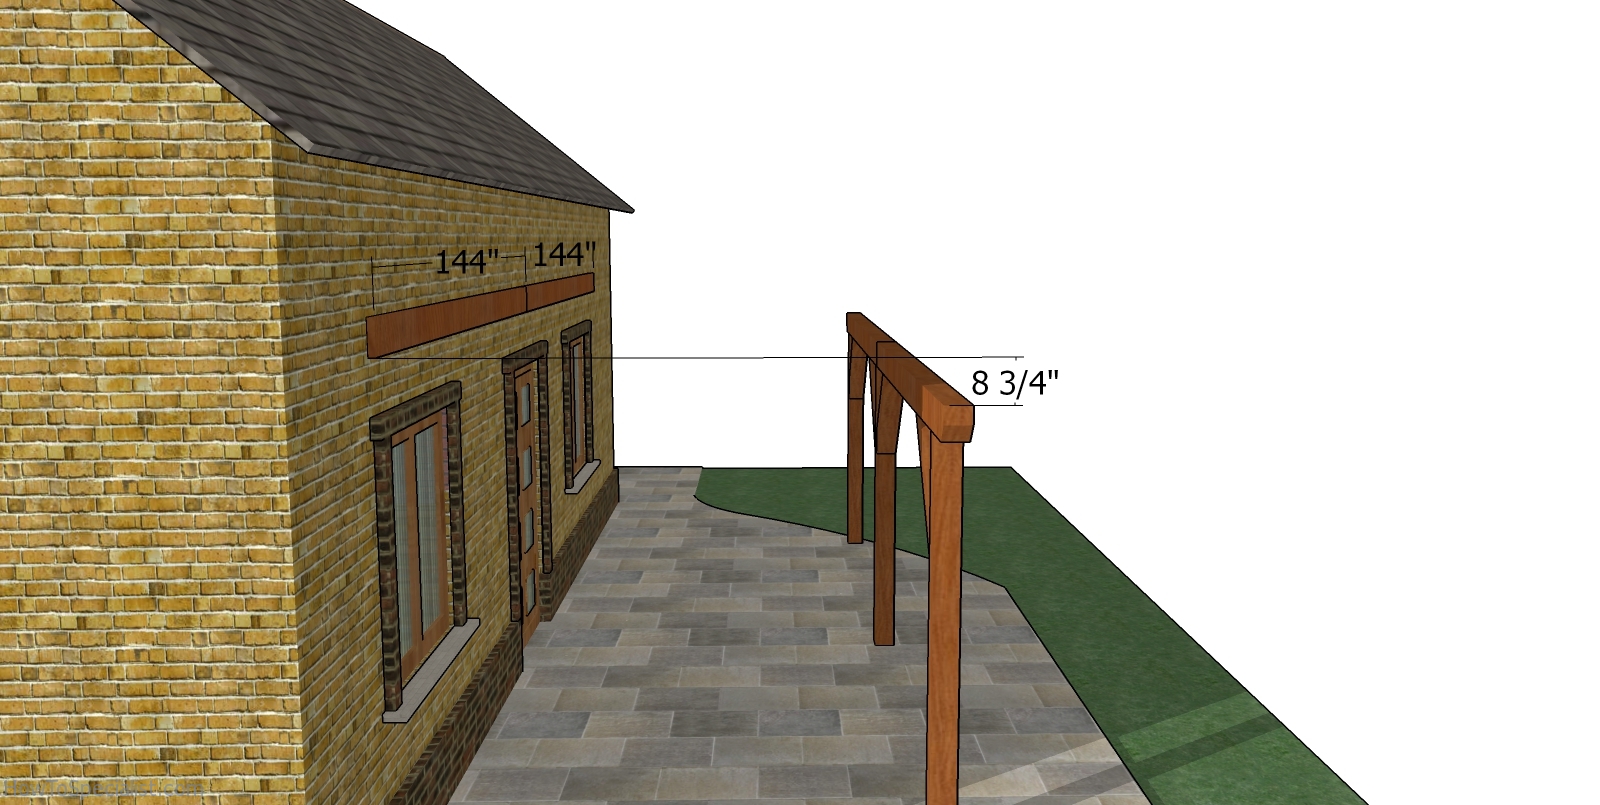
Fitting the ledger boards
Next, attach the 2×8 ledger boards to house. The ledger is placed to the house considering a roof slope of 5 degrees. If you want to change that, just place the ledger higher. It is important to read the local codes before attaching the ledger boards. In this example I consider it’s ok to use 5″ lag bolts, but that doesn’t probably apply to your codes. The codes also shows the number of bolts needed and the distance between them.
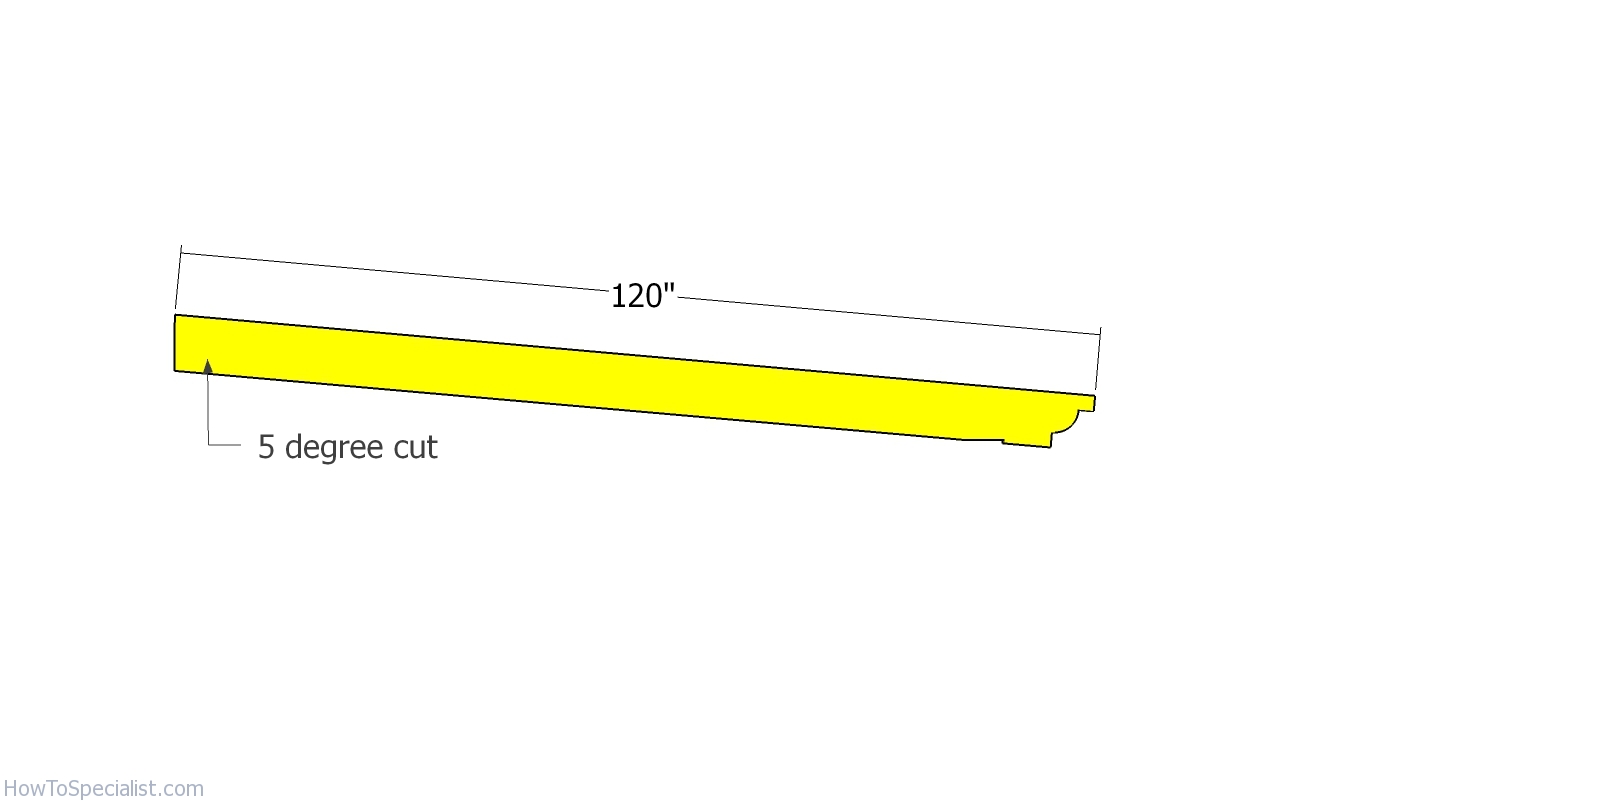
Rafters
Next, we will build the rafters for the patio cover using 2x8s. As you can see in the diagram, use a miter saw to make a 5 degree cut to one end of the rafters.
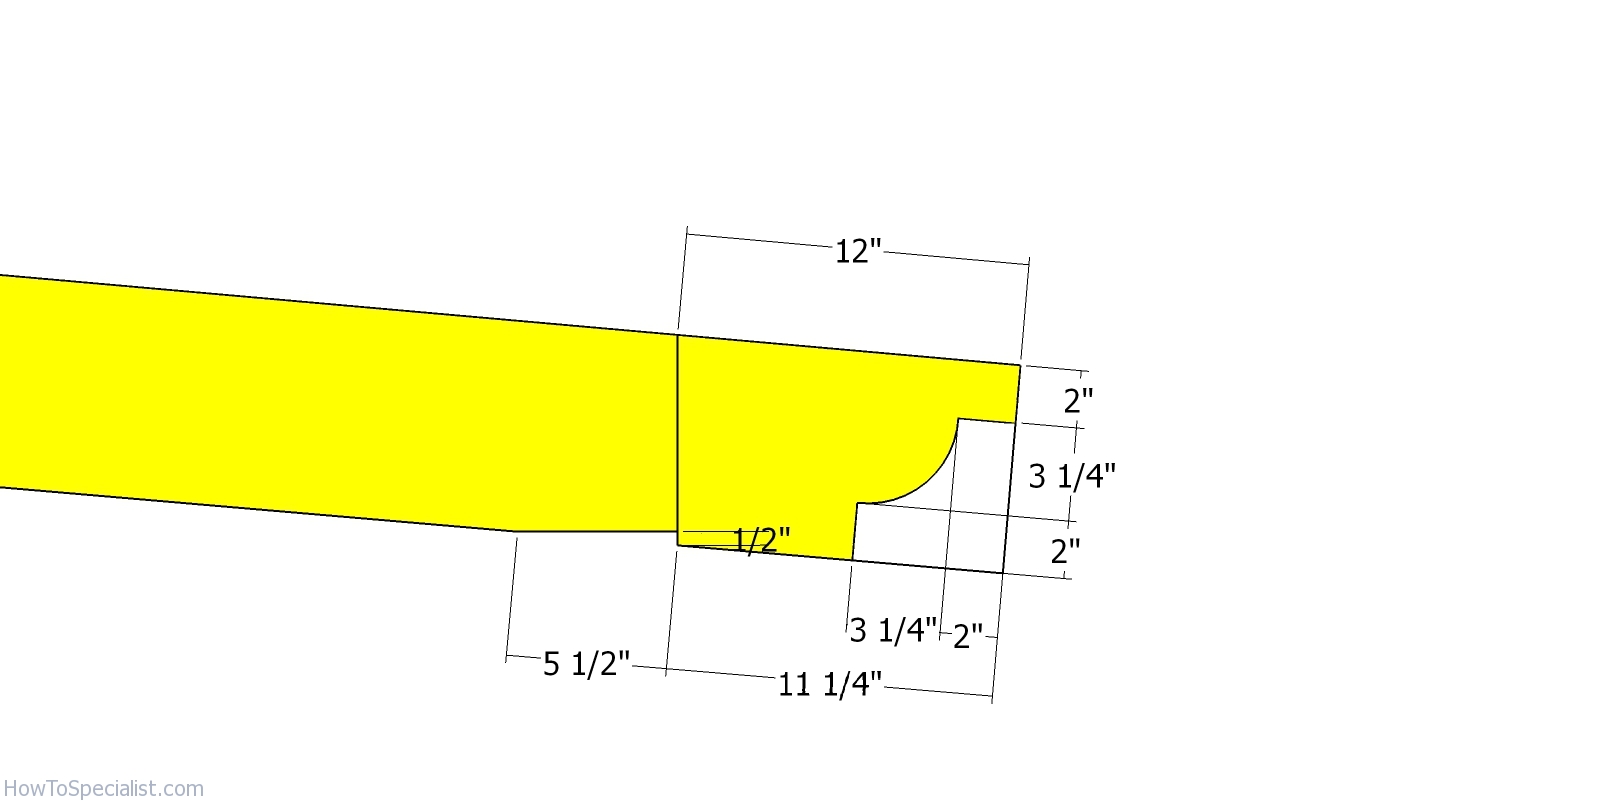
Decorative cuts to rafter
Mark the cut lines to the opposite ends. Use a jigsaw for the curved cuts and a circular saw to for the birds-mouth cuts. Smooth the edges with sandpaper.
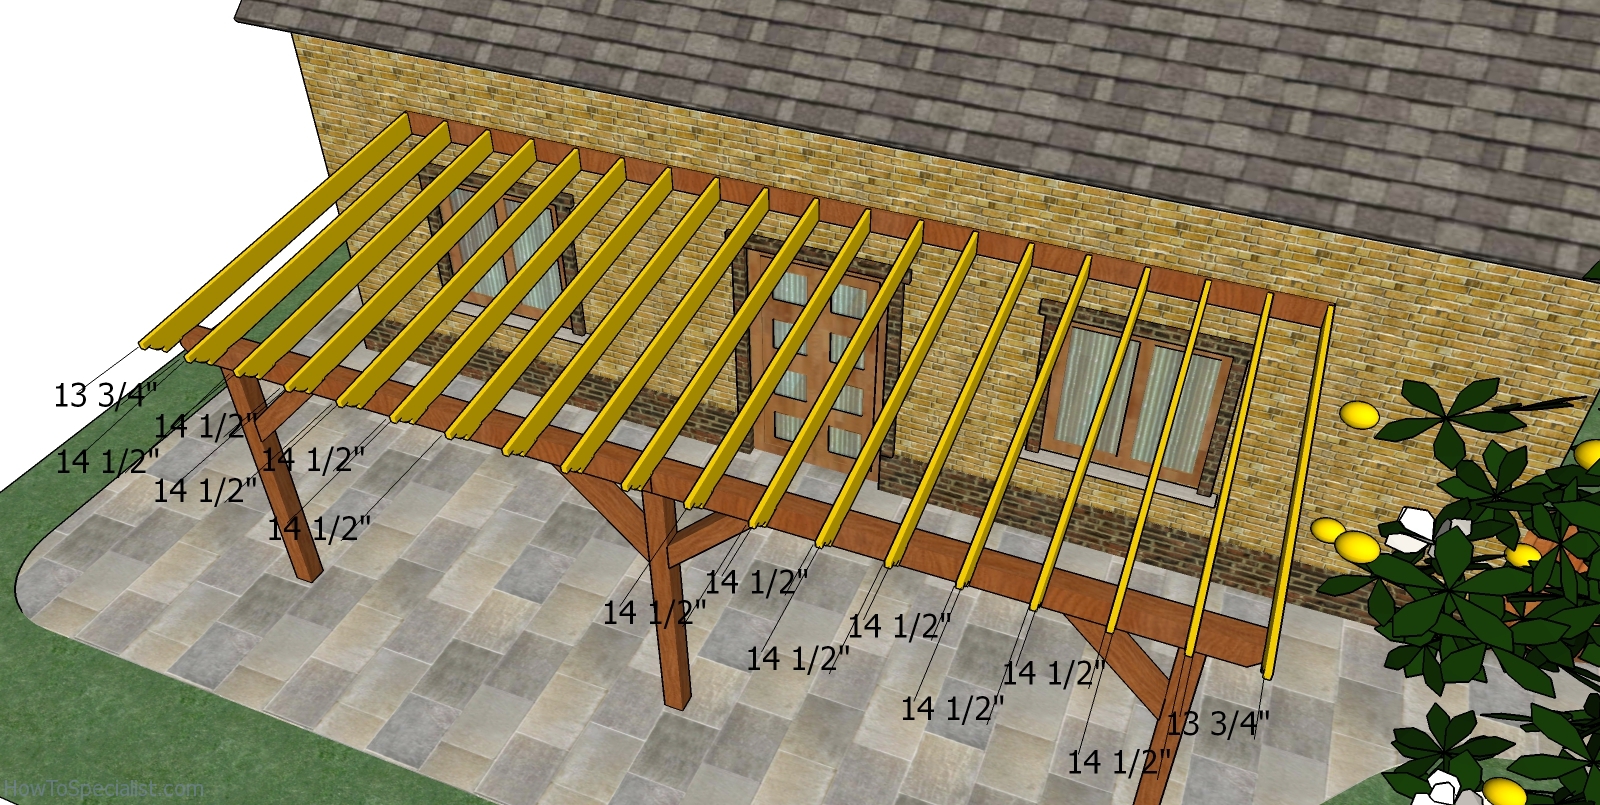
Fitting the rafters – patio cover
Fit the rafters to the top of the patio cover structure. Use the info from the diagram to space the rafters every 16″ on center. The number you see in the plans represents the distance between the rafters. Use rafter hangers to secure the rafters to the ledger boards. Use rafter ties to secure the rafters to the support beam. I recommend you to use 1 1/2″ structural screws to secure the ties into place.
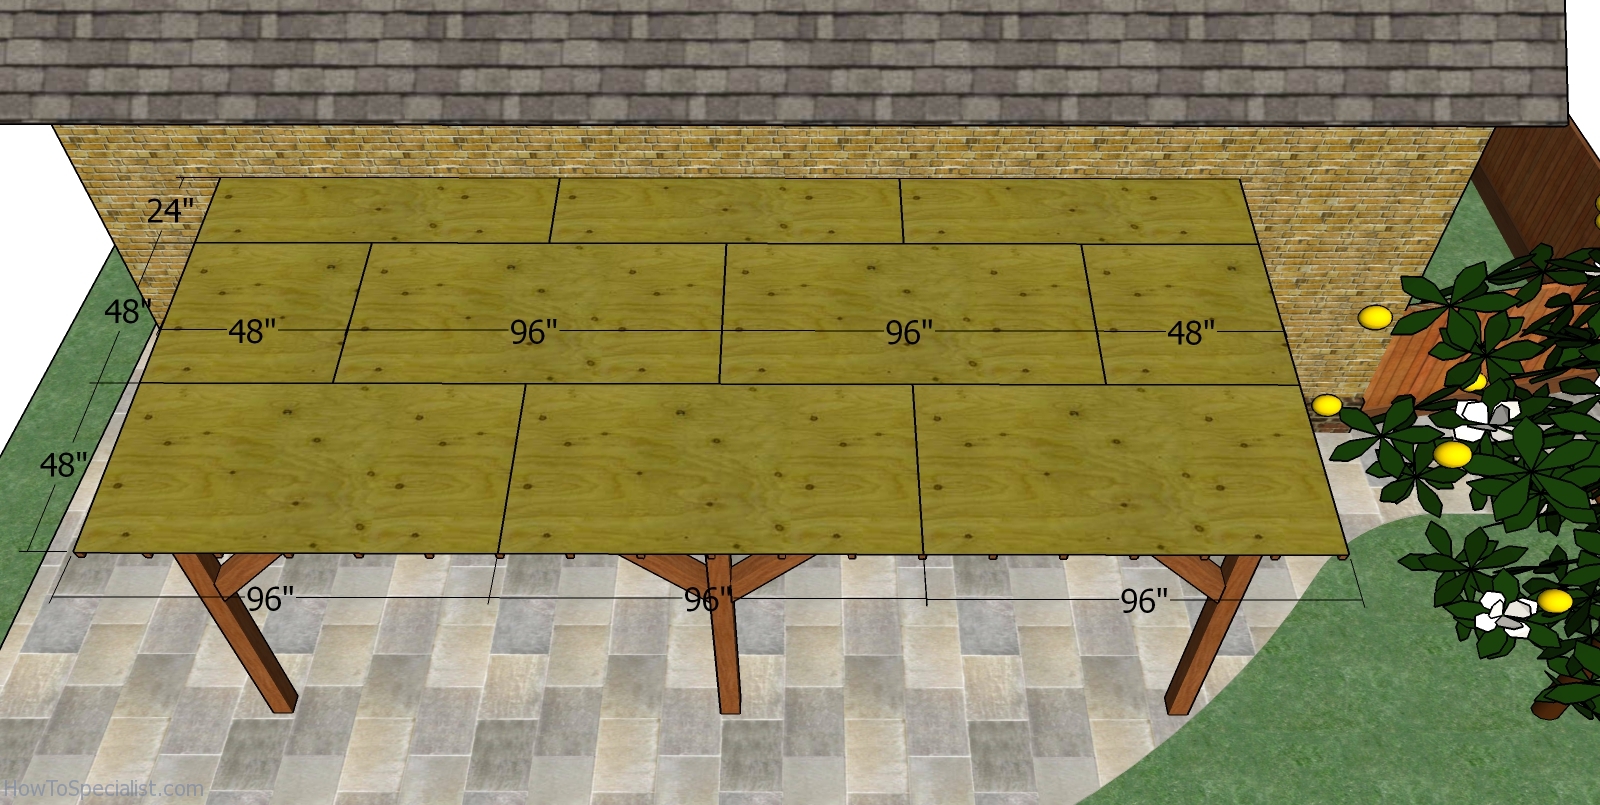
Roof sheets – patio cover
Use 1/2″ plywood for the roof sheets. Make cuts to the sheets and lay them on top of the roof structure. Leave no gaps between the sheets and align everything with attention. Drill pilot holes and insert 1 5/8″ screws, every 8″ along the framing.
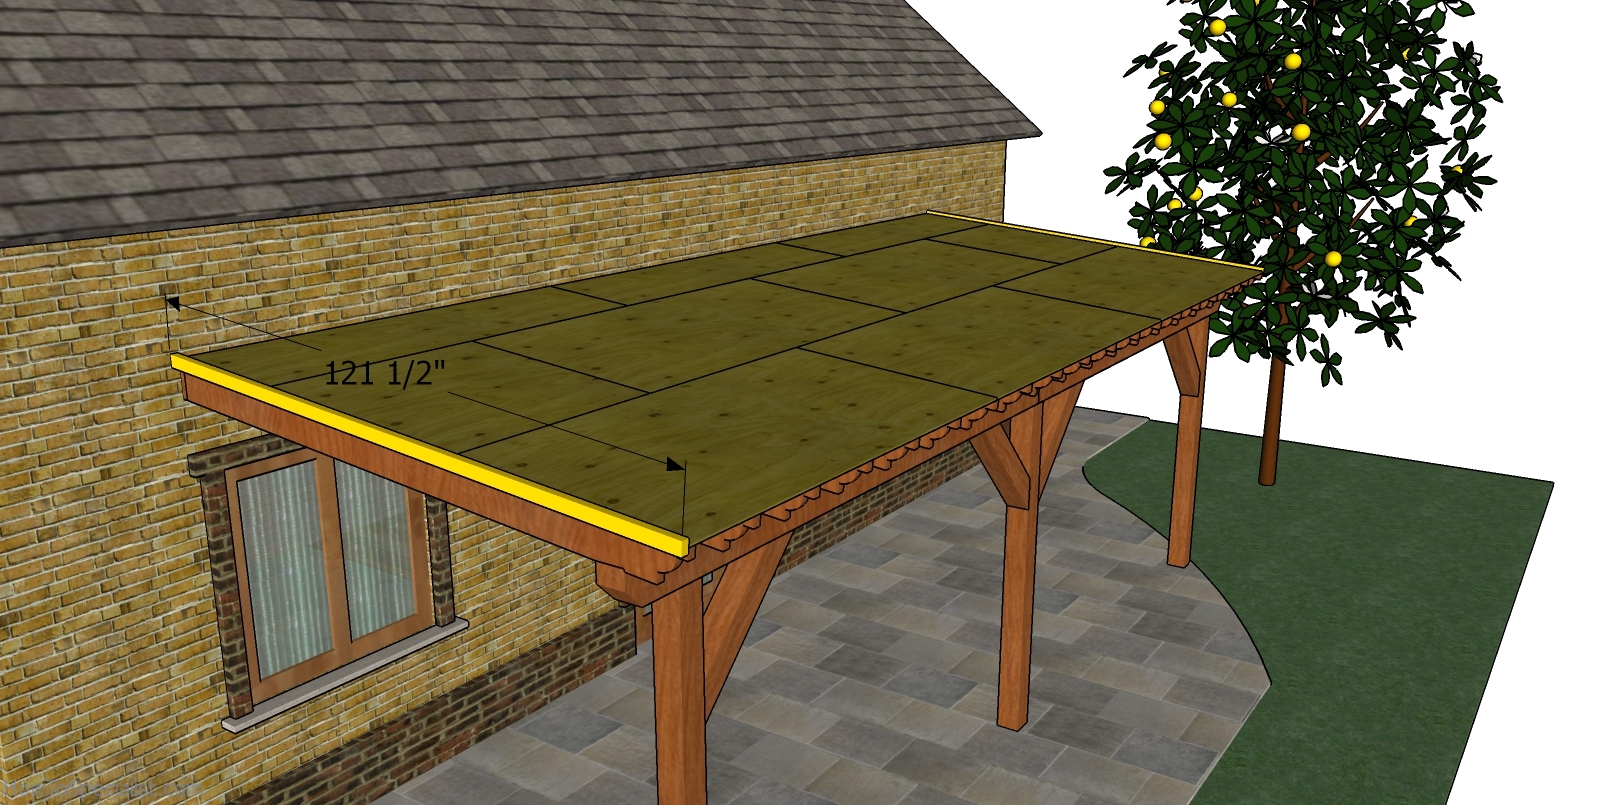
Fitting the side roof trims – patio cover
Use 1×2 lumber for the front and back roof trims. Make a 5 degree cut to one end of the trims. Attach the trims to the rafters and insert 2″ nails to lock them into place tightly.
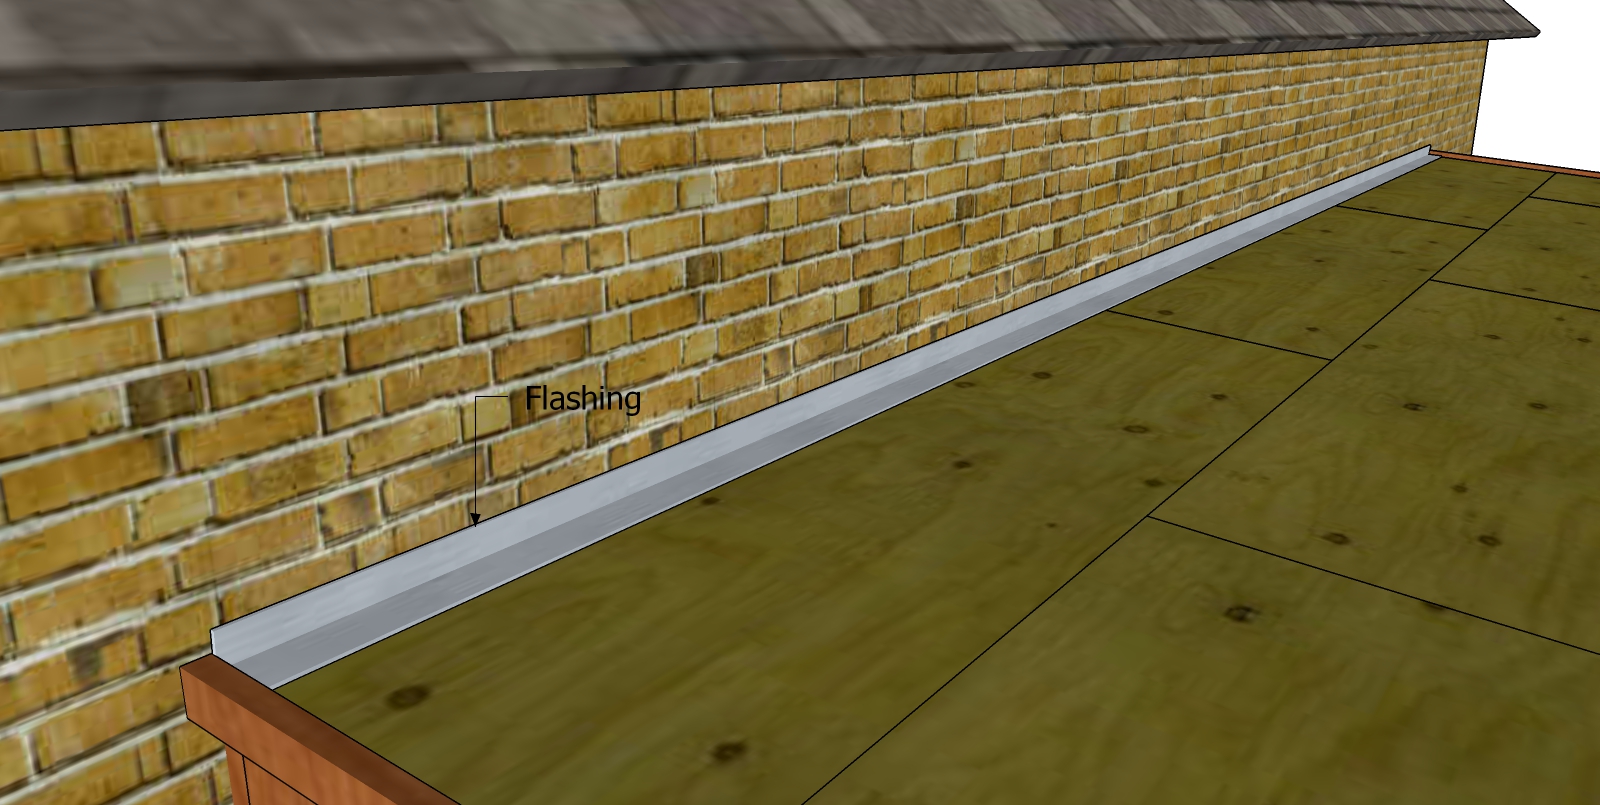
Fitting the flashing
Notice that you need to add flashing between the wall of the house and the roof of the patio cover. In addition, caulk the joints so you prevent water infiltration.
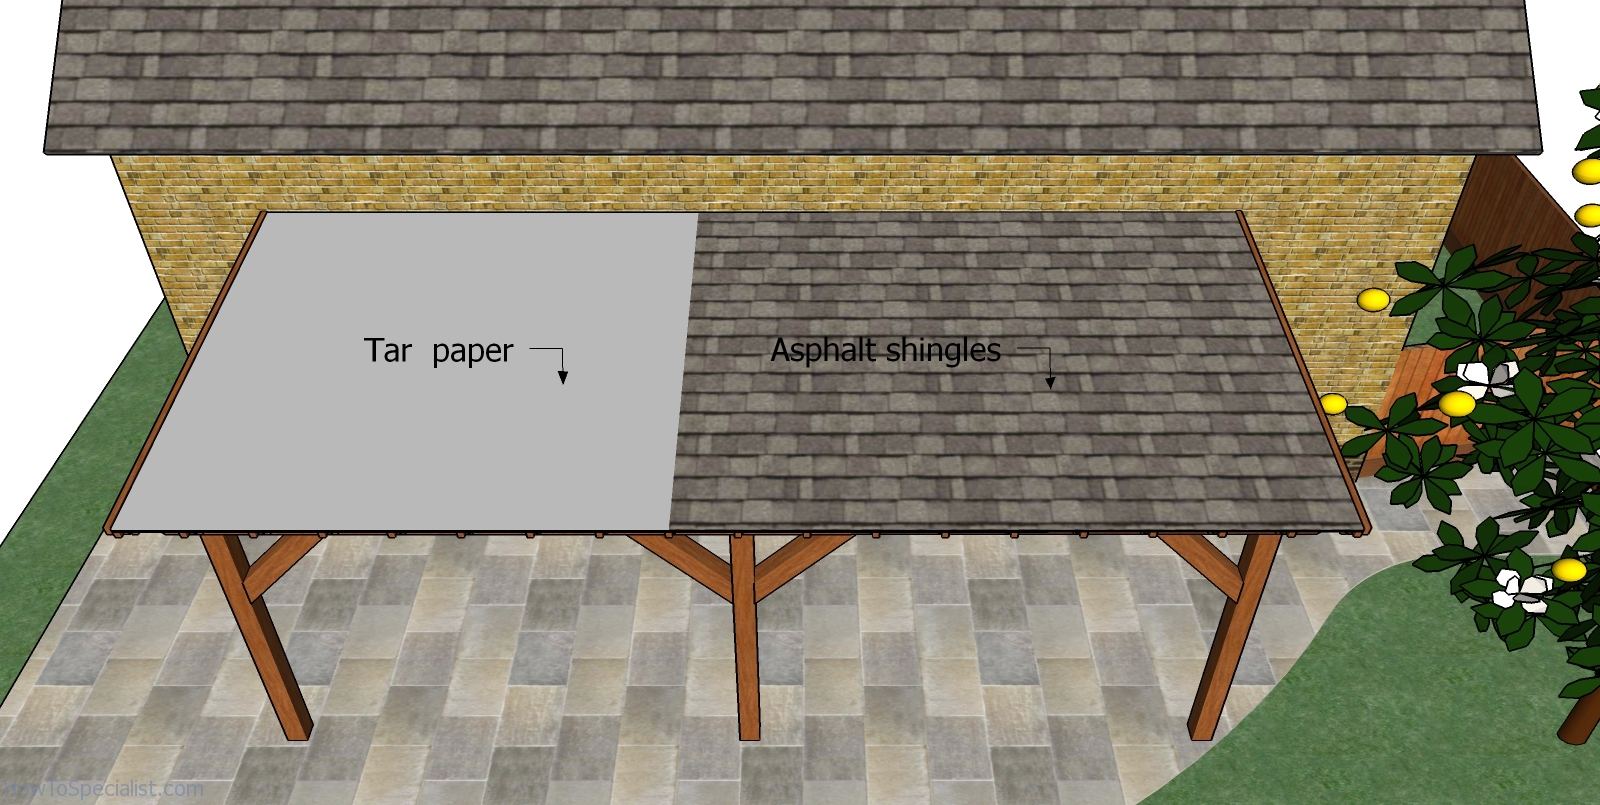
Fitting the roofing – patio cover
You could fit asphalt shingles to protect the roof, as it is a straight forward solution. Therefore, install roofing felt over the roofing sheets, making sure the strips overlap at least 2″. Secure the tar paper to the plywood sheets with roofing staples. Place a starting course at the bottom of the roof, before installing the asphalt shingles. Always read the manufacturing instructions before starting the installation, as there are several aspects that differ.
The first course should star with a 3 tab shingle, the second course with a 2 1/2 tab , the third course with a 2 tab, the forth course with a 1 1/2 tab, the fifth course with a 1 tab, the sixth course with a 1/2 tab. Repeat the process from the beginning, starting with the seventh course. Don’t forget that the shingles should overhang from the drip edge about a 1/4″. In addition, secure the asphalt shingles to the roof decking with tacks.
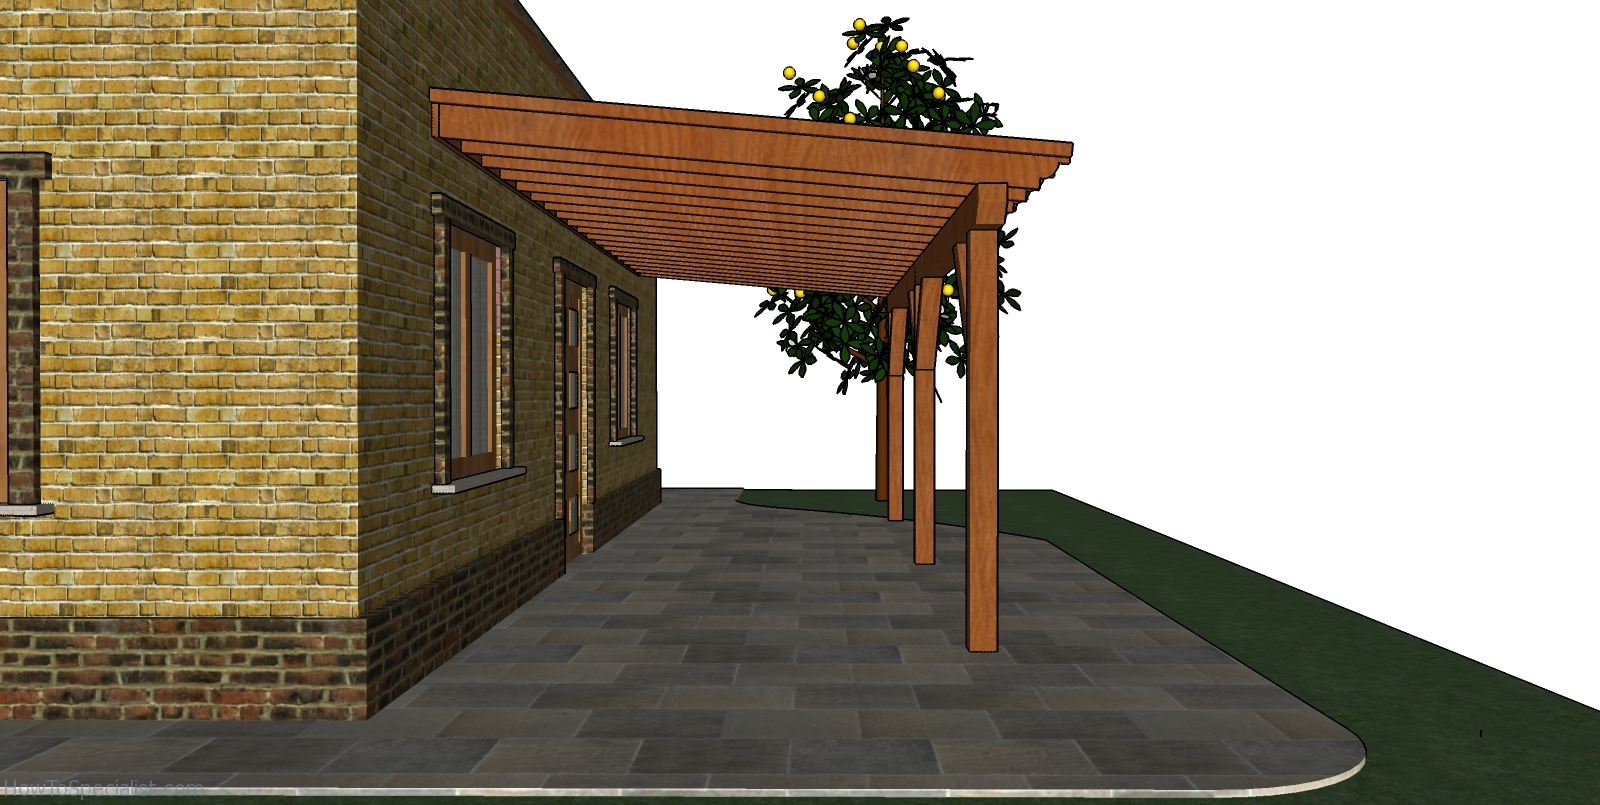
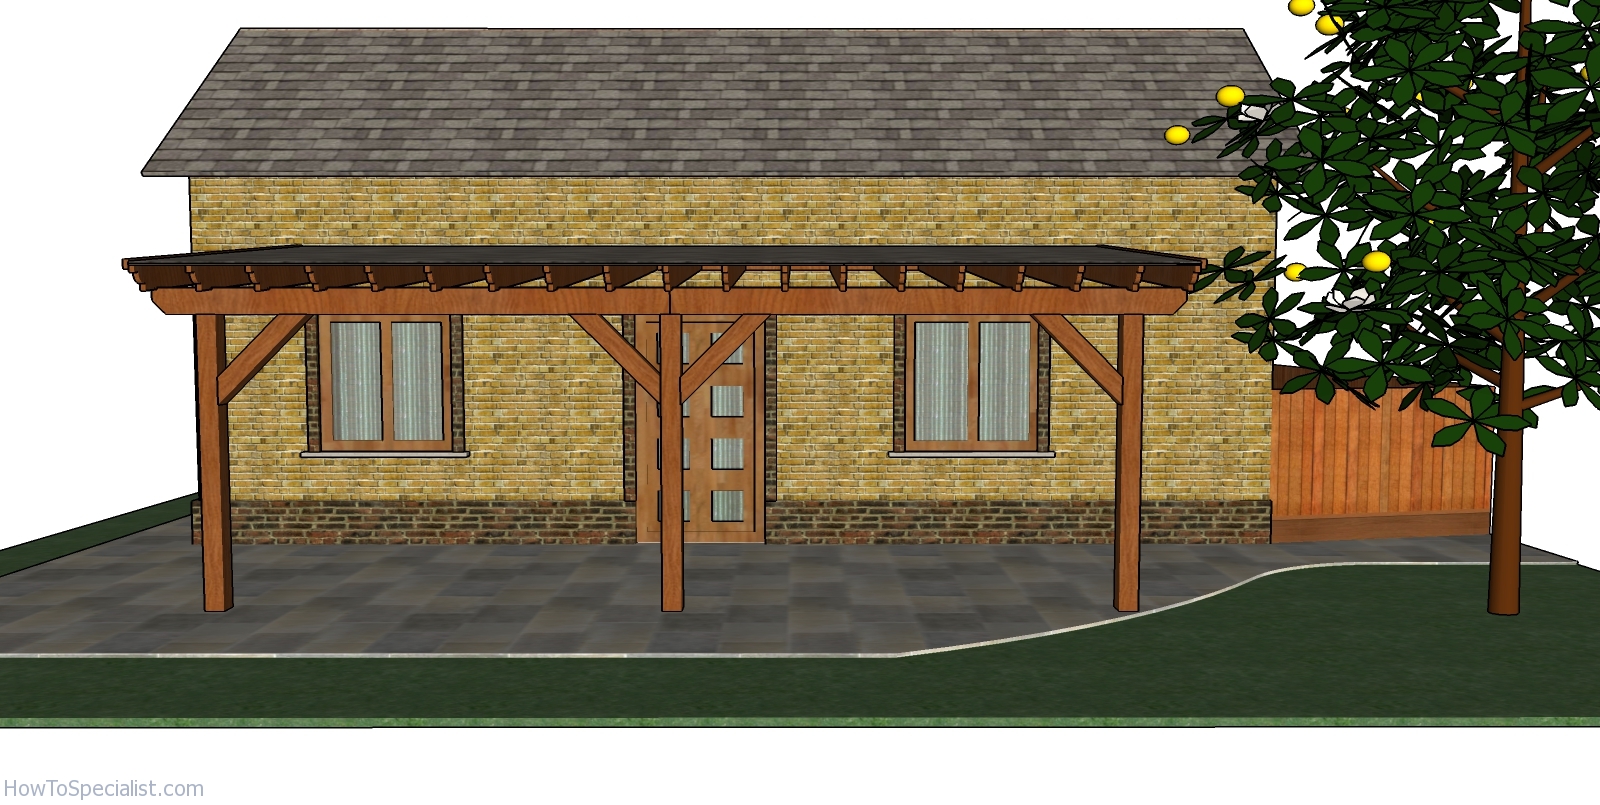
Patio Cover Plans – Side view
You’ve got to like the simplicity of the patio cover. It is super easy to build and you will love the shade during the hot summer days.
How to build a patio cover
This patio cover is built on a sturdy 6×6 structure. You can adjust the slope of the roof to suit your needs.
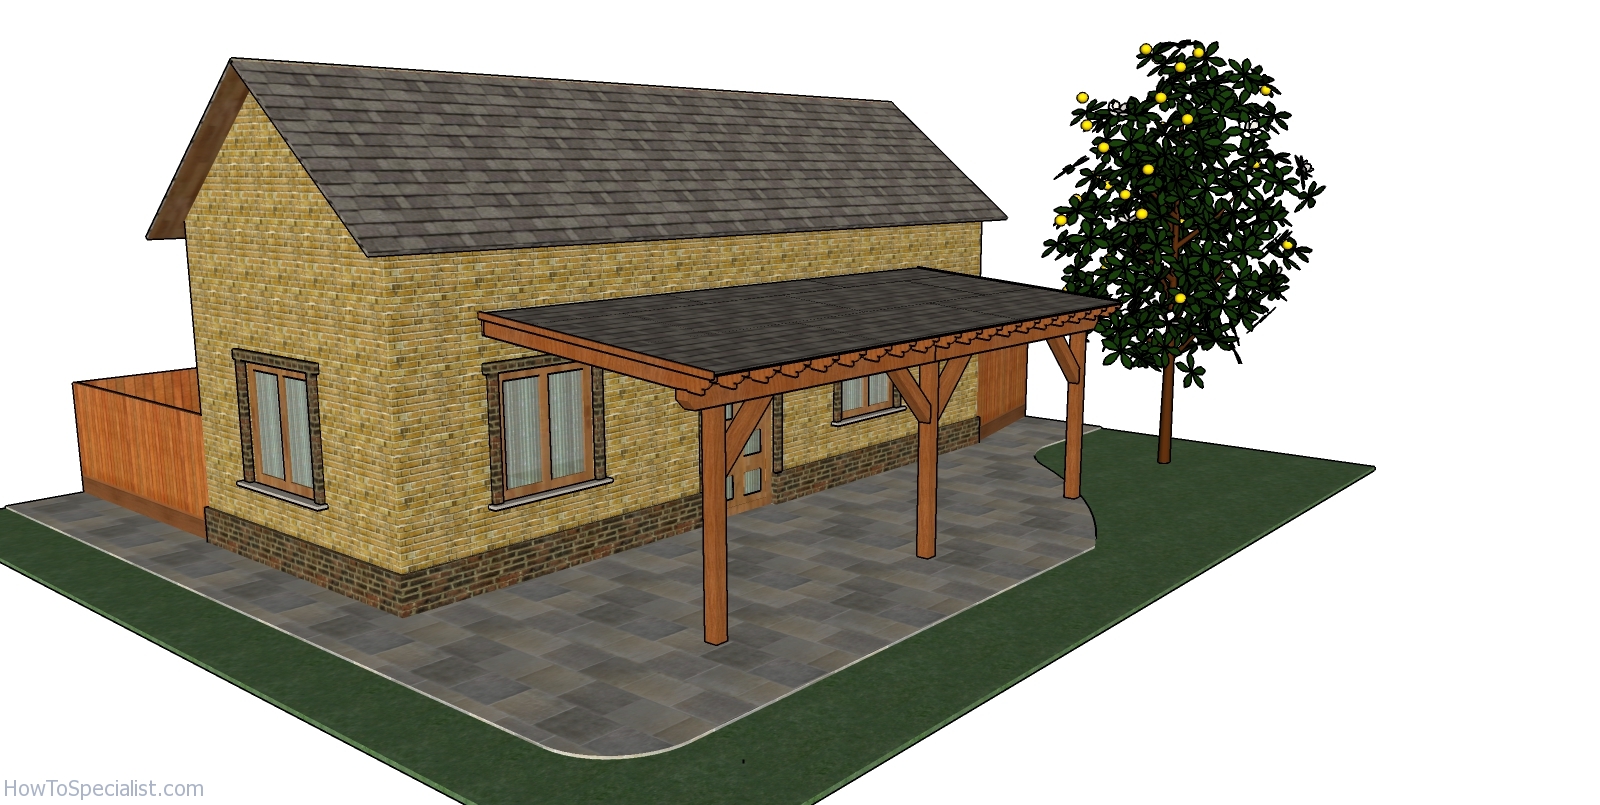
Patio Cover Plans
Last but not least, you need to take care of the finishing touches. Therefore, fill the holes with wood putty and then smooth the surface with sandpaper. Apply a few coats of paint or stain over the components to enhance the look of the shed and to protect the components from decay.
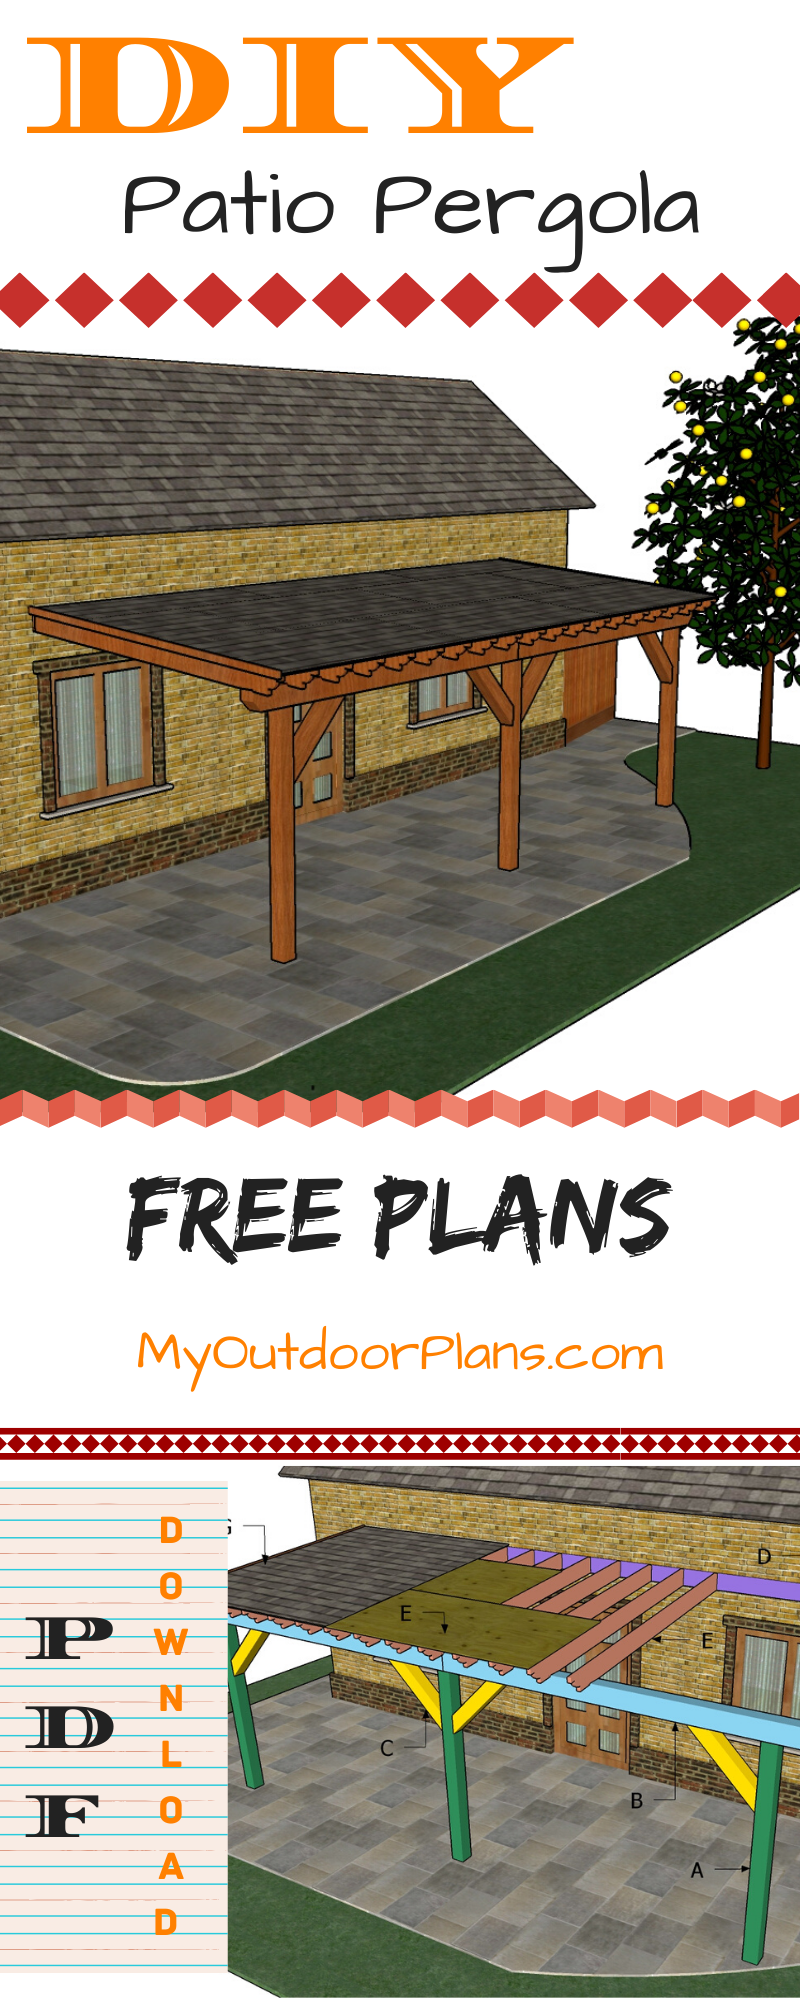
Pin it for later!
Thank you for reading my project about patio cover plans and we recommend you to check out the rest of the projects. Don’t forget to LIKE and SHARE our projects with your friends, by using the social media widgets. SUBSCRIBE to be the first that gets our latest projects.


9 comments
Hello!
This plans interested me, I’m thinking on adapting them to be 110.24″ x 110.24″” (2,8m x 2,8m), using only 2 posts, since it’s basically half of the footage here.
Also, I’m planning to make the rafters concealed, using hangers on both the ledger and front top beam. Do you foresee any issues with this?
Many Thanks! And keep up the awesome work!
I am going to convert and merge this to a front porch
I am planning to build new patio and trying to see on below.
1. How I can find the studs inside the brick wall? (Header board or stud to install Ledger board for patio)
2. Suggest me if it’s a good idea to install ledge just on the brick with out connecting to the studs inside?
3. I am planning to install patio with gable middle with wings on both side, please suggest me with your thoughts for this model.
Please kindly suggest me, it would be greatly helpful for my patio DIY project.
Kind Regards,
Upendra
How is this free??? The PDF downloaded costs $4.99.
All the plans are FREE ONLINE. It’s clearly explained in the FAQs. You don’t need to download the PDF, if you don’t want to pay. Cheers.
Thank you for the plans. My house has Hardie board siding. Do I need to remove it to put the ledger board to the house or just drill through it and attach the ledger board? Thank you,
Darrell
I like to bluild one 36 x 16 like to get plans
I want to do this exact plan but want it 2 feet longer. Could you tell me how tall the post height would be if keeping the same 5 degree slope?
I’m interested in something like this, but 12 x 45. Any plans available?