- Show results for
- Share
The Best Electric Fence Charger. Buying Guide
Resource Description
Contents:
- Classification and Factors of the Fence Charger
- What Fence Energizer to Choose
- The Installation of The Ground System
- How to Install an Electric Fence
- Preparation for Installing a Fence Charger
- How to Install an Electric Fence Charger
- The Process of Checking That Your Ground System is Working
An electric fence charger (or an electric fence energizer) is used to provide the source for the electric current that flows through the fence wires. When an animal touches these wires, electric shocks prevent it from crossing the boundary. As a result, your farm animals are kept in and wild animals are excluded. Pay attention that it is important to choose electric fence chargers from respected companies that offer products without harm to animals.
Nowadays, there is a huge variety of products to choose from. To buy the best product that will meet all your needs is not a walk in the park! In this article, you will find out all the details about selecting the best electric fence charger!
Classification and Factors of the Fence Charger
The type of the fence charger depends on the fence you want to install. Nevertheless there are four main factors that should be mentioned while choosing the fence and energizer.
- the length of the fence - it is recommended to install a bit larger electric fence charger than you think you need (to allow for expansion + to compensate for the power loss if some plants contact your fence). However, you don’t need to buy the most powerful device for a small area.
- the number of wires - as a rule of thumb (for multi-wire fences), you should divide the charger’s distance rating by the number of strands, after that, you can select a charger with a mileage rating you need.
- the type of an animal that is contained or excluded - for instance you are planning on keeping sheep or goats in, then you have to bear in mind that they may not feel the shock due to their thick wool (if the fence charger is not powerful enough). As a rule, the manufacturer indicates the animal to help you to choose the right product.
- power source - there are AC-, DC-, and solar-powered fence energizers. The type of the power source depends on the type of energizer you want to install. It is important to select the right fence energizer with the correct power source to keep animals safe and not to damage them.
AC-Powered |
These are the most popular and easy-to-use fence chargers, all you need to do is plug the device into a standard wall outlet for reliable power. They are great if you need to fence large areas. Please note that these fence energizers offer the best output compared to other types.
| + | − |
|
|
DC-Powered (Battery-Operated) |
These devices are a perfect option for remote locations in case you don't have an electrical outlet. It is important to replace batteries in time (if necessary).
| + | − |
|
|
Solar-Powered |
Ideal for areas without any access to an electrical outlet, the devices are equipped with a battery for energy storage and a solar panel that collects the sun’s energy in order to charge the battery.
| + | − |
|
|
*Note: Ac-operated fence chargers' models are more appropriate in use. Such energizers have a bigger power output as well. This allows you more adjustability for the expansion.
Electric-Energizer Terminology
- Low impedance fence charger - there is less resistance in the charger and more power can be pushed through the wire. Such devices are perfect for lands with weeds.
- Solid-state fence charger - there is a medium amperage shock in pulses of medium duration. Such products are ideal if you need to control short-haired livestock or small animals.
- High-impedance fence charger - known as a weed burner - there is a risk of damaging vegetation that contacts the fence and fires can occur. These devices are not that safe to use.
Note*Pay attention to the units of measurement. Knowing the units of measurement makes it easier to select the right fence charger for your application.
The joule is the unit of energy. You may see 2 types of joules: stored (the energy/power stored inside your fence charger) and output (the energy/power sent through your fence). The bigger fence you have, the more joules you need.
The volt is the unit of electrical potential. High voltage is essential if you want to be sure that your fence is effective even if you deal with animals that have thick hair. The thicker the hair, the higher voltage you need.
The amp is the unit of electrical current. It is the amount of electricity that flows through the circuit.
What Fence Energizer to Choose
Power Wizard electric fence chargers are designed to handle even the worst ground conditions and have built-in lightning protection. They feature a cutting-edge Ultra low impedance technology. Thanks to it, the energy continues to flow even in bad conditions.
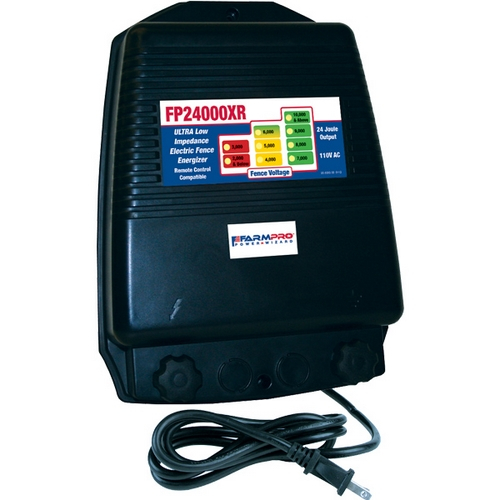
AC-powered
|
It is a powerful 110V plug-in fence charger with an array of useful features. For instance, a Fence Voltage Indicator allows you to view the voltage that is distributed to your fence. The indicator is color-coded so you can determine the voltage as well as the condition of your fence. The benefits of this model include:
If you are in search of a top-notch fence charger, this one is exactly what you need. |
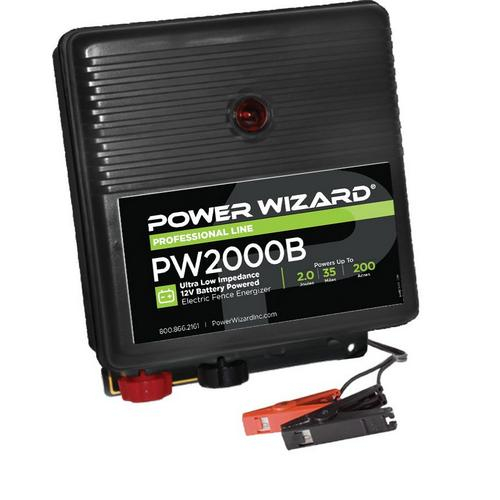
Battery/D-Cell-powered
|
It is a great 12V battery-powered electric fence energizer for use with permanent/semi-permanent fencing. There are such advantages as:
The device is ideal if you don’t have access to electricity or there is not much sunlight in your area. |
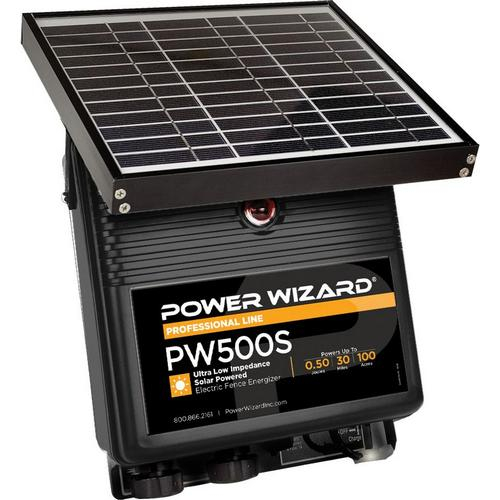
Solar-Powered
|
This device is powered by solar energy and features:
This fence energizer is a perfect device for the areas where electrical current is unavailable. This product can be used for a dairy farm, cattle ranch, etc. With this device, you don’t need to pay for electricity or batteries (like the owners of AC- and DC-powered models). |
The Installation of The Ground System
It is worth mentioning that the ground system completes the circuit during operation and, when touching the fence, an animal gets an electric shock.
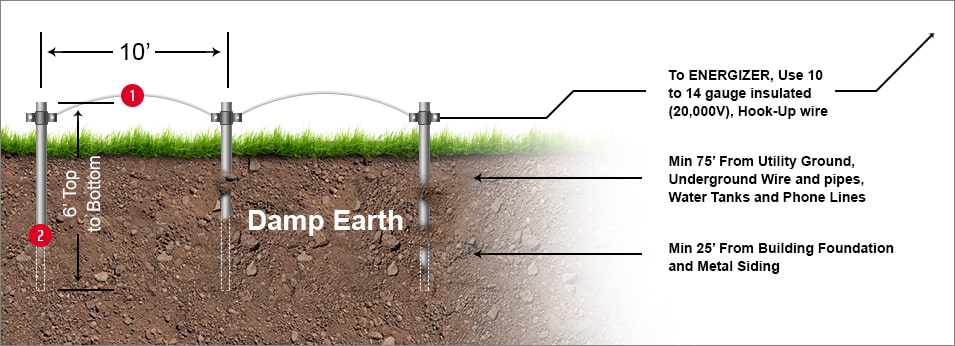
- Locate an area of soil for placing ground rods that contains good conductive earth. Avoid rocky, sandy, or dry earth (pay attention that dry earth is more resistant to electrical flow). Make sure that you locate the ground system within 75 ft of the electric fence charger and a minimum of 25 ft from buildings.
- Locate the ground system at least 75 ft away from utility company ground systems, underground water pipes, metal water tanks, metal siding on the building (at least 25 ft away).
- Drive 3 galvanized ground rods (6 foot by 1/2” at least) 10 ft apart in a straight line or a triangle pattern in the selected ground area. Leave 6 in above the ground (for securing ground clamps). After that, mark the area as a hazard.
- Connect the ground rods, in a series, with 1 piece of continuous 10-14 gauge galvanized wire. Note that the ground hook-up wire should be equal to or larger than the diameter of the fence line wire.
- 12-14 gauge galvanized fence wire.
- ground rods – 6 ft long by 1/2” (at least) in diameter, galvanized steel rods.
How to Install an Electric Fence
First of all, decide how much space the fence is going to take, the number of wires you need for the installation and the amount of animals you want to keep in or the height of the fence to protect your valuables from animals.
Step 1:
Install ground stakes using a digger leaving at about 1,9” above the ground. It is recommended to set your ground stakes at the distance 118” to 236” from each other.
Step 2:
Fix a grounding wire to all ground stakes using a grounding clamp.
Step3:
Point a line where you are going to install your fence. Set fence stakes with a digger into the ground. It is recommended to set ⅓ of the fence stakes into the ground.
*Note: The more stakes you install the stronger power of the fence you get.
Step 4:
To set the electric fence correctly, straighten the stakes with braces or a cement base.
Step 5:
As the power in the wires should be maintained, you need to isolate them from the stakes. What type of isolators to choose depends on your electric fence selection.
Step 6:
Protect wires with the connector clamps that are provided with your fence. Tighten the wires as hard as possible, but don’t let them break.
*Note: Don’t wrap the wire around the stakes. Such a way can cause corrosion and the wires will loosen.
Step 7: Instal the fence charger
Preparation for Installing a Fence Charger
It is not enough to choose the right fence energizer, it is also important to install the device properly.
To install your fence charger, you will need:
TOOLS:
- screwdriver - for mounting your energizer, cut-off switch, and lightning choke;
- wire cutter - for cutting and stripping insulation;
- post driver - for the installation of ground rods;
- digital voltmeter - for the testing/troubleshooting of your electric fence.
ACCESSORIES:
- 3 galvanized ground rods (at least) – minimum 6 ft by 1/2” (minimum) diameter;
- 3 ground rod clamps;
(you can also use a ground rod kit)
- insulated underground hook-up wire – 50 ft (20,000V rating);
- 1 energizer cut-out switch;
- line clamps;
- 1 lightning choke & 1 lightning diverter or a combination choke and diverter;
- 1 surge protector (for AC-powered electric fence chargers only).
Or you can use the Power Wizard Portable Corral Kit, which includes everything you need to make a fenced area intended for cattle, horses, alpacas, and more.
PREPARATION
- Prior to installing and using any device, it is important to read the user’s guide. You can find all the necessary information considering the exact model you own.
- Shelter the device from such factors as moisture, extreme temperatures, etc.
- In case you have a plug-in model, place it near an AC power source.
- The device should be accessible to a ground rod system, which is separate from building or grounding rods used by other systems/buildings.
How to Install an Electric Fence Charger
- Locate your fence charger within 75 ft of the ground system. It is recommended to use only polarized extension cords. Mount the fence charger:
- at the eye level (+ inaccessible to children and livestock);
- protected from moisture and unwanted weather conditions;
- in a ventilated place, away from flammable materials and gasses.
- Prior to connecting the “FENCE” and “GROUND” energizer terminals, make sure you plug in/power on the fence charger and check the output voltage at the terminals with an electric fence voltmeter (use only those voltmeters that are intended for this application). Record the voltage as a benchmark for future reference. The indicator light will be flashing and you will hear a “click” at 1-2 second intervals.
- Unplug/turn your fence charger off and ONLY THEN connect the “GROUND” terminal to a 10-14 gauge insulated lead-out wire (or a “hook-up” or “underground fence wire”, rated at 20,000V). Connect the opposite end of the wire to the closest ground rod using a ground clamp and shiny bare metal contact surfaces. After that, connect the “FENCE” terminal to a 10-14 gauge insulated lead-out wire (rated at 20,000V) and connect the opposite end to a fence “cutout” switch that is located on the first fence post.
- Plug your fence charger in and measure the voltage at the “cut-out” switch before and after activating the fence. Record these voltage measurements so later you can use them as a reference when checking the fence connection.

- 1. insolated hook-up wire (20,000V);
- 2. galvanized fence wire;
- 3. 6 foot galvanized ground rod, 1/2 inch diameter or more;
- 4. ground clamps;
- 5. power supply – use power supply specified by the label on the energizer only;
- 6. ground rods MUST be at least 25 ft away from the building foundation.
The Process of Checking That Your Ground System is Working
- Unplug the fence energizer.
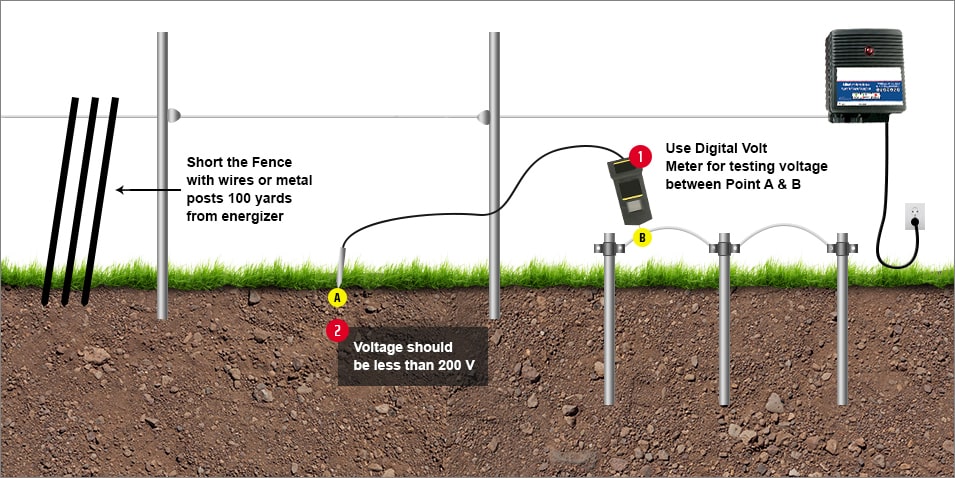
- Place the fence under heavy load by “shorting” the fence: at a location on the fence at least 300 ft from the fence charger, lean 3-4 steel stakes or T-posts against the “hot” wire of the fence. Or, instead of that, you may push several pieces of the fence wire into the earth and wrap the opposite ends around the hot wire.
- Plug the fence charger in and check the fence line voltage (use a digital voltmeter). The voltage should drop below 2,000V due to “shorting” the fence. Keep shorting the fence by leaning steel posts or by making wire connections to the ground at the distance of at least 300 ft from the electric fence charger until the fence line voltage drops below 2,000V.
- Connect 1 lead of the digital voltmeter to a 12 in metal stake driven into the ground 3 ft away from the last fence charger ground rod. Connect the 2nd lead to the ground rod furthest from the fence charger. The voltage reading should be from zero to no more than 200V.
- In case the digital voltmeter shows the reading that is under 200V, everything will work well.
- In case the reading is more than 200V, take the following steps:
- add more ground rods connected in series, 3 ft apart, and/or
- move your ground system to moist soil until the ground system voltage is below 200V.
- Check your ground system condition with a voltmeter once during the driest period and once during the wet season each year to ensure adequate grounding of your electric fence.
To protect your fence charger from lightning damage, you can install a special lightning arrestor, a lightning choke, as well as a surge protector (for AC-powered models).
It is recommended to install a minimum of one more ground rod for the arrestor than the number of ground rods you used for the fence charger ground system.
To monitor the performance of your fence, you can use a special digital voltmeter. With its help, you can easily monitor the voltage levels on the fence. Please note that you CAN’T use a household voltage meter as the input voltage of regular multimeters is exceeded by the output voltage of Power Wizard electric fence chargers.
In case you face some problems with your electric fence energizer, read the troubleshooting guide.
There can be another issue to think about, you may need to locate shorts/broken fence wires. How do you do it? Again, a digital voltmeter will come in handy. Use it to test each section of your fence.
Each type of the fence chargers has its advantages and disadvantages, you should select the most suitable product for your application depending on the important factors.
SAFETY INFORMATION |
DANGER - DOUBLE INSULATEDuse ONLY identical replacement parts and by qualified
service personnel ONLY! |
CAUTION:Do not remove the cover to reduce the risk of electrical shock. Refer to service personnel. |
|
WARNING: Do not connect simultaneously to a fence and any other device (e.g. a cattle
trainer or a poultry trainer).
|
*Warning: Use a digital voltmeter to check if the fence works. DON’T TOUCH it with your hands.