DIY Bird Feeder Plans (Simple Homemade Feeder)
Free DIY bird feeder plans. Create an inexpensive, contemporary, tray or platform bird feeder for your backyard. Whether it is winter, spring, or fall, there are likely to be some hungry birds in your neighborhood! Find more ideas on bird feeders plans and DIY bird feeders.

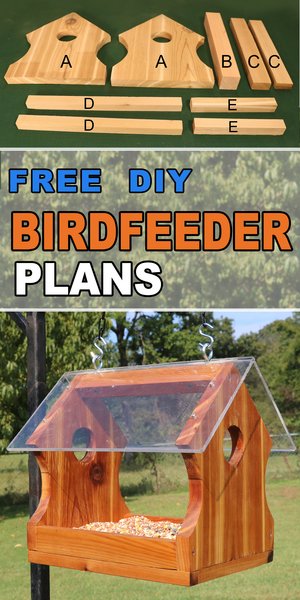
This feeder design has a wire mesh screen on the bottom that provides excellent drainage. This will keep the seed dry and fresh even after a heavy rain. With the plexiglass roof, this platform feeder invites birds to fly in, while still giving you a great view of the birds. Making a bird feeder can be a fun activity to do with your kids and family. This homemade DIY bird feeder will attract chickadees, nuthatches, woodpeckers, house finches, goldfinches, and bluebirds to your yard or garden.
Materials Needed to Build this Homemade Bird Feeder.
- Wood
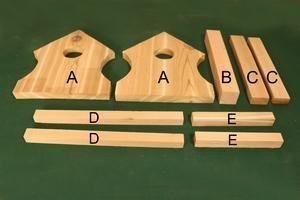
A: 8.5″ x 10.5″ x 3/4″ (22cm x 27cm x 2cm) – 2 pieces.
B: 1.5″ x 1.5″ x 10″ (4cm x 4cm x 25cm) – 1 piece.
C: 1.5″ x 3/4″ x 10″ (4cm x 2cm x 25cm) – 2 pieces.
D: 3/4″ x 3/4″ x 11.75″ (2cm x 2cm x 30cm) – 2 pieces.
E: 3/4″ x 3/4″ x 7″ (2cm x 2cm x 18cm) – 2 pieces. - Wire screen mesh: 11.8 inches x 8.2 inches (30xm x 21cm) – 1 piece.
- Plexi-glass: 6.75″ x 14″ (17cm x 36cm) – 2 pieces
Step 1. Cut pieces of wood for your bird feeder.
Cut pieces of wood to match the dimensions above. Personally, I am using cedar. However, pine would also make a great choice. Optionally sand all pieces smooth.
Step 2: Start to Assemble Your Bird Feeder.
Use a combination of glue and screws to attach Sections A, B, and C. To help extend the life of your bird feeder use a waterproof wood glue. Personally, I recommend using trim screws as shown below. The smaller screw head is less obvious and helps prevent the wood from splitting. If you pre-drill the holes, these screws will countersink themselves nicely because the head is not much larger than the pilot hole.
Step 3. Paint or finish the wood on your bird feeder.
Optionally, paint or finish the wood BEFORE installing the plexiglass roof or the wire mesh floor. In my case, I applied a linseed-oil. This finish helps accentuate the grain and makes the wood more resistant to damage.
Step 4. Cut and install the wire mesh floor.
Use a scissors or metal snips to cut your wire mesh to match the size of your bird feeder. Personally, I was surprised at how easy the wire mesh was to cut. Install wooden pieces D and E to hold the wire screen mesh in place. If possible, I would recommend using stainless steel wire mesh for the floor.

Step 5. Cut and install the plexiglass roof.
You can use a handsaw or a power saw to cut your Plexi-glass to match the dimensions. Pre-drill holes for screws. Attach the plexiglass to the wood using finishing screws.
Step 6. Hang or mount your bird feeder.
Mount your bird feeder and see which bird will visit your home. Your new bird feeder should provide you excitement for many seasons to come.
Related Articles on Bird Houses, Bird Feeders & More
Use these free DIY bird house plans and bird feeder plans to attract bluebirds, chickadees, flickers, finches, house sparrows, hummingbirds, kestrel, nuthatches, owls, purple martins, swallows, thrushes, warblers, woodpeckers, wrens, and other birds to your garden.


