Here are some more of our Easter and Spring crafts that we worked on this week. The first is the peeking bunny.
I've seen this craft many places online, but I wanted each child's to be a little more unique so instead of gluing pre-cut pieces, I had the kids paint their own bunny head and ears by dipping pom poms into paint.
Then they dipped a smaller pom pom into pink paint for the inside of the ears and the nose.
When it was dry, they drew in whiskers, eyes and a mouth. I also hot-glued a jelly bean to the nose. Then they painted their fingers green and made prints for the grass.
So simple, and each one is different. I hung them up with our Easter wreaths.
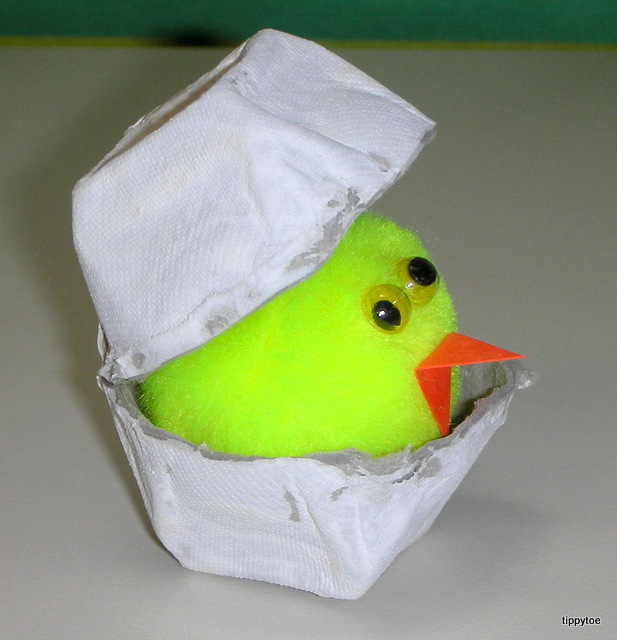
We also made egg chicks. I did this a few years ago, but this time I had the kids do more of the work themselves. I provided the egg-shaped body and the kids cut out everything else. They could do whatever they wanted to turn their egg into a chick.
Love how unique they are! Our last art project was fork tulips, which I first saw at Kids Play Box. I added a little bit of white paint to different colors and the kids pressed a plastic fork into the paint. They had to roll it back and forth a bit in the paint and again when they made their prints.
Most kids made all their tulips first, then added the stems with a brush, but some made a few tulips, added stems, made more tulips, added more stems, etc... They turned out so beautiful!
This will definitely be a project I do every year from now on. They add so much color to my room!
We also did an alphabet matching activity using plastic eggs. I wrote uppercase letters on the top halves and lowercase letters on the bottom halves. The kids had to match the letters together.
I made it a little easier on them by having the top and bottom be the same color.
Once all 26 eggs were put back together, they got a jelly bean! And the neat part was I was able to use a permanent marker to make the letters, but after the activity I just scribbled over them with a dry erase marker and wiped it clean with a tissue! Now I can easily use the eggs for something else.
Happy Easter!
Showing posts with label chicks. Show all posts
Thursday, April 2, 2015
Wednesday, April 16, 2014
Peeps Nest
Here is a super simple (and super sugary) treat for your kids to make!
All you need is Easter grass, cupcake liners, jelly beans and Peeps. The kids helped me cut the grass into smaller pieces.
This isn't necessary but it makes it a little easier when you put it into the cupcake liner, which is the next step.
Then come the eggs -- I mean jelly beans. (We used speckled.)
And lastly, the Peep!
Once you cut or pull apart the Peeps, the sides will be white and very sticky. If you care how it looks, you could always dip the sides in colored sugar. The kids really enjoyed making them.
Too bad that they had to wait until they got home to eat them. Last year we painted with Peeps (see it here) and will be doing it again this year!
Friday, April 13, 2012
Chick in an Egg
Here is my last chick craft, I promise! I've seen these around the web, so when my boss walked in my room with a bag full of egg cartons and asked if I could use them for anything, I said Yes! I cut them apart and taped two together. One piece of tape went on the outside:
And one piece went on the inside:
Yesterday the kids painted the outsides with white paint.
Although, I don't really know how necessary that was because once the paint dried you could hardly tell it had been painted. Anyway, today we put wiggle eyes and beaks on medium-sized pom poms. The kids used a toothpick to apply the glue.
They put them on the top of the pom pom so the glue wouldn't run down, causing them to slide off.
Since there was nowhere to write their names, I let them dry on a piece of paper with the names under them.
Once the glue was dry, we plopped them in the egg!
I had planned on putting a drop of glue at the bottom so the pom pom wouldn't fall out, but the kids didn't want me to. They wanted to be able to take the chick out to play with it. Fine with me! They look so cute peeking out!
**Linking up to Show-n-Share Saturday!**
Thursday, April 12, 2012
Roly Poly Birdies
We made cute little birds today! I started by rolling up a 2" wide piece of construction paper and stapling it.
Then I cut out some simple bird feet and beaks. First, the kids glued the feet to the bottom of the roll, where the staple was.
Then they added some wiggle eyes (with a glue dot) and a beak. Finally, they chose two feathers and glued them to the inside of the roll to make wings. They could glue them anywhere on the inside, but most of the children glued the feathers to the bottom.
I think another feather sticking out of the back would have been cute, too. Like a little tail. You could stick it right in where the staple is.
But they are also cute as is, don't you think?
I loved looking at them all together, like they were in a nest calling out to mom, "feed me!"
Are you tired of all my chick/bird crafts yet? Because I will have one more to share with you tomorrow!
**Linking up to Sharing Saturday!**
Wednesday, April 11, 2012
Bath Pouf Chicks
As soon as we made our snowy owls back in January, I knew I wanted to try the same technique to make chicks. And oh, did they ever turn out cute!
I had cut out some beaks and set out colorful wiggle eyes so they could add them to the chicks while the paint was still wet. We did use a little glue for the eyes, just to be safe.
But after a few minutes, I noticed all the beaks were opening up - all the way up.
It must have been something about the wet paint that made them unfold. And there was nothing I could do to get them to close again. So I quickly took off all the beaks and threw them away. Once the paint was dry, I cut new ones for the kids to glue on. They also colored a background and added some legs.
I kind of wish we had waited to glue the eyes on as well. The glue mixing with the wet paint left a little halo around all the eyes.
Oh well, I still love them! I "framed" them by taping them onto colored construction paper that matched the paint they chose. They are ADORABLE!!
I love how the bath pouf makes them look so fluffy!
I put out three different colors (just to add some variety) and added a bath pouf to each color.
The kids painted with the pouf onto white paper. They dabbed it on up and down, first making a head and then making a body.
But after a few minutes, I noticed all the beaks were opening up - all the way up.
It must have been something about the wet paint that made them unfold. And there was nothing I could do to get them to close again. So I quickly took off all the beaks and threw them away. Once the paint was dry, I cut new ones for the kids to glue on. They also colored a background and added some legs.
I kind of wish we had waited to glue the eyes on as well. The glue mixing with the wet paint left a little halo around all the eyes.
Oh well, I still love them! I "framed" them by taping them onto colored construction paper that matched the paint they chose. They are ADORABLE!!
**Linking up to the Sunday Showcase!**
Subscribe to:
Posts (Atom)