Does your simulation take a large amount of computational time to solve? One potential reason for this is that your mesh is using too many elements. In cases such as this, you may want to switch to user-controlled mesh to manually build and edit the meshing sequences available in the COMSOL Multiphysics® software as an alternative to using the default meshing sequence. As we’ll highlight with a tutorial example, this can help reduce memory requirements while providing accurate results.
Choosing an Accurate and Efficient Mesh
The mesh that you choose for your COMSOL Multiphysics simulation strongly affects your modeling requirements. In fact, meshing is one of the most memory-intensive steps when it comes to setting up and solving a finite element problem.
Identifying the mesh best-suited for your particular model often involves choosing the correct element types and sizes. In COMSOL Multiphysics, meshing utilizes four different element types: tetrahedra (tets), hexahedra (bricks), triangular prisms (prisms), and pyramids. There are also nine preset element size settings, which range from Extremely fine to Extremely coarse.

Images of different element types. From left to right: a tetrahedron, hexahedron, triangular prism, and pyramid.
Meshing, like many of the tools available in COMSOL Multiphysics, is customizable and interactive. In just a few steps, you can easily mesh individual faces or domains. Further, the default physics-controlled meshing sequences create meshes that consist of different element types and size features, which you can use as a starting point to add, move, disable, and delete meshing operations. Each meshing operation is built in the order it appears in the meshing sequence to produce the final mesh. Customizing the meshing sequence can help reduce memory requirements by controlling the number, type, and quality of elements, thereby creating an efficient and accurate simulation.
Customizing Your Meshing Sequence in COMSOL Multiphysics®
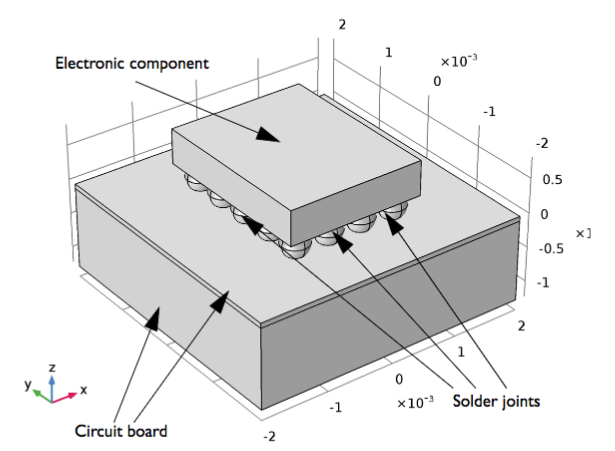
Let’s say that you want to model an electronic component that is mounted on a circuit board by solder joints. Such a device may generate high temperatures when turned on for extended periods of time. As noted in a previous blog post, overheating can damage the device itself and may even present a fire hazard.
In the case of our tutorial model, exposure to extended periods of heat can cause creep in the solder joints holding the electronic component in place. This may eventually result in permanent deformation and failure of the joints. Here, we’ll examine how different meshes can be used to study such a device.

An electronic component that is mounted on a circuit board by solder ball joints.
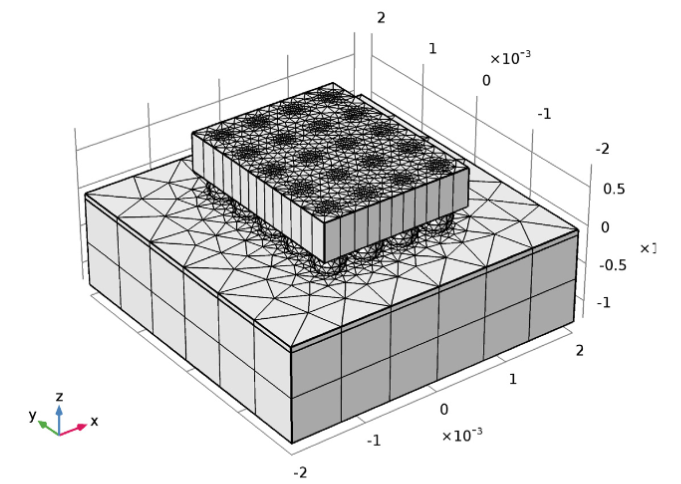
To begin, we’ll use the default Physics-controlled mesh, which is a simple, unstructured tetrahedral mesh. This mesh is automatically created and adapted for the model’s physics settings, with the element size defaulting to Normal, and the meshing sequence, consisting of a Size and a Free Tetrahedral node, is hidden.

A default mesh on the electronic component geometry.
The resulting mesh, shown above, consists of about 45,000 elements. While this number of elements does resolve the geometry quite well, it does so in all regions of the geometry even where much fewer elements would be adequate to use for meshing, thus reducing memory requirements. Let’s see how modifying the meshing sequence can reduce the number of mesh elements…
Using Mesh Operations and Size Attributes in the Meshing Sequence
In order to reduce mesh elements, we can customize the mesh to be more detailed at the spherical domains, which represent the joints, and coarser throughout the rest of the geometry. To do this, we can now turn our attention to the local and global size attributes in the meshing sequence. In the default meshing sequence, the settings of the first global attribute feature are applied to the following Free Tetrahedral 1 node. The name global attribute feature is given to the first Size feature node used in a sequence because it influences all of the operations that follow it.
To achieve our goal, we add a local Size attribute, which applies to the individual solder joint domains, to the Free Tetradhedral 1 operation. Doing so enables us to focus on the key elements of our design. The initial mesh utilizing this method consists of approximately 28,000 elements, almost half the number of elements as the default mesh.

A customized mesh, which contains more mesh elements around the spherical domains.
To further reduce the element number, we can apply a swept mesh, which notably reduces the size of a model and its computational complexity. In our example, we modify the Free Tetrahedral 1 operation to apply only to the domains of the solder joints. Now we want to use the upper part of the circuit board and the electronic component as the sources for our swept mesh. It is important to note, however, that a few of these model faces are already meshed as they border the solder joints.
Next, we add a Free Triangular feature node to our meshing sequence. Since COMSOL Multiphysics adds new nodes into the meshing sequence after the current feature node, the Free Triangular 1 node becomes the current feature instead of the existing Free Tetrahedral 1 node. If desired, you can easily change this by moving the order of the nodes in the meshing sequence. Keep in mind that doing so may cause build errors if an operation depends on earlier operations in the sequence.

Mesh with an added Free Triangular 1 feature node.
We can now once again turn our attention to the local and global size attributes in the meshing sequence. When we created the Free Triangular 1 node, the mesher applied the settings of the first global Size feature. We are able to add a coarser triangular mesh to the Free Triangular 1 operation using a local size attribute. The new mesh, however, has an almost identical appearance to the previous iteration. This is due to the fact that the mesher had to utilize the solder joints’ preexisting mesh on the edges and the global size settings (which are set as Normal) on the outer edges. Therefore, the local coarser mesh was only applied to the interior of the meshed faces.
To avoid this issue, we simply need to ensure that the first global Size node is set as the coarsest mesh in your entire geometry. Then, you can create local size feature nodes for meshing operations that require finer meshes. After applying this technique, we utilize a Coarser predefined mesh size for the swept mesher and continue sweeping the source mesh throughout our remaining domains. The result is a mesh that contains around 17,000 elements.

Revised mesh with even fewer elements.
If you would like to more precisely control the number of mesh elements, you can choose to specify the distribution for the swept mesher yourself. When applying this approach to our tutorial example, the mesh includes about 21,000 elements, with a higher resolution confined to the domains important to our analysis, the solder joints.

Mesh focusing on important design elements, while remaining less dense in other areas.
As we have demonstrated here, modifying meshing sequences is a powerful tool for greatly reducing mesh elements and thus minimizing computational time — all while still delivering accurate results for the key areas of a geometry. Interested in learning more about meshing? Take a look at the resources highlighted below.
Browse Additional Resources on Utilizing Meshing for Your Simulations
- Browse the COMSOL Blog for further posts related to the topic of meshing
- Check out these videos to learn more about utilizing the meshing capabilities of COMSOL Multiphysics:


Comments (4)
Moustafa AlDamook
October 27, 2017Dear Caty,
It is quite helpful post, however, it is not straightforward to understand the steps of meshing sequence and mesh Operations without snapshot for each step. It will be very helpful if you can add these snapshot or pictures.
Moustafa
Caty Fairclough
November 6, 2017Hi Moustafa,
Thanks for your comment and the suggestion. For more details on how to perform this process, please check out the related tutorial model: https://www.comsol.com/model/using-meshing-sequences-13869 .
Ramiro Mansilla
November 22, 2018Dear Caty
A question: how is the process to mesh different size rates of elements in a same structure when this rates are too different? I want to mesh a 2D structure that consists of a very narrow rectangle (0.00064 mm) joined to another rectangle of 40 mm. In the union of these two structures the default mesh has problems. Thank you!
Ramiro
Brianne Costa
November 27, 2018 COMSOL EmployeeHello Ramiro,
Thank you for your comment.
For questions related to your modeling, please contact our Support team.
Online Support Center: https://www.comsol.com/support
Email: [email protected]