- CPA Site Solutions Live! Dashboard
- DNS Update Needed – TR WBCS
- Get Help with your Website and Digital Marketing Needs from CPA Site Solutions. Right Here, Right Now.
- Frequently Asked Questions: Websites & Marketing
- Reputation Marketing
- Secure Firm Portal
- 11 Levels of Security
- Logging Into The Portal
- Portal Alert Notification
- Portal FAQs
- Portal File Vault
- Portal Update
- Users
- Administration
- Portal Applications
- File Vault
- Site Manager
- Logging Into Site Manager
- Updating Contact Information
- Editing Website Pages with the WYSIWYG Editor
- Financial Calculators
- Adding/Modifying Content
- Modifying Your Site
- Add Page
- Adding/Editing Text
- Adding A Link
- Adding A Custom Link To The Nav Bar
- Adding A PDF As A Custom Link
- Remove A Custom Link Page From Your Website
- Linking PDF/Docs
- Adding a Second Link to an Existing Web Page
- Adding an Image
- File Uploader
- Adding YouTube Videos
- Creating A Custom Form
- Editing The Page Title
- Changing Hub Pages on Your Website
- Editing Internet Links
- Reverting to Default Content
- Seminar Registration
- Publishing Your Site
- Blog Page
- Managing Your Site Map
- Firm Info
- More Options
- Newsletter/Email Marketing System Help
- Online Interactive Tax Organizer (Legacy Product)
- Security Measures
- OfficeMojo
- Domain Email
- Embedding WebTools into Your Site
- Diamond
- Third Party Add-On Tools
- SnapEngage Live Chat FAQs
- COVID-19 Update
- Billing Information
- Update Your Contact Information
- Take Your Site Live
- Websites For Bookkeepers
- Websites for Enrolled Agents
- Websites For Financial Advisors
- Digital Services Offered
- Sample Taglines To Choose
- Need Help? Contact Our Team at CPA Site Solutions Today!
Chat Hours 9:00AM - 5:00PM EST M-F
After Hours Email: [email protected]
800-896-4500
Adding an Image
In this tutorial, You will be instructed on how to insert an image onto a page within your website. Some images you might add could be of your office, staff photos, or logos of associations you might belong to.
1.Log Into The Site Manager: Within the portal, you will need to access your “Site Manager.” Once your in the site manager, navigate to the page you wish to add an image to. Move your mouse over the area that you want to edit so it becomes highlighted in gray. “Click the highlighted gray area.” This will open up the WYSIWYG (What You See Is What You Get) Editor.
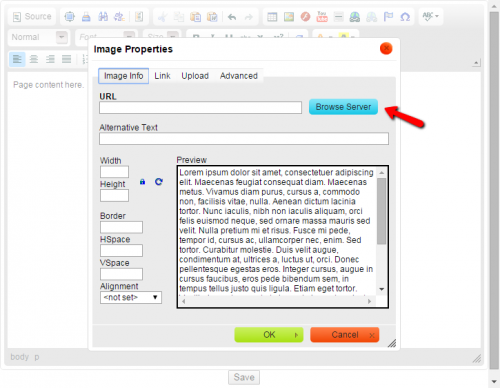
2. Image Settings Icon: Within the WYSIWYG editor toolbar, click the “Image” icon. This opens the Image Settings window.
Note: If you need to insert an image that is on your computer, first click the “Upload” tab and skip the next two steps and see 5B.
3. Browse Server: If you click “Browse Server,” another window will open that allows you to see previously uploaded images to your server.
4. Stock Gallery Images: You can also click the “Plus” sign next to the Galleries to look through our stock images. Once you’ve selected and image, just double click it and select okay.
You can add a black border, adding padding around the image (Hspace=Left and Right of image, Vspace=Top and Bottom of image), and Alignment will determine how the text flows around the picture. Click “Save” when your finished.

6. The image should now be placed inside the WYSIWYG editor. From here, you can move your image virtually anywhere in the editing window by “left-clicking the image and dragging the image to the location” where you want it placed. To make your image larger or smaller, “Single left-click the image” so a series of small boxes develop along the perimeter of the image. You can then left-click and drag a box to resize the image. To make more modifications, right click the image and choose “Image Properties.”
Remember to “Click Save” once you are done making changes. This will ensure your new image is added to your page.
Comments are closed.


