
Playing music, whether it’s a digital audio file or a CD, is one of the things that most, if not all of us do on our Windows 10 computers and devices. Although Microsoft created the Groove Music app for Windows 10, and even if there are many third-party media players out there, some people still like the old Windows Media Player. If you’re a longtime fan of this app, you might want to continue using it in Windows 10. If that’s so, this guide is for you: we show you how to play music in Windows Media Player, regardless of whether it’s songs and other audio files found in your Library or not. We explain the different Playback Modes and how each of the Playback Controls works. We also answer questions, such as how many songs can Windows Media Player handle and how to play all music in Windows Media Player.
How to play music from your library in Windows Media Player
The basic playback of MP3 files and other digital audio files from your Windows Media Player Library is simple. Just navigate through Windows Media Player and double-click or double-tap on a song. Alternatively, you can also select a tune and press Play on the Playback Controls.

How to play music in Windows Media Player
The Playback Controls are always visible, but once a song is playing or selected, they become functional and are no longer grayed out.
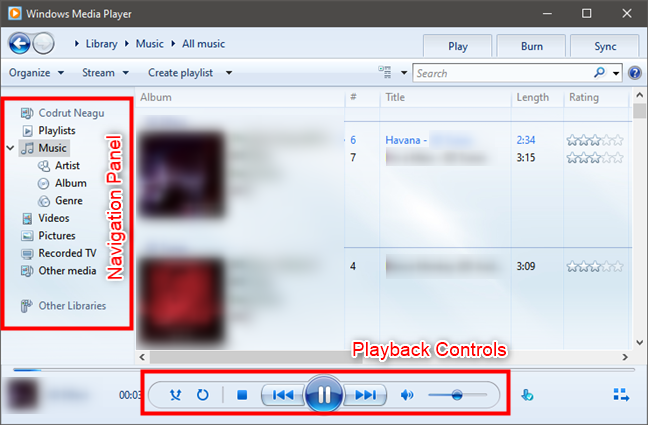
Windows Media Player: Navigation panel and controls
Here’s a closer look at the Playback Controls. From left to right, they are:
- Shuffle – this turns Shuffle Mode on or off. In Shuffle Mode, tracks in the album, playlist, or category you’ve chosen are played in random order.
- Repeat – this turns Repeat Mode on or off. When activated, Repeat Mode repeats the playlist, album, or category you’ve selected. For example, when it reaches the end of an album, it starts again from the first track. If you want to play one song over and over continuously, play it from a search query or create a playlist containing that one song only.
- Stop – pressing Stop ceases playback and resets the Play Position to the beginning of the song.
- Previous – it returns to the previous song in the playlist or category selected. In Shuffle Mode, this button plays the last song played, regardless of its position in the playlist or category.
- Play / Pause – if playback is stopped, this button resumes or begins play. If a song is playing, this becomes the Pause button and stops playback but retains the Playback Position. When you press Play, you start playback from where you left off.
- Next / Fast Forward – Next skips to the next song on the playlist as if the song has reached the end of its duration. Click/tap and hold this button to fast-forward playback so you can seek a specific part of the song.
- Mute – click/tap this button to mute the volume. Playback does not stop, though you do not hear any audio.
- Volume Slider – slide this left to decrease the volume and right to increase the volume.
- Seek – hover your mouse over the progress bar above the playback controls to reveal the Seek slider. Move this to the position where you’d like the song to start playing. Slide left to move towards the beginning of the song, and slide right to move closer to its end.

Windows Media Player: Playback controls
Before you move away from the Playback Controls, you should also note that Windows Media Player displays the currently played song information in the lower-left corner. Click/tap on it to switch from displaying album artwork to a small audio spectrum visualization. You can also hover your mouse over it to display additional song information.

Windows Media Player: Information about the currently played song
Also, note that in Skin Mode or Now Playing Mode, the Playback Controls may be pared down or displayed differently but function in the same way.

Windows Media Player in Now Playing Mode
There’s also another playback feature that isn’t included on the Playback Controls. If you hover your mouse over a song, a little dialogue will pop up with the Preview button. Click it once, and the song will begin playing.

Preview a song in Windows Media Player
Once the song is playing in Preview Mode, you can skip 15 seconds into the song by clicking Skip. Move your mouse away from the dialogue box, and the song automatically stops playing. This is a handy feature if you are looking for a particular song and you aren’t sure if this is the one.

Skipping while previewing a song in Windows Media Player
How to play music in Windows Media Player from your taskbar
Windows Media Player can also play songs right from your taskbar. Simply allow your mouse to hover over its icon on the taskbar, and the Playback Controls appear. Hover over them, and a tooltip will display the name of the song playing. Click or tap Play / Pause, Previous, or Next just like you would while viewing the Windows Media Player Library.

Play music in Windows Media Player from the taskbar
How to play Audio CDs in Windows Media Player
To play Audio CDs or digital audio files saved to a data disc, all you have to do is insert the disc into your computer, and it pops up in your Navigation panel. Note that these songs don’t show up in your Library unless you rip them from the CD. Click or tap on the disc’s name, and Windows Media Player displays its contents.
Note that you can also see the drive letter in the breadcrumbs at the top. Next, choose a song or hit Play just like playing a song from your Library.

How to play an Audio CD in Windows Media Player
How to play songs that are not in your Windows Media Player library
You can also use Windows Media Player to play the music that isn’t part of your Library. Do so by dragging one or more audio files from another location, such as a folder or your desktop, and drop it on Windows Media Player’s playlist. If the playlist is not displayed, first click or tap on the Play tab from the upper-right corner of the window. The song(s) are then played by Windows Media Player but are not added to your library.
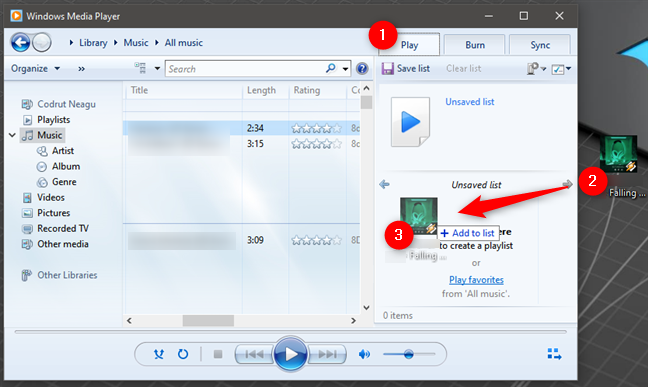
Play music in Windows Media Player that's not part of the library
You can also right-click (press-and-hold) on an audio file in File Explorer or your desktop and select “Play with Windows Media Player” or “Add to Windows Media Player List.”
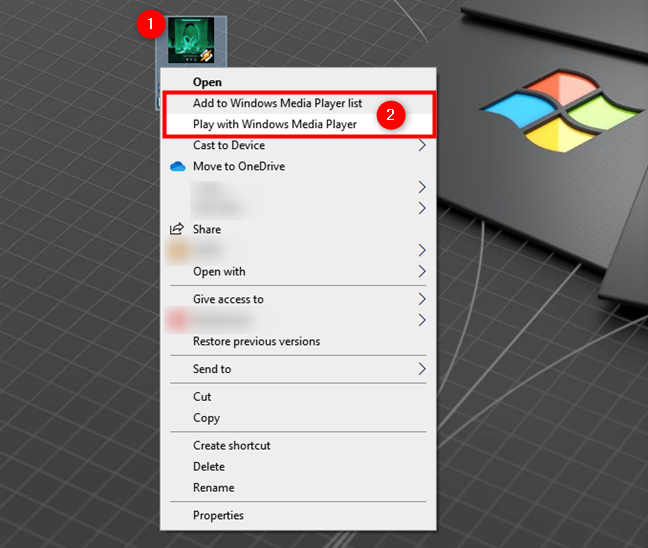
Play with Windows Media Player from the desktop or a folder
If you are viewing a folder with music files in it in File Explorer, you can select the Music Tools tab from the ribbon interface at the top, and then press Play, Play all, or “Add to playlist.” If Windows Media Player is not your default app for playing media files, you can select it from the dialog that shows up.

Play music in Windows Media Player from File Explorer
How to play all music in Windows Media Player
There are three ways we know for playing all music in Windows Media Player. The first one is probably the easiest: open Windows Media Player and just press the Play button without selecting any song from the library. That automatically creates a playlist with all your music, which Windows Media Player starts playing. Note that if you first select a song, album, category, or playlist, Windows Media Player starts playing just that item instead of all your music.

How to play all music in Windows Media Player
The second method to play all music in Windows Media Player is also easy. Open Windows Media Player and right-click or press-and-hold on its icon from the taskbar. Then, in the contextual menu that shows up, select “Play all music.”
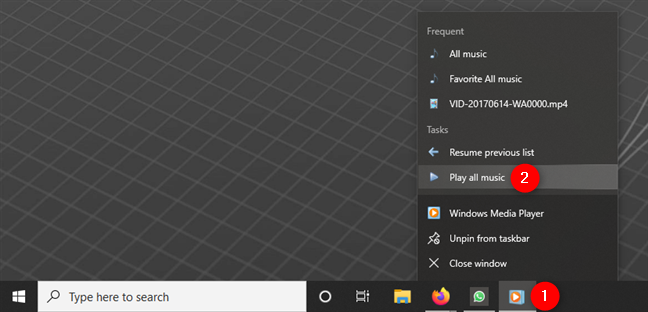
Play all music in Windows Media Player using its taskbar icon
Note that you can also pin Windows Media Player to your taskbar or Start Menu. Right-clicking or pressing-and-holding on its pinned shortcut gives you the same “Play all music” option.
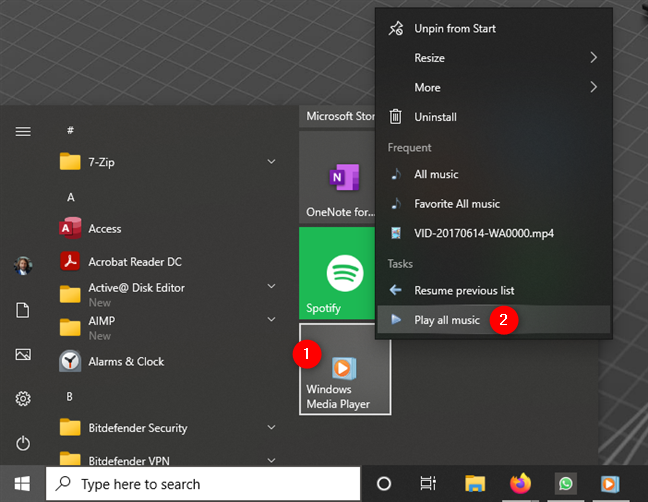
How to play all music in Windows Media Player using its pinned shortcut
Finally, there’s also a third method to play all music in Windows Media Player, but it’s a bit more complicated. Create a new playlist and add all the songs in your library to it.
How many songs can Windows Media Player handle?
Windows Media Player has no limitation when it comes to how many songs it can handle. The only problems that may occur when dealing with large music libraries are related to how fast and powerful your Windows 10 computer or device is. When dealing with massive music libraries, Windows Media Player’s performance might be negatively affected, especially if you keep your songs on slow hard drives.
Windows Media Player Supported Formats
Windows Media Player natively supports many audio and also video file types:
- Windows Media formats (.asf, .wma, .wmv, .wm)
- Windows Media Metafiles (.asx, .wax, .wvx, .wmx, wpl)
- Microsoft Digital Video Recording (.dvr-ms)
- Windows Media Download Package (.wmd)
- Audio Visual Interleave (.avi)
- Moving Pictures Experts Group (.mpg, .mpeg, .m1v, .mp2, .mp3, .mpa, .mpe, .m3u)
- Musical Instrument Digital Interface (.mid, .midi, .rmi)
- Audio Interchange File Format (.aif, .aifc, .aiff)
- Sun Microsystems and NeXT (.au, .snd)
- Audio for Windows (.wav)
- CD Audio Track (.cda)
- Indeo Video Technology (.ivf)
- Windows Media Player Skins (.wmz, .wms)
- QuickTime Movie file (.mov)
- MP4 Audio file (.m4a)
- MP4 Video file (.mp4, .m4v, .mp4v, .3g2, .3gp2, .3gp, .3gpp)
- Windows audio file (.aac, .adt, .adts)
- MPEG-2 TS Video file (.m2ts)
- Free Lossless Audio Codec (.flac)
Windows Media Player also automatically uses codecs installed by other players when possible. To check which codecs are already installed on your Windows 10 PC, first open the Help menu from Windows Media Player. If you don’t see it, click or tap on Organize, select Layout, and click or tap on “Show menu bar.”

How to see the menu bar of Windows Media Player
Then click or tap Help on the menu bar and select “About Windows Media Player.”
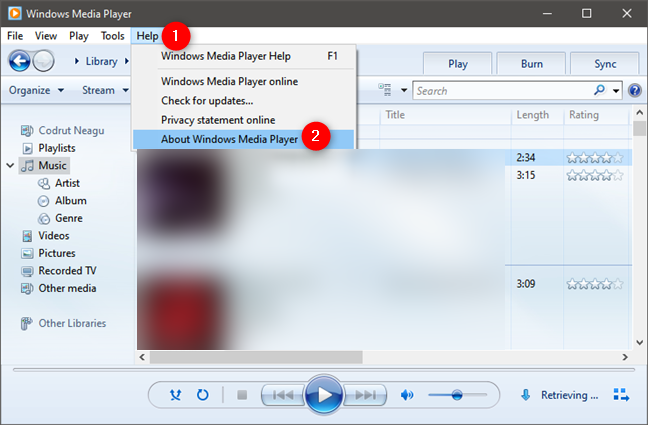
About Windows Media Player
Next, click or tap on the “Technical Support Information’” link from the “About Windows Media Player” window.

Technical Support Information for Windows Media Player
Windows Media Player now opens a webpage in your web browser with information about it. Scroll down to find details about the audio codecs installed.

Audio Codecs used by Windows Media Player
Do you still prefer Windows Media Player to other newer apps?
That covers the basic playback functionality of Windows Media Player for listening to digital audio and audio CDs. Are you still using it in Windows 10 to play your favorite songs and maintain your music library? Feel free to add your tips or questions about Windows Media Player in the comments section.


 10.12.2020

