Microsoft introduced ASP.NET Web API as a lightweight HTTP based web services framework with the launch of Visual Studio 2012 and .NET Framework 4.5. Prior to Web API, communicating over HTTP in Microsoft’s dev stack was a colorful mess comprising of WS-* stack. There were other third party libraries that were built ground up on .NET, like ServiceStack. With Web API, Microsoft took a clean break and built a framework that stuck to the basics of HTTP without introducing any complicated stubbing or end point proxies.
After a long period of incubation in the WCF team, the Web API team was merged with the ASP.NET MVC team. A lot of the final Web API’s end point implementations thus mimic MVC.
If all this HTTP service talk sounds confusing, let’s see if this diagram helps where a user requests my twitter profile using his/her browser – http://www.twitter.com/suprotimagarwal
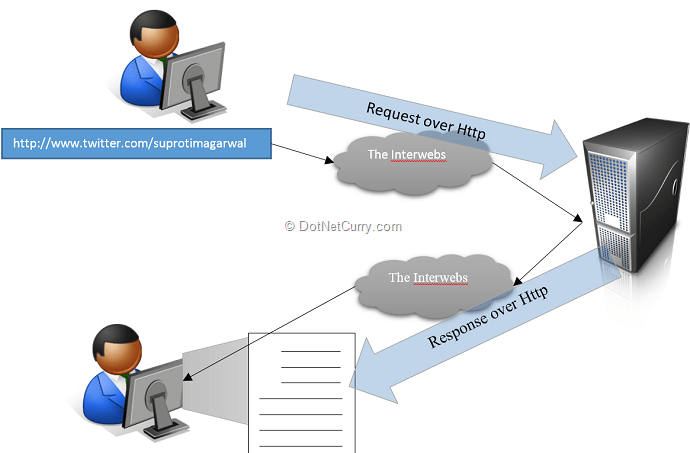
- In the diagram above, a user is sitting at the computer and types in a URL in the browser. Notice that apart from the URL he also types in /suprotimagarwal which tells the server ‘something’.
- The browser sends this request over HTTP to (GET) the actual site. The discovery process of “www.twitter.com” leverages the routing mechanism of the internet and it happens over port 80 using HTTP.
- The request is eventually sent to the Twitter server where it is processed by a web application running a service on top of HTTP at port 80.
- This service then interprets the ‘suprotimagarwal’ in the URL as a request to GET (as in the HTTP request keyword) the profile of suprotimagarwal. Thus it makes appropriate backend calls to retrieve the user profile data and sends it back to the requestor. In this case, the users’ browser renders the data that came in. Note, sometimes, the raw data may not be sent back instead the data is used to build the respective view and the complete view (in html) may be returned, but in context of Web API, it’s not a view; only the data. Keep the term ‘Content Type Negotiation’ in mind, we will circle back to it in the next section.
Overall the idea of Web API is to offer services that work seamlessly over HTTP as we saw above. This is a great way to build public APIs for multiple client platforms.
Http and Content Types
Whenever we think of HTTP URLs and web browsers, we picture HTML being received by the browser and then rendered. However, there are instances when our browser renders an image by itself, or plays music or shows a PDF document in the browser itself. These are instances of data/content other than html was sent over and the browser ‘understood’ the ‘Content Type’ and acted appropriately. For example, if we have a link to a PDF and the browser has a plugin for it, it can directly display the PDF in browser.
When you build Web API based services, you can return data as JSON by default. However you can send out other types of content as well. For example if you are sending out Calendar information, you can send it out as an iCal, when sending out graphs data you can send out the rendered image and so on. What type of data is acceptable to the client and what can the server provide is a ‘negotiation’ that happens between the client and the server before either a content type is agreed upon or a 406 (Not Acceptable) error is sent by the server implying it cannot provide data in any of the requested Content Types.
Media Formatters and Content Types
As I mentioned briefly above, Web API services return data in JSON or XML. This is because the data returned by the Controller is converted into JSON or XML by a component referred to as Media Formatter. Web API has two of these out of the box, no points for guessing they are for JSON and XML formats.
Media Formatters are the extension points that allow us to plug in our own Formatter and thus help our Service support more Content Types.
Defining the Premise
Today we will see how we can build a Web Service that returns Appointments in a rudimentary Timekeeping application that maintains ‘Timecards’. Please note that I am using ASP.NET Web API V1.0 for this demo.
On top of the Service, we will have a Single Page application that uses Knockout JS to render basic CRUD screens for Timecards. We will also create a Media Formatter that formats these ‘Timecards’ into the VCalendar format so that they can be downloaded and imported into our Calendaring tools like Outlook etc.
Building a ‘Time Card’ Service
We will start off by creating a new ASP.NET MVC 4 project in Visual Studio and call it TimeKeepr. From the templates list, we select the ‘Web API’ template to get started.
First up, let’s build the model and the controller.
The Model and (Web) API Controller
Our Model is very simple. It has the following properties.
public class TimeCard
{
public int Id { get; set; }
public string Summary { get; set; }
public string Description { get; set; }
public DateTime StartDate { get; set; }
public DateTime EndDate { get; set; }
public string Status { get; set; }
}
As we can see it’s a bare-bones definition of a Task, it simply maintains Summary, Description, StartDate and EndDate.
Once the model is added we build the app, and then add a TimeCardController with the following settings. As you can see, we are creating API controllers as opposed to MVC Controllers so no views are going to be generated.
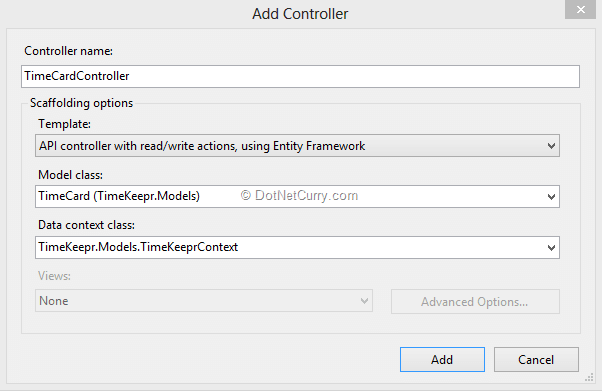
The DBContext that is created by the scaffold pretty much takes care of the database persistence. Today we will cut some ‘pattern’ corners and leave the DBContext instantiation in the controller itself. For a production system, it should be a part of the Repository and we should be injecting repository instances into the controller.
The View using Knockout JS
We will build a single page View with Add and Edit functionality. The view will use the Knockout JS library to implement two way data-binding. This will give us a nice and responsive UI. We will post data back to the server using Ajax. We will also use a plugin by Ryan Niemeyer that will help us control Knockout’s two way data-binding by giving us options to either commit or roll-back any changes.
Setting up Dependencies
We’ll update our jQuery and KO dependencies from the Nuget Package Manager using the following commands
PM> update-package jquery –version 1.9.1
PM> update-package knockoutjs
Note: Nuget takes care of the latest versions, so the versions of jQuery and KnockoutJs may be different as the ones shown above.
Next we’ll add a JS called knockout.protectedObservable.js and add the following script by Ryan Niemeyer.
// Source-Ryan Niemeyer's JS Fiddle at http://jsfiddle.net/rniemeyer/X9rRa/
//wrapper for an observable that protects value until committed
ko.protectedObservable = function (initialValue)
{
//private variables
var _temp = initialValue;
var _actual = ko.observable(initialValue);
var result = ko.dependentObservable({
read: _actual,
write: function (newValue)
{
_temp = newValue;
}
});
//commit the temporary value to our observable, if it is different
result.commit = function ()
{
if (_temp !== _actual())
{
_actual(_temp);
}
};
//notify subscribers to update their value with the original
result.reset = function ()
{
_actual.valueHasMutated();
_temp = _actual();
};
return result;
};
The Above script prevents Updates to the ViewModel unless we call an explicit commit() method. Once this script is in, our dependencies are set, let’s build a View Model.
The View Model
We’ll add a new JavaScript file to the Scripts folder called timekeepr-vm.js. In the ViewModel, we have a collection called timecards that essentially lists all the time cards in the database.
The selectedTimeCard property is set when the user clicks on the ‘Select’ link on any of the Time Card rows OR when a new TimeCard is added. The addNewTimeCard method is called when user clicks on the “Add New TimeCard” button. It adds an empty TimeCard object into the timecards collection. This method is also called when we are loading data from server into our ViewModel. In that case, it maps the JSON objects into KO Observable objects.
The commitAll function is a helper function that commits each property in the selectedTimeCard. It has to be called before we save any changes to the database.
var viewModel = {
timecards: ko.observableArray([]),
selectedTimeCard: ko.observable(),
addTimeCard: function ()
{
viewModel.timecards.push(addNewTimeCard());
},
selectTimeCard: function ()
{
viewModel.selectedTimeCard(this);
},
commitAll: function ()
{
viewModel.selectedTimeCard().Summary.commit();
viewModel.selectedTimeCard().Description.commit();
viewModel.selectedTimeCard().StartDate.commit();
viewModel.selectedTimeCard().EndDate.commit();
viewModel.selectedTimeCard().Status.commit();
}
};
function addNewTimeCard(timeCard)
{
if (timeCard == null)
{
return {
Id: ko.protectedObservable(0),
Summary: ko.protectedObservable("[Summary]"),
Description: ko.protectedObservable("[Description]"),
StartDate: ko.protectedObservable((new Date()).toJSON()),
EndDate: ko.protectedObservable((new Date()).toJSON()),
Status: ko.protectedObservable("Tentative")
};
}
else
{
return {
Id: ko.protectedObservable(timeCard.Id),
Summary: ko.protectedObservable(timeCard.Summary),
Description: ko.protectedObservable(timeCard.Description),
StartDate: ko.protectedObservable((new Date(timeCard.StartDate)).toJSON()),
EndDate: ko.protectedObservable((new Date(timeCard.EndDate)).toJSON()),
Status: ko.protectedObservable(timeCard.Status)
};
}
}
The View
Once the view model is in place, we setup our view by updating the Index.cshtml. This page is served up by the HomeController, but we don’t have any Controller side code for it. We’ll make AJAX calls to the API controller to manipulate data
@section Scripts{
}
We have split the view into two using the ‘left-section’ and ‘right-section’ CSS classes. The ‘left-section’ has the List of all the TimeCards whereas the ‘right-section’ shows the currently selected card if any.
To edit a card we ‘Select’ it first. This populates the selectedTimeCard property in the view model which is bound to the ‘right-section’ and thus it comes up automatically. Once we do the changes and save, the data is posted back to the server and the selectedTimeCard is cleared out.
The implementation for adding new, selecting and saving data is in the timekeeper-client.js.
$(document).ready(function ()
{
$.ajax({
url: "/api/TimeCard",
method: "GET",
contentType: "text/json",
success: function (data)
{
viewModel.timecards.removeAll();
$.each(data, function (index)
{
viewModel.timecards.push(addNewTimeCard(data[index]));
});
ko.applyBindings(viewModel);
}
});
Once the document loads, we call the server to get all the time cards available. When the server returns the data, we add each TimeCard to the view model. Since the ‘timecards’ property is a KO Observable, Knockout will automatically update the view as each timecard is added.
$(document).delegate("#submitButton", "click", function ()
{
viewModel.commitAll();
var vm = viewModel.selectedTimeCard;
var current = ko.utils.unwrapObservable(vm);
var stringyF = JSON.stringify(ko.mapping.toJS(current));
var action = "PUT";
var vUrl = "/api/TimeCard?Id=" + current.Id();
if (current.Id()==0)
{
action = "POST";
vUrl = "/api/TimeCard";
}
$.ajax(
{
url: vUrl,
contentType: "application/json;charset=utf-8",
type: action,
data: stringyF,
success: function (response)
{
alert("Saved Successfully");
viewModel.selectedTimeCard(null);
},
failure: function (response)
{
alert("Save Failed");
}
});
});
Note: As of jQuery 1.7, .delegate() has been superseded by the .on() method. I have used .delegate() to support users using older versions of jQuery. However depending in your scenario, feel free to use the latest jQuery .on event handlers. Also replace success and failure Ajax methods with .done and .fail
The Submit button click handler has the implementation for sending the currently selected TimeCard’s information to be saved in the Server.
To do this, the ‘selectedTimeCard’ object is converted into a Json string and put in the payload of the Ajax POST.
$(document).delegate("#cancelButton", "click", function ()
{
viewModel.selectedTimeCard(null);
});
Cancelling the Edit process simply resets the selectedTimeCard property to null. This hides the Edit Panel on the UI.
Running the App to Get and Put/Post data to Web API
Now that we have our Web API Controller and Index.cshtml with its client side dependencies setup, let’s run the app. On first run, we are greeted with a near empty screen with only the ‘Add New TimeCard’ button and the list headers for the TimeCards

Clicking on ‘Add New TimeCard’ adds a default time card
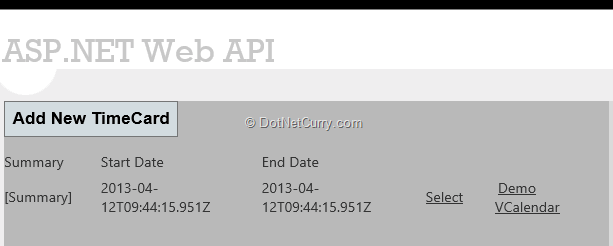
We can edit this by clicking on the ‘Select’ link
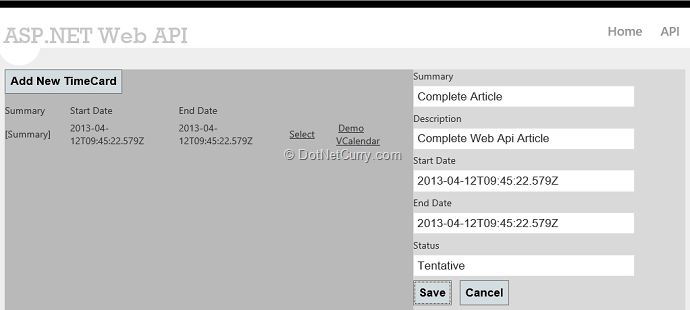
We Update the Summary and Description before hitting ‘Save’ the data gets updated in the DB.
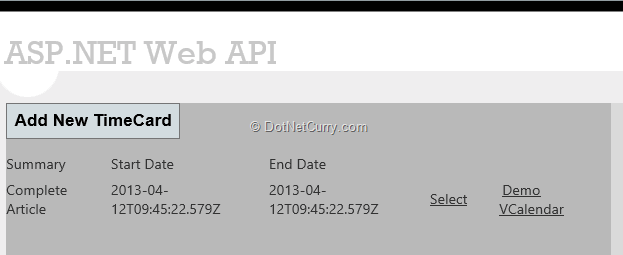
Behind the Scenes
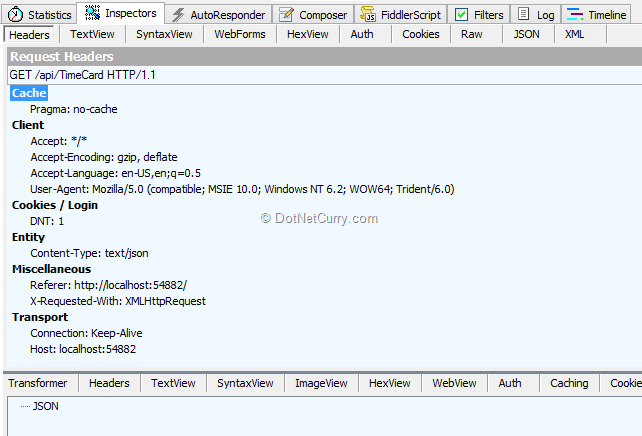
Now that we’ve seen what’s happening in the UI, let’s see what’s happening behind the scenes. To look at the HTTP Traffic, I had kept Fiddler running and the first request in Fiddler is a GET request which as we can see below gets an empty JSON in return.
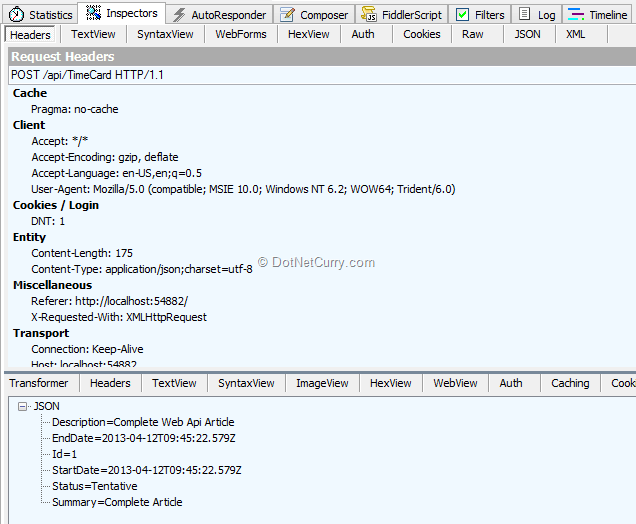
The next POST request pushes JSON Data to the Server.
On the next load, we again do a GET request and we see an array of JSON objects is returned, it has the newly created object in it.
In each of the cases, if you see the ‘Content-Type’ header parameter, it’s set to Content-Type: text/json because we are requesting for the JSON data or posting JSON data. The Web API service can serve JSON and XML, it sees a request for Json and uses the Json formatter to convert the Entity or Entity List into JSON. It’s worth noting that in our API Controller we return Domain entities or their lists directly. Note the GetTimeCards and the GetTimeCard methods below.
namespace TimeKeepr.Models
{
public class TimeCardController : ApiController
{
private TimeKeeprContext db = new TimeKeeprContext();
// GET api/TimeCard
public IEnumerable GetTimeCards()
{
return db.TimeCards.AsEnumerable();
}
// GET api/TimeCard/5
public TimeCard GetTimeCard(int id)
{
TimeCard timecard = db.TimeCards.Find(id);
if (timecard == null)
{
throw new HttpResponseException(Request.CreateResponse(HttpStatusCode.NotFound));
}
return timecard;
}
…
}
}
Custom Media Type Formatters and Content Types
Thus, we’ve seen how the out of the box media formatters work let’s see what options we have for formatting data in a custom media formatter.
Use Case
The information we have can be easily saved as Calendar items. So it would be nice if our service could serve up VCalendar items too. VCalendar is a data format that most calendaring tools support. If our Web API could serve up VCalendar items for each TimeCard, then they could be easily integrated with calendaring tools like Outlook.
With this use case in mind, let’s create a VCalendarMediaTypeFormatter.
Our Custom Media Type Formatter
Custom Media Type Formatters subclass the MediaTypeFormatter abstract class or one of its implementations. We will subclass the BufferedMediaTypeFormatter.
public class VCalendarMediaTypeFormatter : BufferedMediaTypeFormatter
{
…
}
First thing we do in the constructor is to clear out all Supported media types and only keep “text/calendar”, which is the standard header type for requesting calendar items.
public VCalendarMediaTypeFormatter()
{
SupportedMediaTypes.Clear();
SupportedMediaTypes.Add(new MediaTypeHeaderValue("text/calendar"));
}
Next we override the SetDefaultContentHeaders and set content-disposition as an attachment with a generic file name (myFile.ics).
public override void SetDefaultContentHeaders(Type type, HttpContentHeaders headers, MediaTypeHeaderValue mediaType)
{
headers.Add("content-disposition", (new ContentDispositionHeaderValue("attachment") {
FileName = "myfile.ics" }).ToString());
base.SetDefaultContentHeaders(type, headers, mediaType);
}
Since our formatter will not be accepting ICS files in posts, we’ll override the CanReadType method and return false directly.
public override bool CanReadType(Type type)
{
return false;
}
Our Formatter should only try to format requests of type TimeCard and not any other type. So we limit this in the CanWriteType method by checking if the incoming type is of type TimeCard only.
public override bool CanWriteType(Type type)
{
if (type == typeof(TimeCard))
{
return true;
}
}
Next comes the crux of the formatter the WriteToStream method. We cast the incoming object into a TimeCard and call the WriteVCalendar method that writes to the stream buffer.
public override void WriteToStream(Type type, object value, Stream stream, System.Net.Http.HttpContent content)
{
using (var writer = new StreamWriter(stream))
{
var timeCard = value as TimeCard;
if (timeCard == null)
{
throw new InvalidOperationException("Cannot serialize type");
}
WriteVCalendar(timeCard, writer);
}
stream.Close();
}
As we can see below, VCalendar items are simply formatted text and we use the data in our TimeCard to create the appropriate string for the VCalendar.
private void WriteVCalendar(TimeCard contactModel, StreamWriter writer)
{
var buffer = new StringBuilder();
buffer.AppendLine("BEGIN:VCALENDAR");
buffer.AppendLine("VERSION:2.0");
buffer.AppendLine("PRODID:-//DNC/DEMOCAL//NONSGML v1.0//EN");
buffer.AppendLine("BEGIN:VEVENT");
buffer.AppendLine("UID:[email protected]");
buffer.AppendFormat("STATUS:{0}\r\n", contactModel.Status);
buffer.AppendFormat("DTSTART:{0}Z\r\n", (contactModel.StartDate.ToFileTimeUtc().ToString()));
buffer.AppendFormat("DTEND:{0}Z\r\n", (contactModel.EndDate.ToFileTime().ToString()));
buffer.AppendFormat("SUMMARY:{0}\r\n", contactModel.Summary);
buffer.AppendFormat("DESCRIPTION:{0}\r\n", contactModel.Description);
buffer.AppendLine("END:VEVENT");
buffer.AppendLine("END:VCALENDAR");
writer.Write(buffer);
}
Associating Custom Formatter in our WebAPI Application
This is a single line of configuration in code. In the App_Start\WebApiConfig.cs we add the following in the last line of the Register method
config.Formatters.Add(new VCalendarMediaTypeFormatter());
If you don’t have the WebApiConfig.cs you can use
GlobalConfiguration.Configuration.Formatters.Add(new VCalendarMediaTypeFormatter());
That’s it we are done.
Testing the Custom Formatter Out
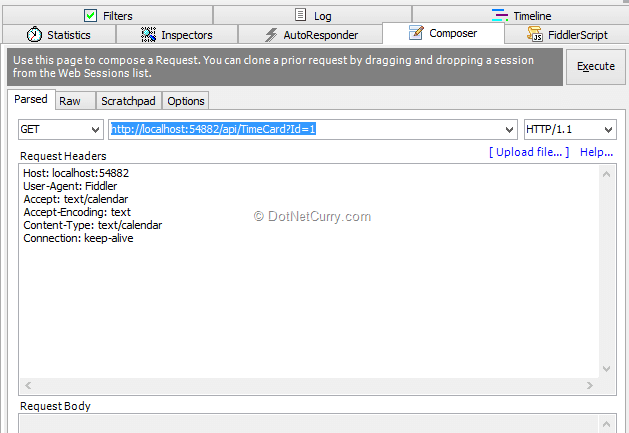
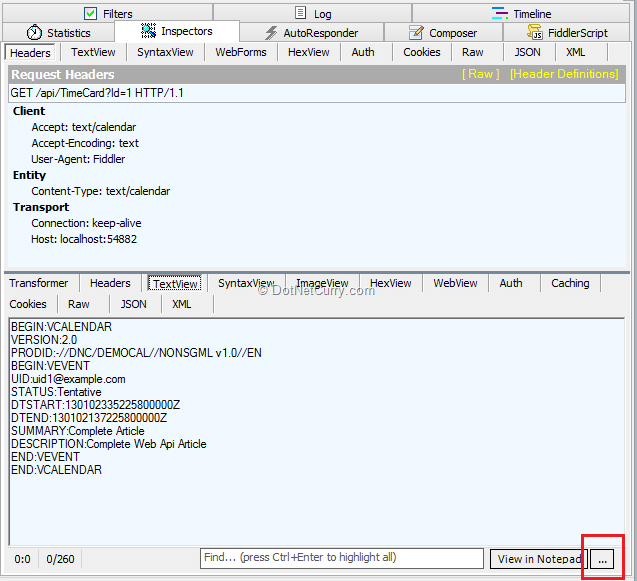
Our Formatter is all set, how can we test this? Well we can test it using Fiddler by creating a new Request as follows:
In the Composer Tab we set the Request Type to a GET put the following headers
Host: localhost:54882
User-Agent: Fiddler
Accept: text/calendar
Accept-Encoding: text
Content-Type: text/calendar
Connection: keep-alive
We post it to the URL
http://localhost:54882/api/TimeCard?Id=1
Once the post completes, we switch to the Inspectors and select ‘TextView’. We can see the Text returned by our Web API service. It detected the Content-Type request and sent us back a ‘text/calendar’. To get the actual file click on the ellipsis button to the right of ‘Open in Notepad’ button at the bottom of the screen.
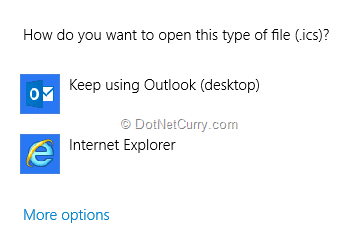
On clicking the ellipsis, we get the following (on Windows 8). You will see all apps that are registered to deal with ICS files in that list
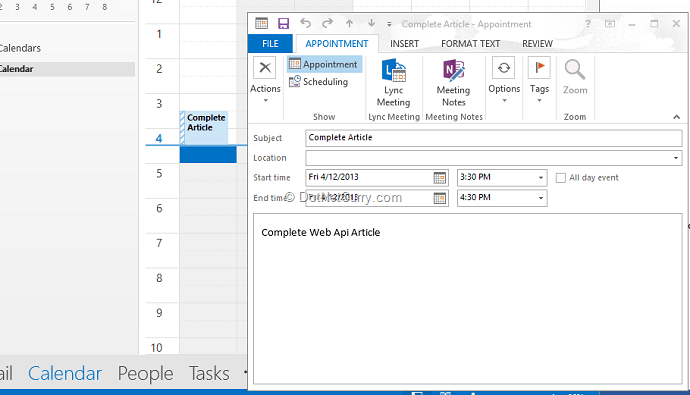
On selecting Outlook, I get the Calendar item imported into my calendar
Isn’t that awesomesauce?
We just built a Custom Media Type Formatter that can format our TimeCard data into a VCalendar that can be downloaded and imported into Outlook!
To Wrap up
Well, with the Media Type Formatter demo, we bring this article to a close. Today we saw how to build web services using ASP.NET WebAPI and access them over HTTP using AJAX. We sent our service request via browser as well as via a HTTP tool called Fiddler. We got back response as JSON and we built a custom formatter to get data as a VCalendar.
Now that we have our service in place, we can very easily build clients on any platform that can communicate over HTTP (which is essentially all platforms). So we could have Windows 8 App or a Windows Phone App or an iOS app talk to the same service and get back this same data.
You can download the entire source code from Github at http://bit.ly/dncm6-wapicf
This article has been editorially reviewed by Suprotim Agarwal.
C# and .NET have been around for a very long time, but their constant growth means there’s always more to learn.
We at DotNetCurry are very excited to announce The Absolutely Awesome Book on C# and .NET. This is a 500 pages concise technical eBook available in PDF, ePub (iPad), and Mobi (Kindle).
Organized around concepts, this Book aims to provide a concise, yet solid foundation in C# and .NET, covering C# 6.0, C# 7.0 and .NET Core, with chapters on the latest .NET Core 3.0, .NET Standard and C# 8.0 (final release) too. Use these concepts to deepen your existing knowledge of C# and .NET, to have a solid grasp of the latest in C# and .NET OR to crack your next .NET Interview.
Click here to Explore the Table of Contents or Download Sample Chapters!
Was this article worth reading? Share it with fellow developers too. Thanks!
Suprotim Agarwal, MCSD, MCAD, MCDBA, MCSE, is the founder of
DotNetCurry,
DNC Magazine for Developers,
SQLServerCurry and
DevCurry. He has also authored a couple of books
51 Recipes using jQuery with ASP.NET Controls and
The Absolutely Awesome jQuery CookBook.
Suprotim has received the prestigious Microsoft MVP award for Sixteen consecutive years. In a professional capacity, he is the CEO of A2Z Knowledge Visuals Pvt Ltd, a digital group that offers Digital Marketing and Branding services to businesses, both in a start-up and enterprise environment.
Get in touch with him on Twitter @suprotimagarwal or at LinkedIn