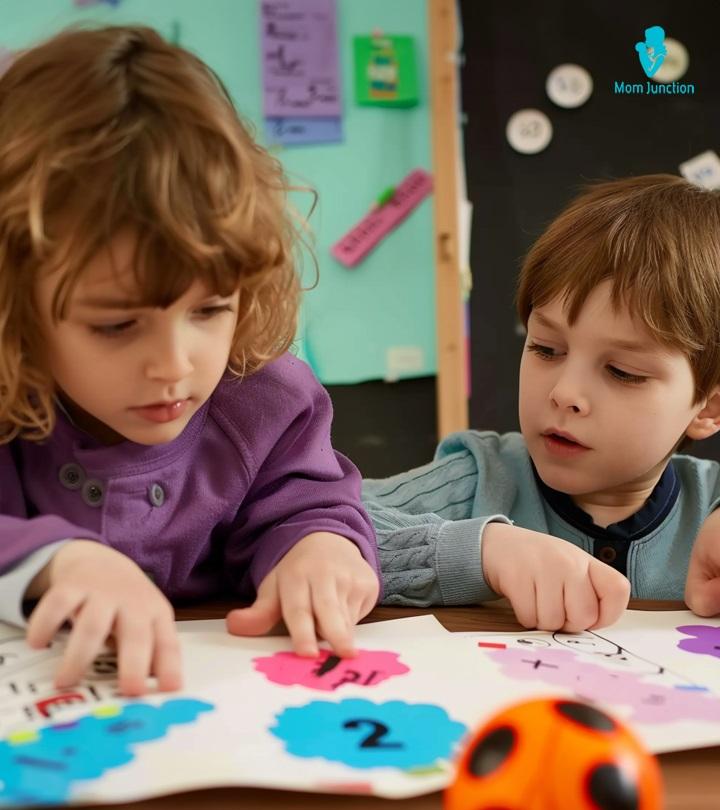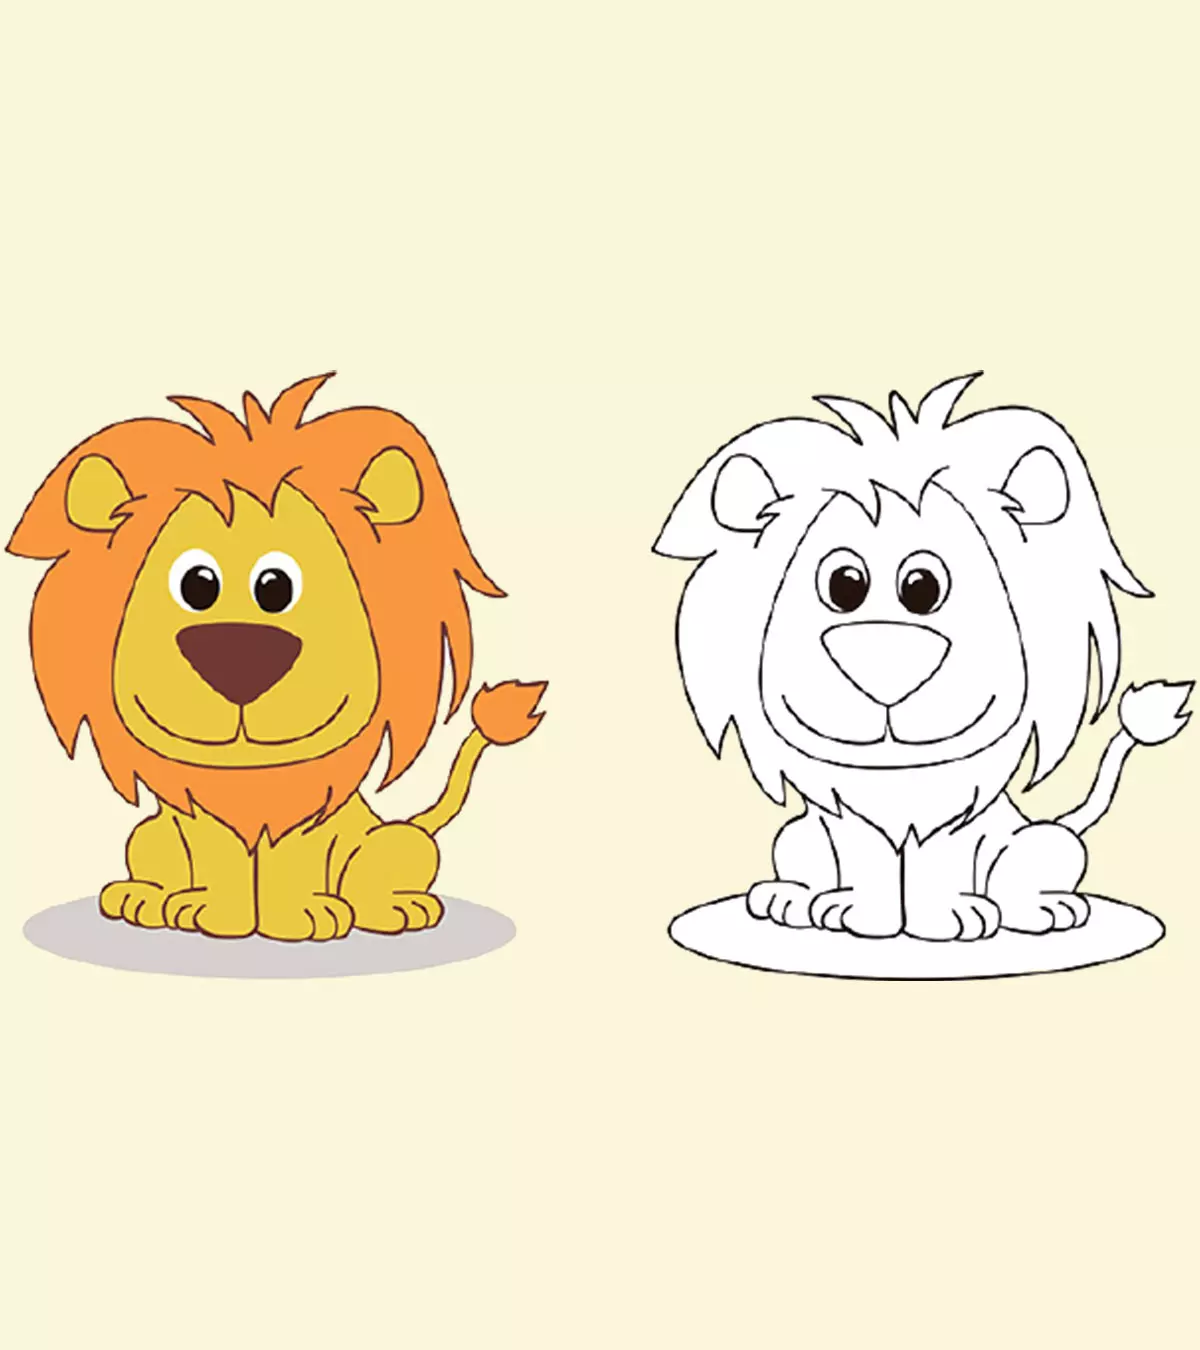
Preschool drawing projects are a great method to get kids to discover new topics. For example, you might come across an assignment to draw a sketch of a lion and wonder how to draw a lion. While drawing a lion with your kid, you can also tell them interesting things like how powerful a lion is and why it is called the king of the jungle to make the activity more engaging, enjoyable, and educational. In this post, we provide a step-by-step guide on how to draw a lion. Perhaps it could help hone your child’s fine motor skills and instill a love of art in them. Scroll down.
Things You Need To Draw A Lion
First, let’s look at the things you need to draw a lion.
- Pencil
- Black sketch pen
- Compass to draw a circle
- A4 size paper
- Orange, yellow, and black crayons
- Eraser
- Colored pencils
You may also use charcoal pencils for sketching the lion to capture its bold features.
How To Draw A Lion
Method 1: How To Draw A Lion In 13 Simple Steps
Step 1
:
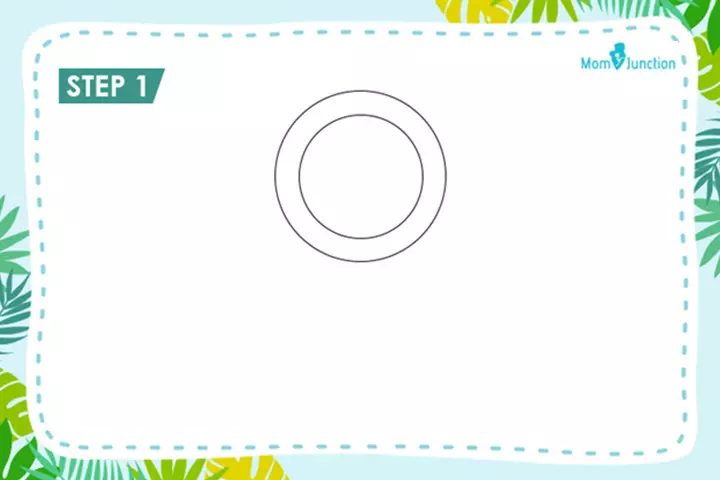
Using a compass, draw a circle with a circumference of five centimeters. Next, draw a smaller circle inside this circle such that the space between both the circles is one centimeter. The smaller circle makes the head of the lion.
Step 2:
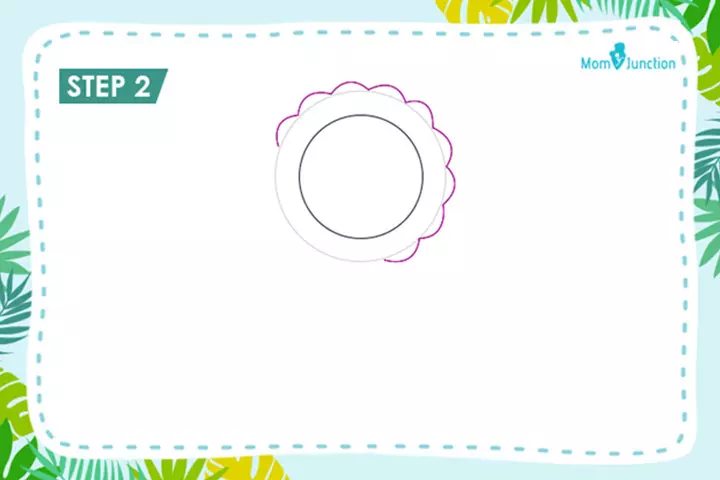
Along the circumference of the outer circle, draw frills. Ensure that these frills are on the outer part of the circle as they form the lion’s mane. After you have drawn the frills, erase the outer circle.
Step 3:
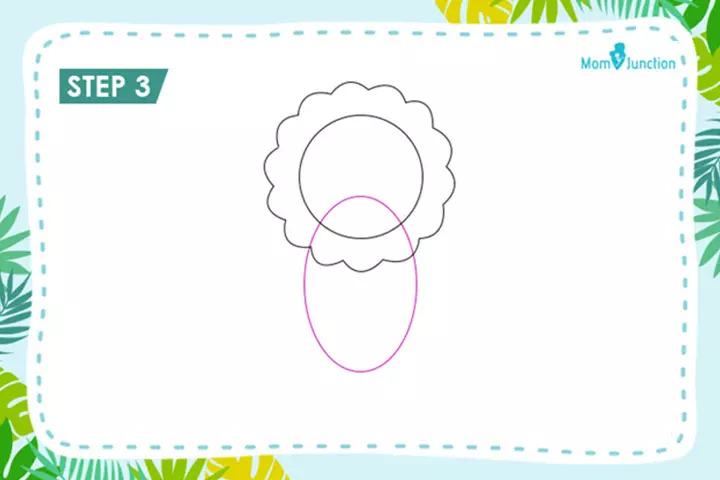
Next, draw an oval-shaped circle, starting from one centimeter above the base of the inner circle. The oval circle is the lion’s body, so make sure it is in proportion with the head.
Step 4:
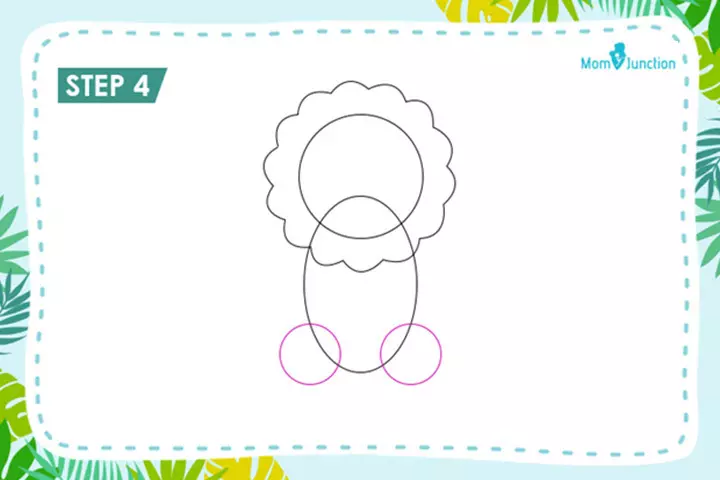
Along the base of the oval circle, draw two small circles. Make sure these circles cut across the oval circles, as shown in the image.
Step 5:
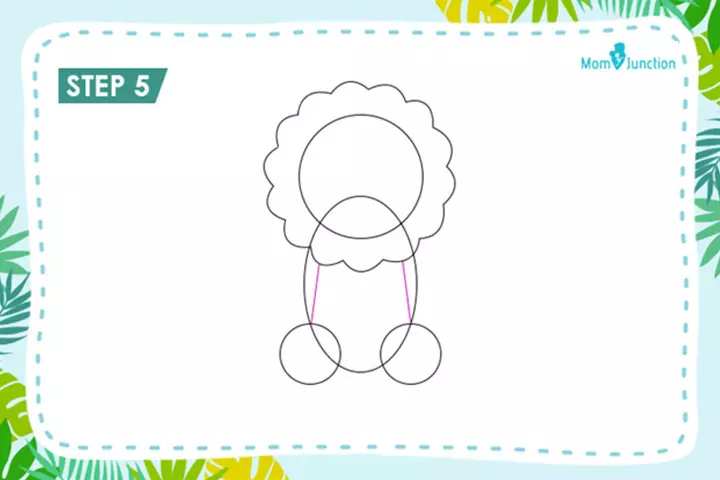
As shown in the image, draw two lines inside the oval circle such that they are just above the two smaller circles drawn in the previous step.
Step 6:
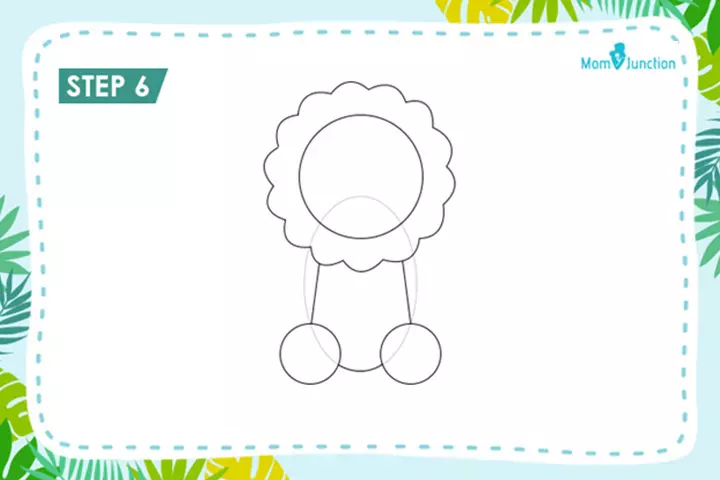
Now, erase the oval circle. Look at the image for further guidance.
Step 7:
Do you now see an outline of the lion’s body with a head and a body? Take a deep breath, as we are now about to draw the intricate parts of the lion.
Step 8:
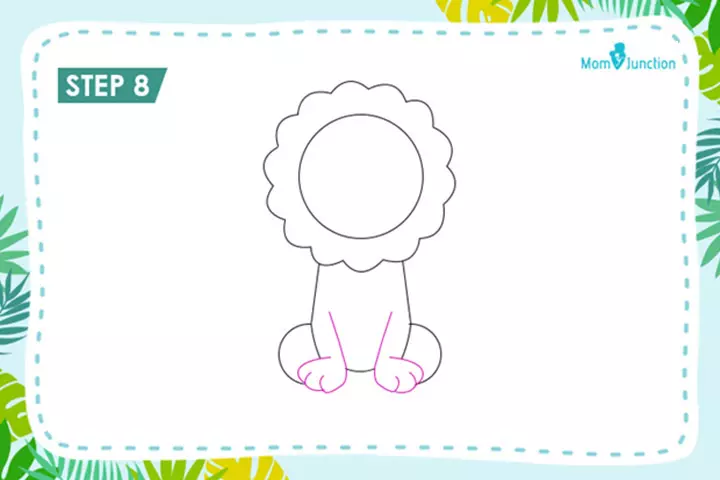
Now it’s time to draw the lion’s legs and paws. Draw a “J” on the left and an “L” on the right, and draw two arcs to form the toes on both the feet, as shown in the image.
Step 9:
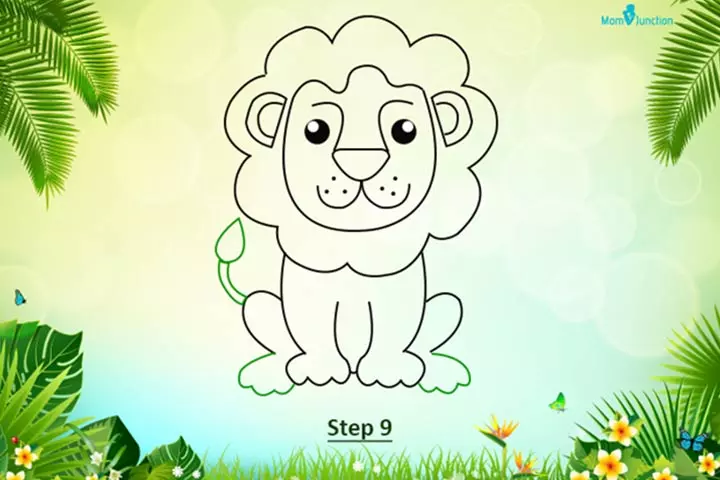
For the tail, draw two upward parallel lines on the right and draw a leaf-like structure at the end of these lines, as shown in pink.
Step 10:
Now, it is time to draw features such as eyes and a nose.
- Draw two small circles at equal distance to each other on the lion’s head. These form the lion’s eyes. For the pupils, draw small oval circles inside the eyes, and draw little circles on the top left-hand side of the pupils, which make the white part of the eyes.
- Color the pupils black, but ensure to leave the smaller circles white, as shown in the picture.
- To form the nose, draw a wide ‘V’ below the lion’s eyes. Connect the ends of the ‘Y’ by drawing an arc. Color the nose in black.
:
To draw the lion’s mouth, draw a curved line below the nose. Draw a semi-circle beneath this curved line to form the tongue of the lion. Draw two whiskers on both sides of the mouth.
Step 12:
Color the lion’s tongue in black and outline the rest of the body with the black sketch pen.
 Be watchful
Step 13:
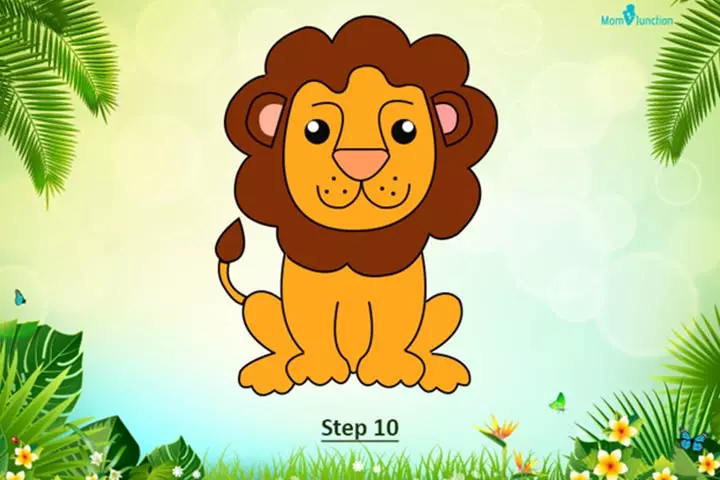
Color the lion’s body and face yellow and the mane and end part of the tail brown.
Encourage them to practice as many times as they want. Once they have completed the drawing, let them add their personal touch. For instance, they can add a beautiful background or draw a den for the lion surrounded by foliage. Your child will be delighted to see the lion come into shape in front of their eyes. Hang their masterpiece in their room or stick them to the fridge to display their achievement to your family and friends.
Through dedicated practice, your little one may develop the skills to create a meticulously detailed canvas painting of a lion. You may hang their masterpiece in their bedroom, allowing them to savor and appreciate their own artwork in all its glory.
Method 2: How To Draw A Lion In 10 Simple Steps
Here is another easy method to draw a lion.
Step 1:
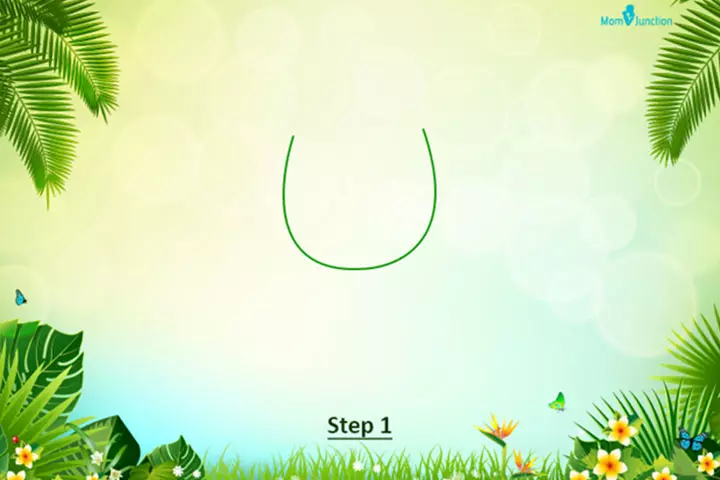
To begin with, draw a “U” with a slightly wide bottom on the paper.
Step 2:
Connect the ends of the “U” with a wavy line. Also, draw an inverted triangle in the middle of the “U” shape – this will form the lion’s nose.
 Do remember
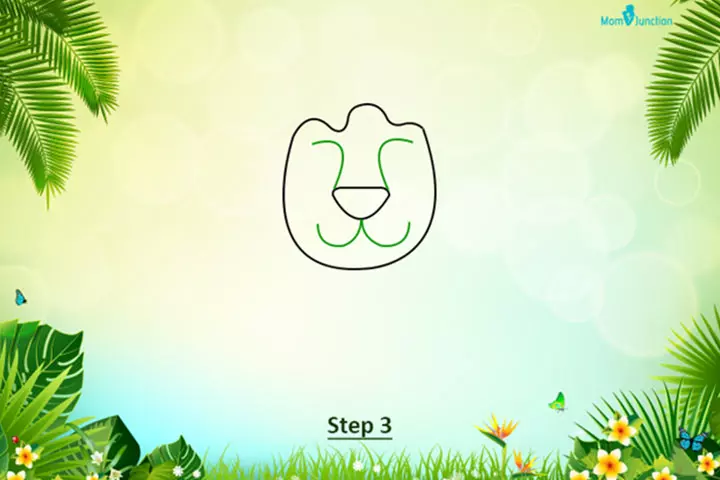
Step 3:
Next, draw two curved lines on the forehead, starting from the sides of the nose, as shown in the figure. Next, for the lion’s mouth, draw a wide, curvy “W” below the nose, with the middle line touching the nose.
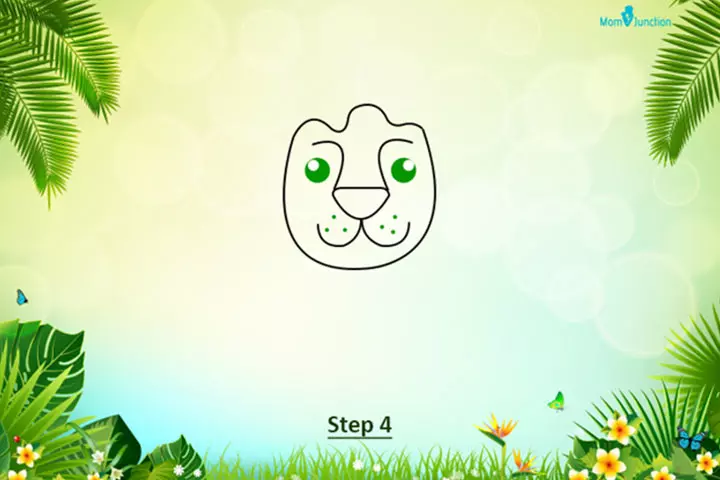
Step 4:
Put three dots on both sides of the mouth. For the lion’s eyes, draw two circles below the curved lines above the nose. Draw two small circles inside the eyes. Color the entire eyes apart from the smaller circles in black.
Step 5:
Did you know that a full and dark mane is a sign of a healthy lion? Draw a chain of semi-circles around the head to give your lion a mane.
Step 6:
Draw ears on either side of the head inside the mane, as shown in the image. Next, draw two curved lines below the head, as shown in the figure. These will form the body of the lion.
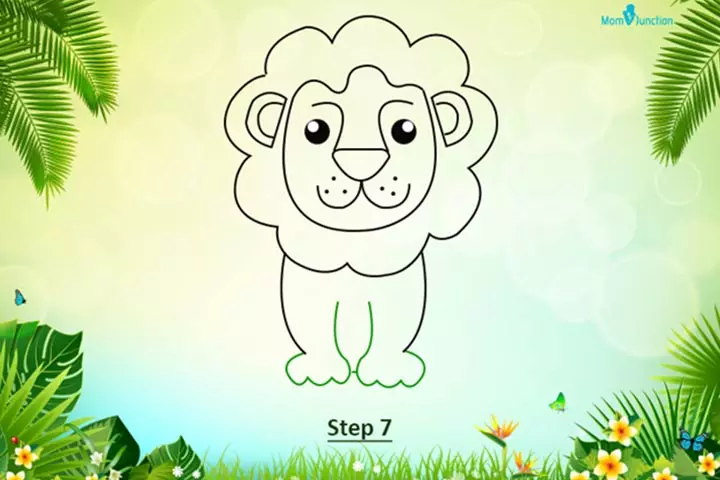
Step 7:
Draw a “J” on the left and an “L” on the right, inside the body. These will form the legs of the lion. Next, draw two arcs to create the toes, as shown in the image.
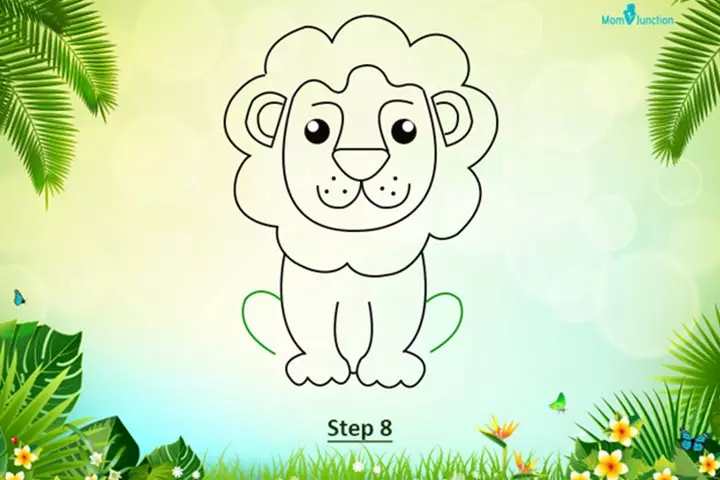
Step 8:
Give the lion its back legs by drawing an arc on either side of the lion’s body, as shown in the figure.
Step 9:
Extend the back legs by drawing the toes, and complete the drawing by adding a tail, as shown in the figure.
Step 10:
Outline your drawing with a black sketch pen. Color the lion’s mane and end of the tail in brown; the body, the face, and the legs in yellow; and the inner ears and nose in pink.
The creative soul knows no bounds when it comes to possibilities. So alongside the simplicity of drawing, explore sketching a lioness, the true pride of the jungle. Let your imagination run wild and capture the grace and strength of this majestic creature on paper.
Illustration: A Step-By-Step Guide On Drawing A Lion For Kids
Image: Stable Diffusion/MomJunction Design Team
Frequently Asked Questions
1. What colors can children use to make a lion’s drawing realistic?
Shades of brown, yellow, and orange colors are commonly used to draw a lion. The drawing can be made more realistic by incorporating depth, shadows, and highlights through shading. Children may also use some black/brown color strokes to create fur-like details on the lion’s body to make it look more lively.
2. Can children draw a lion with a funny expression or doing something silly?
Yes, drawing a lion with a funny expression or doing something silly can make the drawing alluring. For example, children could draw a lion with a big grin, sharp claw, tongue sticking out, or squinted eyes. The lion may also be depicted as playing with a ball, chasing a butterfly, or hanging from a tree.
3. What shapes can be used to draw a lion’s face?
The most commonly used shapes for drawing a lion’s face include concentric circles, triangles, and U-shaped or curved lines.
4. How can children use pencils or markers to create different effects in the lion’s drawing?
Different markers and pencils can help incorporate darker, lighter, thinner, and thicker lines and shades in the drawing. They help add texture and detailing to the lion’s drawing, making it more appealing.
5. What are some fun background ideas for a lion’s drawing?
Including a jungle scene with snakes, trees, vines, and a rocky landscape can make for an interesting and fun background. You may also add sand dunes, boulders, or other animals, such as zebras, giraffes, or elephants, to make the image vibrant and dynamic.
Drawing and painting are the best ways to lift your child’s creative spirit. These activities help them develop fine motor skills and improve their concentration. Wild animals such as the majestic lion never fail to fascinate children who may often ask how to draw a lion. Help your child follow the simple steps to draw their favorite animal. Sharing some lion facts for kids can make the activity more interesting. These activities will also keep your child engaged and entertained for hours, giving you a much-needed respite from parenting duties. Also, such activities ignite a child’s interest in exploring other arts and crafts avenues.
Infographic: Easy Steps To Draw A Lion For Children
Lions are magnificent animals considered the ‘King of the Jungle.’ It can be a fascinating animal to teach children to draw. The following infographic provides an easy-to-follow stepwise guide to drawing a lion for children. Whether they’re drawing a lion for a school activity or just for fun, this guide will surely help.
Illustration: Momjunction Design Team
Key Pointers
- Preschool drawing projects provide an excellent opportunity for children to explore new topics while engaging in a creative activity.
- Drawing and painting activities are beneficial for children, as they promote the development of fine motor skills and improve concentration.
- To successfully draw a lion, children will need several materials, including a pencil, a black sketch pen, a compass for circles, A4 size paper, and crayons in orange, yellow, and black.
- Sharing fun facts about lions during the drawing process can make the activity more enjoyable while encouraging children to explore other arts and crafts in the future.
Let’s learn how to draw an angry lion from number 53! Follow these simple steps to make a lion drawing. Get ready to create a masterpiece!
Community Experiences
Join the conversation and become a part of our nurturing community! Share your stories, experiences, and insights to connect with fellow parents.
Read full bio of Erin DeCarlo
Read full bio of Harshita Makvana
Read full bio of Deepa Thomas


