*This post is sponsored by Ridgid Power Tools and The Home Depot. I have been compensated for my time and provided with product or payment in exchange. All opinions are my own. This post contains affiliate links.
I have been so blessed lately! Last month I finally got the Kreg Foreman I'd been lusting after for years, and just a couple months ago I partnered with Ridgid Power Tools and received their 13" Thickness Planer (model # R4331). After making my brass and walnut cutting board a while back, a fire was lit inside me and I've been dying to start working with hardwood a bit more.
To have the most versatility with different materials, I really needed a thickness planer. Not only does a planer sound scary, it's huge and heavy and takes up a ton of precious workbench top space. That's just the nature of the beast. I brainstormed for a while and realized I could come up with a flip-top design that kills 4 birds with one stone and would have space for multiple large tools to be mounted.
If you're interested in the full building plans, materials list and cut diagrams, click below.
Check out the video to follow the whole building process. Or keep scrolling to see how it came together and what tools I used to make the process a whole lot simpler
Luckily, a workbench like this is pretty forgiving. All the 2 x 4 and 2 x 2 components could be cut to length at once before I started to assemble.
And the best part of a shop project is, they don't have to be put together with delicate joinery. It was the perfect opportunity to try out my new DeWalt 20V Cordless Framing Nailer.
Not being tethered to a hose and compressor was SO NICE! The DeWalt 21 degree nail gun has a large capacity magazine, is capable of firing nails up to 3-1/4" long, and even has a bump fire mode.
For the few areas of the workbench that needed to be put together with screws, I had a new Milwaukee M18 combo kit to try out.
The Milwaukee Fuel brushless impact driver and hammer drill are heavy duty work horses that had no problem powering through thick material quickly. Even though the new Milwaukee Hammer Drill is the most compact on the market, it's 60% more powerful than other models.
I was able to get the workbench frame put together in a couple hours.
I also discovered on this project, decent casters are worth spending a little more on.
Having the larger pad to lock the wheels is kinda a lifesaver when you're wearing thick work boots.
With the frame assembled, I moved on to building the flip-top platforms the tools will be mounted to.
What allows the flip-top function to work is the hardwood dowel that runs through the center and acts as an axle for the top to pivot on.
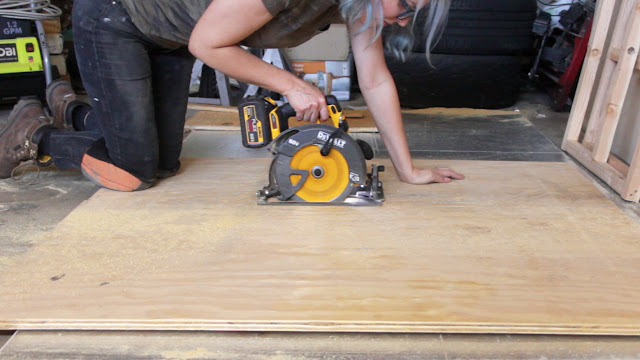
Luckily I had some randomly size 3/4" plywood leftover from my folding mobile workbench to clad the work surfaces in. To cut them down to the right dimensions, I used the new DeWalt 60V brushless circular saw.
This 7" circular saw has as much power as a corded model but is so much easier to lug around. The coolest part of this particular saw is the fact that it comes in combo kit. Buy the saw and get the super popular DeWalt 20V impact driver, both of which can be powered by the beefy FlexVolt batteries.
Once the work tops were put together, I added them to the workbench frame and reinforced the sides.
I had to put my thinking cap on for a while to figure out how to lock the flip-top panels in place. I decided to simply drill a hole through the frame and into the flip-tops that would accommodate a 5" carriage bolt as a locking pin. It prevents the tables from tilting, but it also helps support the weight when the bench is loaded.
I designed the tops to be large enough to hold even large tools like my Foreman pocket hole jig.
I just made sure to bolt everything down really well to the tops.
The crown jewel was attaching the Ridgid 13" thickness planer.
I'll admit, I was super nervous the first time I flipped the planer over. I would have cried if it fell off. Luckily, it held on like a champ. It ain't going anywhere!
It's so nice having a space for those big heavy tools. No more giving myself a hernia every time I need to move them around.
I got a chance to make friends with the Ridgid Planer once it was installed. I think it's the start of a beautiful relationship. Notice what I added on the opposite end of the planer?
I'm working on a DIY outfeed roller video and will be sharing that with you guys next week, so keep and eye out for that! It was SO easy to make guys. I think I need to build one for my table saw too.
Ready to build your own double flip-top workbench? Click below to be able to purchase the full building plans, materials list and cut diagrams.
Or feel free to pin the image below to save the idea for later!
If you like this project, you'll love these ideas:
Let's be friends! Follow along so you don't miss a thing!


This is amazing idea!!!! Good job!
ReplyDeleteI tried to buy these plans, but it would not go through.
ReplyDelete