Both Firebase Hosting & GitHub Actions offer generous free quota (with limit of course), perfect for our personal project!
Let's use these tools to set up our hosting and automate our deployment workflow.
Feel free to skip any sections (that you already know) or dive into the source code jec-11ty-starter straight away!
This is the second post of the series. Here is the previous post - Building Personal Static Site with Eleventy. It's fine to continue reading this though. The basic setup is similar among projects.
Refer to official documentation for latest pricing:
Setting up Firebase Hosting
Please complete these two prerequisites before we continue:
a. Sign up & login to console.firebase.google.com.
b. Create a project, follow the steps on screen. Give your project a nice name.
In your project, open up the terminal and follow the steps below:
- Run
npm install firebase-tools -Din the terminal. This will install Firebase CLI as our project's dev dependency. - Run
npx firebase loginto sign in using your Google / Firebase account. - Run
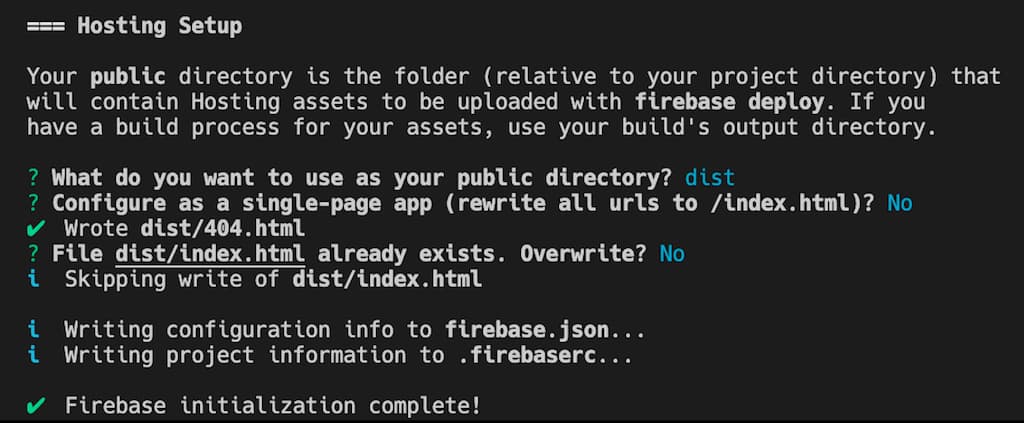
npx firebase init hosting- Firebase provides a lot of other features, but we only need hosting for now. - Select
Use an existing projectand choose the project created in prerequisite step b. - It will prompt you 2-3 more questions along the way. Just press enter or answer anything. You will be fine, no worries 😆. Not convinced? Follow the my answers below lol.

Why the steps?
The steps above will eventually create two files in the project - .firebaserc and firebase.json. We can edit both (that's why no worries, heh).
Let's look into each of these files.
.firebaserc stores the Firebase project name. In case you chose the wrong project in step 4 earlier, you may update it here.
// .firebaserc

{
  "projects": {
    "default": "[your_firebase_project_name]"
  }
}
Next, firebase.json stores our project configuration. Replace your file with the code below. 👇🏼
// firebase.json

{
  "hosting": {
    "public": "dist",
    "cleanUrls": "true",
    "ignore": [
      "firebase.json",
      "**/.*",
      "**/node_modules/**",
    ]
  }
}
A few explanations on the configuration above,
publicindicates the folder that we will deploy / upload to Firebase Hosting, our deployment folder isdist.ignoreas the name indicates, ignore any files (do not deploy) that matches the provided names.cleanUrlsallows us to control our.htmlextension. (Extra explanation needed)
Suppose we have the following html document:
- about.html
- licenses.html
When the user navigates to our pages in browser, the URLs would be:
- your_domain.com/about.html
- your_domain.com/licenses.html
Urgh, not that pretty right? It would be nice if our URLs looked prettier, like:
- your_domain.com/about
- your_domain.com/licenses
That's what the cleanUrls setting does. Refer to the Firebase documentation for more details.
Setting up NPM scripts
Alright, Firebase Hosting is ready. Next, add our deployment scripts in package.json:
/* .package.json */

{
  ...
  "scripts": {
    ...
    "clean": "npx del dist",
    "prebuild": "npm run clean",
    "build:prod": "ELEVENTY_ENV=prod npx eleventy",
    "predeploy": "npm run build:prod",
    "deploy": "npx firebase deploy",
  }
}
All set! Let's try to run npm run deploy in your terminal. The below tasks will be executed in sequence:
- Delete the
distfolder if it exists. - 11ty will build and compile your
srcfiles to thedistfolder. - Firebase will deploy all the files in the
distfolder to its hosting service.
As mentioned in the previous post, the prebuild task is optional. You may not need that. Also, if you prefer to run the build and deploy scripts separately, feel free to remove the predeploy script.
Nice, so where's my url?
Your URL should appear in the terminal upon successful deployment. Otherwise, go to your Firebase console, select the project and click on the Hosting menu. At the page, you should see the URL Firebase has created for you.
Copy the URL and open it in the browser. You should see HELLO world! on screen.
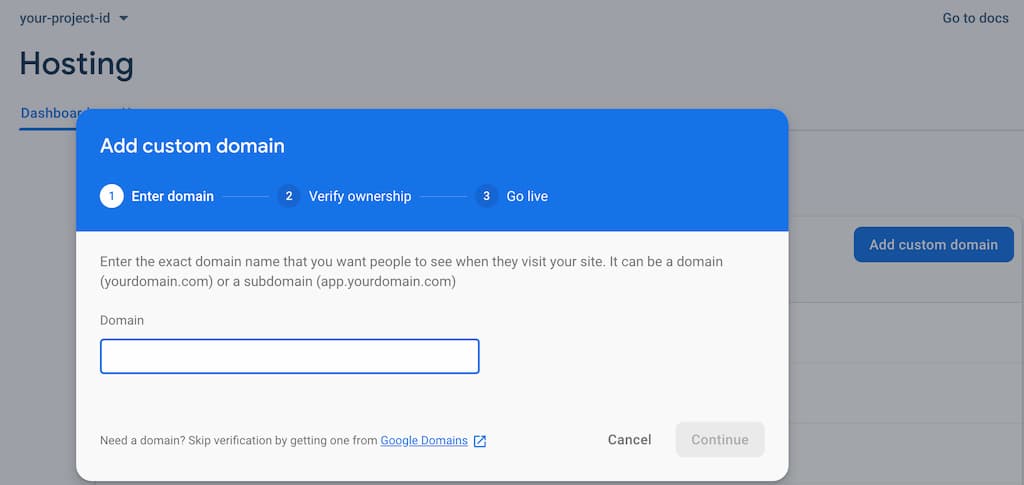
If you bought a domain (e.g. my domain is jec.fish), you can start setting it up by clicking on the Add custom domain button. Follow the instructions on screen and you'll be fine.

Setting up Github Actions
As a developer, we don't want to run the deployment step manually every time. Let's use GitHub Actions to automate that!
In your project folder,
- Create a new folder
.github. - Create a
workflowsfolder under.github. - Create a
main.ymlfile in theworkflowsfolder. You can rename the file freely, not necessarymain.
First step to automate our deployment
First, we need to decide when to deploy. In our case, the project is small. It's a personal website.
We want to deploy when either condition is met:
- Whenever changes pushed to
masterbranch - Everyday, 9pm, Malaysia time.
Configure our workflow
Let's configure our main.yml to reflect that.
# main.yml

name: CI # Give it any name

on:
  push:
    branches:
      - master
  schedule:
    - cron: '0 13 * * *' # daily 9pm MYT
The configuration is quite expressive itself. The schedule is using the cron syntax. If you want to learn more about it, go to crontab.guru (keep pressing the random link on screen to learn further 😆).
Another gotcha: you might be wondering why 13:00 is 9pm MYT. Well, GitHub does not support timezones yet, so it uses UTC time. Do your own math or use worldtimebuddy.com to do the conversion beforehand. If you'd like to have built-in timezones, go upvote the feature in GitHub Community!
Define our build steps
Next, let's add in our step-by-step instructions in main.yml. We want to:
- Run the deployment tasks on Linux (Windows and macOS are available too, but more expensive though).
- Checkout the source code from the repository.
- Install Node.js.
- Run
npm installto install dependencies. - Run the
deployscript we created earlier to build and deploy to Firebase (npm run deploy).
Convert the above steps into main.yml.
# main.yml
...

jobs:
  build:
    runs-on: ubuntu-latest

    steps:
      - name: Checkout branch
        uses: actions/checkout@v1

      - name: Use Node.js
        uses: actions/setup-node@v1
        with:
          node-version: 12.16

      - name: Install dependencies
        run: npm install

      - name: Build & deploy
        run: npm run deploy
        env:
          CI: true
          FIREBASE_TOKEN: ${{ secrets.YOUR_SECRET }}
The steps are quite expressive itself. A few explanations on the fields.
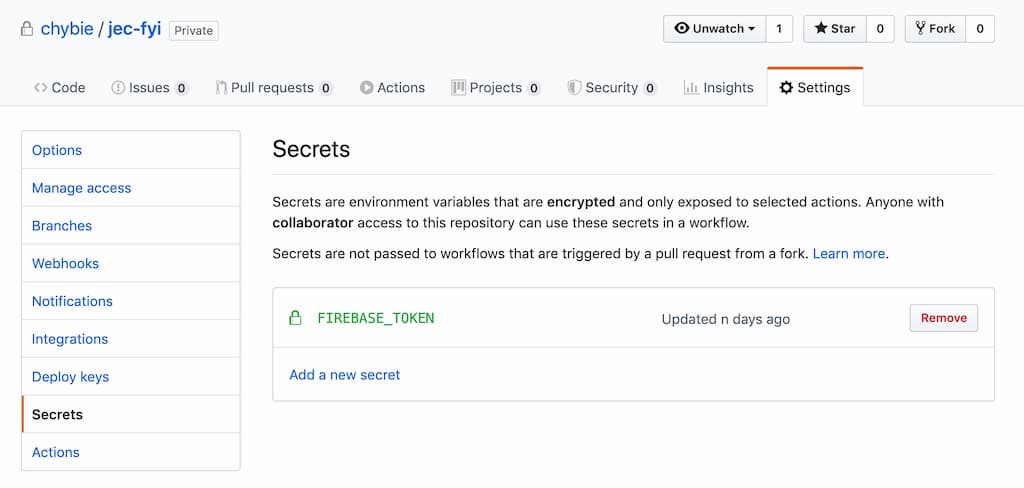
name- It's good to name each step, but it's optionalrun- The command to execute in terminaluses- The pre-built actions you want to use, if any. Find them in GitHub Marketplace, pick and utilize those.env- Specify the environment variables for the step. (e.g. we setELEVENTY_ENVin our npm script, it's ok to put it here instead).FIREBASE_TOKENenv variable - Firebase needs this token to authorize the deployment (because we can't runnpx firebase loginremotely). Generate the token beforehand by runningnpx firebase login:cicommand in your machine. Detailed instructions here- The
secrets.YOUR_SECRET- The token is sensitive information, so we need a safe place to store it. Copy the token and create a new secret in GitHub Repository > Settings > Secrets. Name itYOUR_SECRETor feel free to rename it whatever you want (remember to update the variable name inmain.ymlif you do so).

Run & test our GitHub Actions
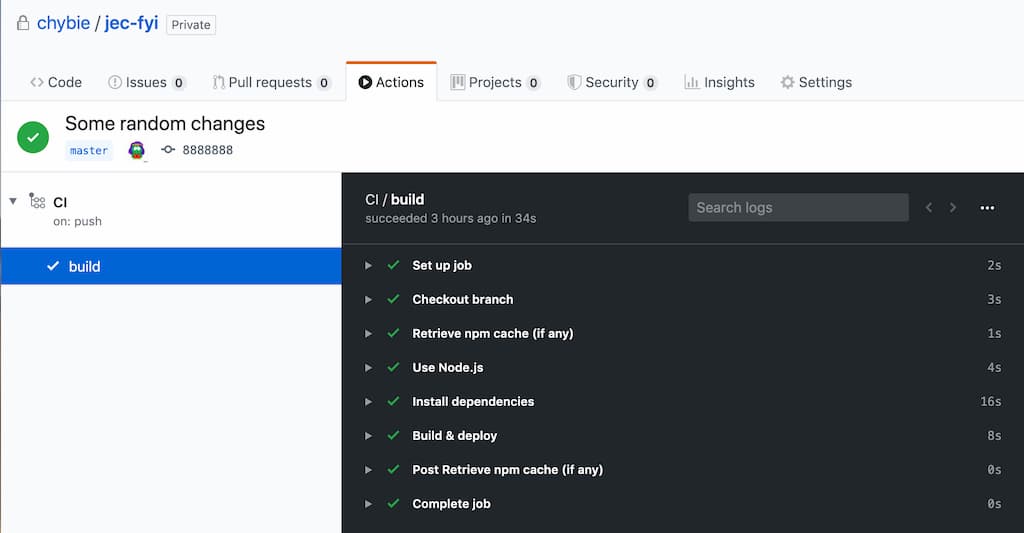
All good! Let's push your changes to the master branch. Open your GitHub repository page, and view your deployment progress in the Actions tab.

You can drill down further to see the status of each step, the steps shown on screen are the name we defined in main.yml (give your steps meaningful names).

Explore further:
You may want a totally different configuration - for example, you might want to run the build on every branch or whenever someone creates a PR. You might have more than one workflow as well. In some projects, you might even want to build on different OS (e.g. Windows, Mac) and software versions (e.g. NPM, Android project simultaneously).
GitHub Actions can support complex use cases, pretty powerful. Just try to play around and configure that.
Bonus: Two extra handy configurations
Thanks for reading so far ! Here are the two handy configurations for you.
Skipping the build
Other popular deployment tools (e.g. Travis or Circle CI) support [skip-ci]. We can type [skip-ci] in our commit message or PR title to stop the build intentionally.
This doesn't come with GitHub Actions by default, but we can write an extra line to support that easily.
# main.yml
...

jobs:
  build:
    if: "!contains(github.event.head_commit.message, '[skip-ci]')" # add this line
    runs-on: ubuntu-latest
...
Cache your dependencies
npm install takes time. The more dependencies we have, the slower our build is. It's good to cache them for faster subsequent builds. Let's add in one more action for that.
GitHub supports more complex cache settings too, refer to its documentation (with instant copy-pastable example 😍).
# main.yml
# place after the "Checkout branch" step

...

- name: Retrieve npm cache (if any)
  uses: actions/cache@v1
  with:
    path: ~/.npm
    key: npm-packages

...
.
Combine all the steps above. Here is our full main.yml file!
# main.yml

name: CI

on:
  push:
    branches:
      - master
  schedule:
    - cron: '0 13 1/1 * *'

jobs:
  build:
    if: "!contains(github.event.head_commit.message, '[skip-ci]')"
    runs-on: ubuntu-latest

    steps:
      - name: Checkout branch
        uses: actions/checkout@v1

      - name: Retrieve npm cache (if any)
        uses: actions/cache@v1
        with:
          path: ~/.npm
          key: npm-packages

      - name: Use Node.js
        uses: actions/setup-node@v1
        with:
          node-version: 12.16

      - name: Install dependencies
        run: npm install

      - name: Build & deploy
        run: npm run deploy
        env:
          CI: true
          FIREBASE_TOKEN: ${{ secrets.FIREBASE_TOKEN }}
Alrighty, what's next?
Yay! We have set up hosting and automate the deployment successfully. 🎉 That's how my site jec.fish was set up as well. I have been using GitHub Actions and Firebase for several projects, so far so good.
Alternative:
If you are looking for alternatives for hosting and automation, try Netlify! They offer free quota too. The developer experience in Netlify is better than both Firebase Hosting and Github Actions, IMHO, especially for people without prior experience in hosting and deployment. Much easier to get started. I like it.
However, Netlify has a less generous free quota 😆 (check out their pricing plan), but it is enough for personal projects. I am not sure if it can support complex deployment scenarios like GitHub Actions can.
.
In the coming posts, I plan to write about more on how I built my website with 11ty:
- Building Personal Static Site with Eleventy ✅
- Setting up GitHub Actions and Firebase Hosting ✅
- Customizing File Structure, URLs and Browsersync ✅
- Automating Image Optimization Workflow ✅
- Setting up SEO and Google Analytics ✅
- Minifying HTML, JavaScript, CSS - Automate Inline ✅
- How many favicons should you have in your site? ✅
- Creating Filters, Shortcodes and Plugins ✅
- Supporting Dark Mode in Your Website ✅
- and probably more!
Let me know if the above topics interest you.
Here's the GitHub repo for the code above: jec-11ty-starter. I'll update the repo whenever I write a new post.
That's all. Happy coding!
Have something to say? Leave me comments on Twitter 👇🏼
Follow my writing: @jecfish