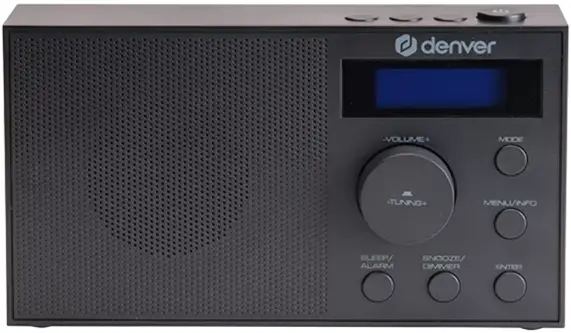
denver DAB-51B DAB + FM Radio With Alarm Clock User Manual
- June 1, 2024
- Denver
Table of Contents
denver DAB-51B DAB + FM Radio With Alarm Clock

Safety Information
Please read the safety instructions carefully before using the product for the first time and keep the instructions for future reference.
- This product is not a toy. Keep it out of reach of children.
- Keep product out of the reach of children and pets to avoid chewing and swallowing.
- Product operating and storage temperature is from 0 degree Celsius to 40 degrees Celsius. Under and over this temperature might affect the function.
- Never open the product. Touching the inside electrics can cause electric shock. Repairs or service should only be performed by qualified personnel.
- Do not expose to heat, water, moisture, direct sunlight!
- Please protect your ears against loud volume. Loud volume can damage your ears and risk in hearing loss.
- The unit is not waterproof. If water or foreign objects enter the unit, it may result in fire or electric shock. If water or a foreign object enters the unit, stop use immediately.
- Do not use non-original accessories together with the product as this can make the product functionality abnormal.
- Please notice that DAB signal can be weaken MUCH depending on the type of building you are living in. (fx. It can be hard to catch proper signal when being in a concrete building.)
- Signal can also be different in different areas of the country.
- Please check your local transmitter to get the best signal in your area.
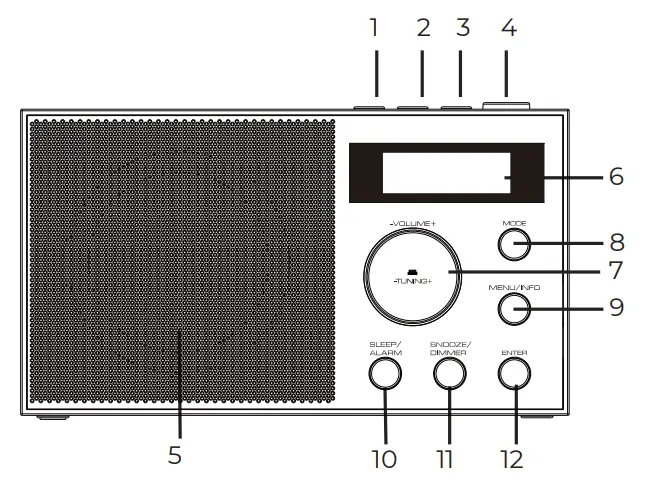
LOCATION OF CONTROLS

ACCESSORIES: USB-C Cable
- P1 (Preset station 1)
- P2 (Preset station 2)
- P3 (Preset station 3)
- Power ON/OFF
- Speaker
- LCD
- Volume +/- or Tuning +/-
- Mode
- Menu / Info
- Sleep / Alarm
- Snooze / Dimmer
- Enter
- USB-C DC 5V power input jack14. 3.5mm audio Aux-In input
- 3.5mm mono Phone Jack
- Antenna
POWER SUPPLY
- Connect USB-C charging cable to DC 5V input jack on the radio.
- Connect to USB adapter 5V, 1A (not included).
- Press the “Power ON/OFF” button to switch the unit on or to standby mode.
ANTENNA
Use Antenna to improve the signal reception.
- Extend the antenna and adjust the position of the antenna for the best reception.
FULL SCAN
- Turn on the unit and press “MODE” button to select FM or DAB mode.
- Press and hold “ENTER” button to do a full scan and stations with suitable signal strength are automatically stored. After the search is completed, the first stored station is broadcast automatically.
- Press “ENTER”, then turn the “TUNING +/-” knob to choose the station and press “ENTER” again to confirm.
QUICK PRESET STORE & RECALL
- Hold “P1 or P2 or P3” button to save the desired station as a preset.
- Press “P1 or P2 or P3” button to recall the preset station.
DAB MENU
- Press and hold “MENU” button.
- Turn “TUNING +/-” knob to choose different modes.
- Press “ENTER” button to confirm the selection.
- Press “MENU” button to return to the previous selection.
MANUAL TUNE
- Turn “TUNING +/-” knob to select the desired frequency.
- Press “ENTER” button to confirm the selection.
PRESET RECALL
- Press and hold “MENU” button.
- Turn “TUNING +/-” knob to select “Preset Recall”.
- Press “ENTER” button to confirm.
- Turn “TUNING +/-” knob to select the desired preset number (from 1 to 40).
- Press “ENTER” button to confirm.
PRESET STORE
- Press and hold “MENU” button.
- Turn “TUNING +/-” knob to select “Preset Store”.
- Press “ENTER” button to confirm.
- Turn “TUNING +/-” knob to select the desired preset number.
- Press “ENTER” button to confirm.
PRUNE
- After finishing auto scan function, some invalid stations may have been saved.
- A “?” will be shown in the invalid station.
- Turn “TUNING +/-” knob to choose to delete the stations “No” or “Yes”. – No: Return to the previous menu. – Yes: Remove invalid stations form the station list.
- Press “ENTER” button to confirm the selection.
DRC (DYNAMIC RANGE CONTROL)
DRC On or Off enables a degree of compensation for the differences in the
dynamic range between radio stations.
- Turn “TUNING +/-” knob to confirm the DRC off, low or high setting: (The asterisk behind the option indicates the current setting.)
- DRC off: No compensation applied
- DRC low: Medium compensation applied
- DRC high: Maximum compensation applied
- Press the “ENTER” button to confirm the selection.
FM MENU
- Press and hold “MENU” button.
- Turn “TUNING +/-” knob to choose different modes.
- Press “ENTER” button to confirm the selection.
- Press “MENU” button to return to the previous selection.
SCAN SETTING
Turn the “TUNING +/-” knob to confirm the selection below: (The asterisk
behind the option indicates the current setting.)
- Strong station
- All Stations: Regardless of the signal strength
AUDIO SETTING
Turn “TUNING +/-” knob to confirm the selection below: (The asterisk behind
the option indicates the current setting.)
- Stereo allowed
- Forced mono
SYSTEM
The SYSTEM menu allows you to change the settings relating to Sleep, Alarm, Time, Backlight, Language, Factory Reset and SW version.
- Turn “TUNING +/-” knob to select an option.
- Press “ENTER” button to confirm.
SLEEP
Press “SLEEP” button repeatedly to select the sleep time (Options: Off, 15,
30, 45, 60 and 90 minutes). Press “ENTER” button to confirm the selection.
After the set time has elapsed, the device automatically switches to standby.
ALARM
- Press and hold “ALARM” button.
- Turn “VOLUME +/-” knob to choose Alarm 1 or Alarm 2.
- Press “ENTER” button to confirm the selection.
- Turn “VOLUME +/-” knob to choose the desired setting.
- Press “ENTER” button to save the setting.
Alarm On or Off
- When the alarm setting is active, the corresponding Alarm 1 and Alarm 2 icon will be displayed.
- After the set time has expired the device will sound an alarm.
- The volume will gradually increase until the set volume level is reached.
- The corresponding alarm icon will also flash on the display.
TIME
The date and time of the unit are set automatically when the radio
transmission signals are received (if this information is available).
To set it manually, proceed as follows:
- Press the “MENU” button in standby mode, and go to SYSTEM.
- Turn the “TUNING +/-” knob to set Time/Date, 12/24 Hour, date format, auto update.
- Press the “ENTER” button to confirm the selection.
BACKLIGHT
- Turn the “TUNING +/-” knob to select an option.
- Press “ENTER” button to confirm. (The asterisk behind the option indicates the current setting.)
Timeout
- Options: 10, 20, 30, 45, 60, 90, 120, 180 sec or On
On level
- Low, Medium or High
LANGUAGE
- Turn the “TUNING +/-” knob to select a language.
- ress “ENTER” button to confirm.
- (The asterisk behind the option indicates the current setting.)
FACTORY RESET
- This option returns the product to its initial state, restoring the default values.
- Press the “ENTER” button to confirm Yes or No.
SW VERSION
- This option displays the current software version.
SNOOZE/ALARM OFF
- To temporarily stop an audible alarm, press the “SNOOZE” button.
- The alarm will sound again after 9 minutes.
- Press the “POWER” button to cancel the snooze and the alarm function.
AUX-IN
- Press the “MODE” button to select “AUX” mode.
- Use a 3.5 mm jack AUX IN cable (not included) to connect the AUX IN jack and the external audio player. Control the music from the external audio player (Volume adjustment from the device).
- All controls are managed by the external audio source only.
HEADPHONE
- Connect headphone (not included) with 3.5mm jack to the headphone jack of the device. Use the volume knob to adjust the sound level.
- Please notice – All products are subject to change without any notice. We take reservations for errors and omissions in the manual.
- ALL RIGHTS RESERVED, COPYRIGHT DENVER A/S
- Electric and electronic equipment contains materials, components and substances that can be hazardous to your health and the environment, if the waste material (discarded electric and electronic equipment) is not handled correctly.
- Electric and electronic equipment is marked with the crossed-out trash can symbol, seen above. This symbol signifies that electric and electronic equipment should not be disposed of with other household waste, but should be disposed of separately.
- All cities have established collection points, where electric and electronic equipment can either be submitted free of charge at recycling stations and other collection sites, or be collected from the households. Additional information is available at the technical department of your city.
- Hereby, Denver A/S declares that the radio equipment type DAB-51 complies with Directive 2014/53/EU. The fulltext of EU declaration of Conformity is available at the following internet address: denver.eu and then click the search ICON on the topline of the website.
- Write model number: DAB-51. Now enter product page, and RED directive is found under downloads/other downloads.
Operating Frequency Range:
- DAB: 174.928 MHz to 239.200 MHz
- FM: 87.5 – 108 MHz
- Max Output Power: 15W / 1.5W RMS
- DENVER A/S
- Omega 5A, Soeften
- DK-8382 Hinnerup
- Denmark
- www.facebook.com/denver.eu.
Contact
- Nordics
- Headquarter
- Denver A/S
- Omega 5A, Soeften
- DK-8382 Hinnerup
- Denmark
- Phone: +45 86 22 61 00 (Push “1” for support)
- For technical questions, please write to:[email protected].
- For all other questions please write to:[email protected].
- Benelux
- DENVER BENELUX B.V.
- Barwoutswaarder 13C+D
- 3449 HE Woerden
- The Netherlands
- Phone: 0900-3437623
- E-Mail: [email protected].
- Spain/Portugal
- DENVER SPAIN S.A
- Ronda Augustes y Louis Lumiere, nº 23 – nave 16
- Parque Tecnológico
- 46980 PATERNA
- Valencia (Spain)
- Spain
- Phone: +34 960 046 883
- Mail: [email protected].
- Portugal:
- Phone: +35 1255 240 294
- E-Mail: [email protected].
- Germany
- Denver Germany GmbH Service
- Max-Emanuel-Str. 4
- 94036 Passau
- Phone: +49 851 379 369 40
- E-Mail[email protected].
- Fairfixx GmbH
- Repair and service
- Rudolf-Diesel-Str. 3 TOR 2
- 53859 Niederkassel
- (for TV, E-Mobility/Hoverboards/Balance boards,
- Smartphones & Tablets)
- Tel.: +49 851 379 369 69
- E-Mail: [email protected].
- Austria
- Lurf Premium Service GmbH
- Deutschstrasse 1
- 1230 Wien
- Phone: +43 1 904 3085
- E-Mail: [email protected].
- If your country is not listed above, please write an email to [email protected].
- DENVER A/S
- Omega 5A, Soeften
- DK-8382 Hinnerup
- Denmark
- denver.eu.
- facebook.com/denver.eu.
- DAB-51B denver.eu. 04/2024
Read User Manual Online (PDF format)
Read User Manual Online (PDF format) >>