Three Hearts Table Runner

Triple the love with this heart table runner!

I’ve been sharing tutorials on my blog for over a decade, and I’m frequently asked how they can be printed or saved. The answer is here! You can find this printable tutorial in my shop, which contains the instructions, color photos, and templates from the original blog post, without the extra things you don’t need to make the project. The file is in PDF format, so you can either print or save it to your computer.

I don’t have a lot of flat surfaces in my house where cute, quilted things can be placed. That means table runners are the star around here.

This one measures 16" x 36" once it’s finished, so it’s just big enough to make an impact, but small enough to use on most dining tables. And the hearts make it perfect for this time of year!

As you go through the instructions, keep all those triangle shapes you’ll cut off. I’ll show you a bonus project at the end!

To make this table runner you’ll need:

  • 1/3 yd white cotton fabric

  • 1/3 yd black cotton fabric

  • 1/4 yd light pink cotton fabric

  • 1/4 yd medium pink cotton fabric

  • 1/4 yd dark pink cotton fabric

  • 1/2 yd cotton fabric for backing

  • 1/3 yd cotton fabric for binding

  • 18" x 38" batting

Cut the following:

white fabric

A (8) 2 1/2" x 2 1/2"

B (8) 2 1/2" x 6 1/2"

C (3) 2 1/2" x 12 1/2"

black fabric

D (4) 2 1/2" x 2 1/2"

E (10) 2 1/2" x 6 1/2"

F (3) 2 1/2" x 12 1/2"

light pink fabric

G (6) 2 1/2" x 12 1/2"

medium pink fabric

H (6) 2 1/2" x 12 1/2"

dark pink fabric

I (6) 2 1/2" x 12 1/2"

backing fabric

J (1) 18" x 38"

binding fabric

K (4) 2 1/2" x width of fabric

batting

L (1) 18" x 38"

Before you begin:

  • All pieces are sewn right sides together (RST).

  • All seams are 1/4" unless indicated otherwise.

  • When instructed to trim, that means trim 1/4" from the stitching line.

  • When instructed to press to a color, direction, or the name of a piece, that refers to the direction for pressing the seam.

This quilt is assembled by making two units for each heart, sewing those together, and adding the final pieces at the top and bottom edge.

To begin the quilt, sew together three light pink G pieces, side-by-side. Sew the remaining three light pink G pieces side-by-side. Press seams to the right.

Repeat the same process with the (6) medium pink H. Press seams to the right.

Repeat again with (6) dark pink I. Press seams to the right.

Sew (1) black E to the right of (1) white B. Sew a second black E to the left of the same white B.

Sew (3) more units in the same manner. Press all seams toward the black. We’ll refer to these as EBE units.

Sew (1) white B to the left of (1) black E. Sew a second white B to the right of the same black E.

Sew a second unit in the same manner. Press all seams toward the black. We’ll refer to these as BEB units.

Using a fabric safe pen, draw a diagonal line on the wrong side of (8) white A and (4) black D.

On (1) light pink G unit, with the seams running vertically, place (1) white A on the upper left corner with the drawn line from the upper right to lower left.

Place (1) white A on the upper right corner of the same G unit, with the drawn line from the upper left to lower right.

Repeat with the second light pink G unit.

Stitch on the drawn lines.

Trim each corner. Press the seams toward the light pink.

Repeat these steps with (4) black D and (2) medium pink H units.

Press the seams toward the medium pink.

Repeat once more with the remaining (4) white A pieces and the (2) dark pink I units. Press toward the dark pink.

Lay out (1) EBE unit with the seams running vertically and the wrong side up. Using a fabric safe pen, draw a diagonal line from the upper left corner to the lower right corner.

Lay out one light pink G unit with the seams vertical and the white A pieces at the top. Place the EBE unit right side down, even with the lower edge, with the line from the upper left to lower right.

Stitch on the drawn line. Trim the corner. Press the corner out and the seam toward the light pink. Save these corners, and all those to follow, for the bonus project at the end.

Lay out (1) EBE unit with the seams vertical and wrong side up. Draw a diagonal line from the lower left corner to the upper right corner.

Lay out the second light pink unit G with the seams vertical and white A pieces at the top. Place the EBE unit even with the lower edge and the line from the lower left to the upper right.

Stitch on the drawn line. Trim off the corner. Press the corner out and the seam toward the light pink.

You should have two light pink units that are opposite each other.

Repeat this process with the (2) medium pink units, using the (2) BEB units. Press the seams toward the medium pink.

Sew the remaining (2) EBE units to the (2) dark pink units using the same method. Press the seams toward the dark pink.

Place the (2) light pink units with right sides together, matching the seams, with the black and white stripes on the left. Sew near the right edges to create a heart. Press the seam to the left.

Repeat with the (2) medium pink units.

Repeat with the (2) dark pink units.

Sew (1) black F to the upper edge of the light pink heart. Sew (1) white C to the lower edge. Press the seams toward the black.

Flip the medium pink heart upside down, with the point up. Sew (1) white C to the bottom edge and (1) black F to the lower edge. Press the seams toward the black.

Sew (1) black F to the upper edge of the dark pink heart and (1) white C to the lower edge. Press the seams toward the black.

Lay out the (3) hearts side by side.

Sew the right side of the light pink heart to the left side of the medium pink heart. Press the seam to the right.

Sew the dark pink heart to the right of the medium pink heart. Press the seam to the right.

Lay the backing fabric out, right side down. Top with the batting. Center the heart quilt top over all, right side up. Pin well.

Quilt as desired. Trim the backing and batting to match the top.

After cutting off the selvages, sew the binding strips end-to-end to create one continuous strip. Sew the binding around the edge, using your favorite method, to finish.

I love the contrast of this runner. But wait a minute….I promised you a bonus project! How about a Lonely Triangles Placemat? Did you save all those cut-off triangles?

If you did, you should have:

  • (4) EBE (black, white, black)

  • (2) BEB (white, black, white)

  • (2) light pink

  • (2) medium pink

  • (2) dark pink

I did not use the small triangles cut from the A and D corners on each heart.

The finished placemat measures about 10" x 15".

You’ll also need:

  • (1) 15" x 20" backing fabric

  • (2) 2 1/2" x width of fabric fabric strips for binding

  • (1) 15" x 20" batting

Lay out the triangles as shown below:

Sew the diagonal edges together within each square. Be careful not to stretch, because these are bias edges. Press each seam toward the pink.

Trim each of the (6) squares to 5 1/2" x 5 1/2"

Lay out again as shown, or alter the layout to your preference. Sew the squares into vertical rows. Press the left and right seams to the top and the middle row to the bottom.

Sew the rows together to complete the top.

Lay the backing right side down. Top with the batting. Lay the quilt top in the center. Pin well.

Quilt as desired.

Trim the backing and batting to match the top.

After cutting off the selvages, sew the binding strips end-to-end to create one continuous strip. Sew the binding around the edge, using your favorite method, to finish.

Two great projects, with minimal waste. All the hearts! 💖💖💖

.

Coordinated Placemats and Napkins

Want to brighten up your table? Make a set of these matching placemats and napkins!

About a year and a half ago my husband and I were in a local shop that sells wood. That might sound kind of boring, but I could spend all day at this place. They have pieces in all sizes and species.

We were there to find something to use for the mantle above our fireplace, which we found, but I also fell in love with this beauty.

It was a slab of black walnut, measuring about eight feet from top to bottom. I figured we’d have to store in for a few years until after we build the house, but I couldn’t leave without it.

Well, I got a great surprise for Christmas! My husband, with some help from our son, spent weeks sanding, welding, pouring resin, sealing, and all the other things it took to turn that rough slab into the most beautiful table I’ve ever seen.

They used some of the beams that were left over from the wall of windows to build the base. No one is going to accidentally bump it out of place - it literally weighs hundreds of pounds!

I can’t even tell you how much I love this table, and how much it exceeded my expectations for that slab (and they were high!). My whole family fits around it with room for an extra guest or two.

As you might imagine, no one is eating at that table without some protection for it. A tablecloth just isn’t an option, so I needed to make some placemats that would do it justice.

In a shock to no one, my dishes are a rainbow of Fiesta. Rather than make a bunch of placemats that look the same, I decided to go all in on the rainbow, and add some napkins for good measure.

This post contains affiliate links. For my full disclosure policy, click here.

To make one placemat and napkin set you’ll need:

  • neutral color fabric (you’ll need a couple of inches more than a half yard for one, but you can easily fit two on a full yard)

  • dark color fabric (1/3 yard - two will fit)

  • light color fabric (1/3 yard - two will fit)

  • backing fabric (1/2 yard - two will fit)

  • batting (15" x 20")

Cut the following:

neutral fabric

(1) 2 1/2" x 14 1/2"

(1) 14 1/2" x 14 1/2"

(2) 2 1/2" x width of fabric (for binding)

dark fabric

(4) 2 1/2" x 2 1/2"

(1) 12" x 12"

light fabric

(3) 2 1/2" x 2 1/2"

(1) 12" x 12"

backing fabric

(1) 15" x 20"

batting

(1) 15" x 20"

Set aside the two 12" squares, the backing, and batting. Lay out the remaining pieces as shown.

Pieces are sewn right sides together with a 1/4" seam unless instructed otherwise.

Sew the vertical row of dark and light squares together. Press the seams as desired.

Sew the neutral 2 1/2" x 14 1/2" to the left. Press the seam to the left.

Sew the neutral 14 1/2" x 14 1/2" to the right. Press the seam to the right.

Lay out the backing right side down and top with the batting. Place the placemat on top, right side up.

Mark your desired quilting lines. I used my Hera marker (one of my favorite tools) to make diagonal lines in a grid pattern, 2" apart.

Make sure all layers are flat and smooth and pin together.

Stitch on quilting lines.

I recommend flipping it over to verify you’ve stitched on all the lines, as it can be hard to tell from the front with the accent squares. I discovered a missing row on this one.

Trim the batting and backing even with the top.

Trim the selvage edges from the neutral 2 1/2" x width of fabric pieces. Sew together with a diagonal seam. Trim to a 1/4". Fold the entire strip in half lengthwise and press.

Sew the binding to the back side of the placemat with the raw edges even.

Press the binding out. Wrap it over to the front side of the placemat and clip in place.

Sew the binding in place, close to the inner folded edge.

I don’t try to sew through the binding on the back, but rather I wrap it far enough so I’m sewing just past the edge on the back. Be sure to use the same thread as the quilting to make this less obvious.

Repeat until you have your desired number of placemats. My family happens to number seven. These should measure about 14" x 18" each.

With the placemat complete, let’s move on to the napkin. Pin the two 12" x 12" squares with right sides together.

Sew 1/2" from the edges, leaving 2 1/2" unsewn so there’s an opening for turning. Clip the corners. With a wider seam like this, I clip each side one more time after clipping the corner off.

Turn the napkin right side out through the opening. Gently push out the corners.

Press the edges, turning the opening to the inside 1/2".

Sew around the napkin 1/8" from the edges.

Sew around again about 1 1/4" from the edges.

Don’t skip that second row of stitching, because it will help the napkin stay flat through washing and drying.

These are so easy to use. They’re each 11" x 11", and it’s fun to fold them in a way you can see both the dark and light colors.

I did throw a couple of Color Catchers in during the first wash, just to be safe.

I feel good about how these look with this incredible table. As a bonus, deciding who was getting which color and where they were sitting kept my grandkids busy for a LONG time! 😂

.

Dog Paw Christmas Stocking

Since last Christmas, we welcomed a new canine member into the family, so it was time to make the dog his own Christmas stocking!

This post contains affiliate links. For my full disclosure policy click here.

I’ve been sharing tutorials on my blog for over a decade, and I’m frequently asked how they can be printed or saved. The answer is here! You can find this printable tutorial in my shop, which contains the instructions, color photos, and templates from the original blog post, without the extra things you don’t need to make the project. The file is in PDF format, so you can either print or save it to your computer.

The new guy’s name is Thor, and he belongs to my son. Or rather, my son belongs to him. He spends most days with me while Tucker is at school and work. He thinks quilts are very boring, unless it’s cold and he wants to lay on one.

Everybody gets a Christmas stocking in our house, and Thor is no exception. But since the ones for humans are loosely shaped like something we’d put on our feet, I thought it only fair that his represented his paws.

To make this you’ll need:

  • 1/2 yard of cotton fabric (I used the same for outside and lining)

  • 1/3 yard of fleece for the cuff (or fabric of your choice)

  • 5 1/2" x 6 1/2" white felt

  • 5 1/2" x 6 1/2" fusible adhesive

  • this template, printed, cut out, and taped together

Cut (2) templates from the fabric. Either cut them at the same time, with the fabric folded, or flip the template face down to cut the second.

Cut (2) 9 1/4" x 12 1/2" from the fabric for the lining.

Cut (1) 2 1/2" x 5 1/2" from the fabric for the hanger.

Cut (1) 10 1/2" x 17 3/4" from the fleece for the cuff.

Trace (4) of the paw pads, located on the template, onto the paper side of the fusible adhesive. Cut out loosely.

Using an iron, fuse the paw pads to the felt.

Cut out the pads on the lines. Peel off the paper.

Place the foot pads on (1) fabric stocking with the felt side up, using the template as a guide. Fuse in place. Press from the wrong side of the fabric if needed.

Stitch around each paw pad near the edge, by hand or machine.

Pin the (2) stockings right sides together with the edges even. Stitch 1/4" from the edges, leaving the top edges open. Clip the seam between the pads.

Pin the (2) lining pieces right sides together and edges even. Stitch 1/4" from the edges, leaving one set of 9 1/4" edges open and 4" open in the middle of one 12 1/2" side. Clip off the corners within the seam.

Fold the hanger in half lengthwise with wrong sides together and press. Fold both long edges inside to meet the crease and press again.

Stitch close to both long edges. Apologies for the blur here!

Fold the cuff widthwise with right sides together, so the short edges meet. Sew 1/4" from the 10 1/2" edges to create a loop.

Fold the cuff in half with the wrong sides together and the raw edges even. Pin to hold together.

Turn the lining right side out. Don’t worry about the corners, as they will get turned again later. Slip the cuff over the lining and match up the raw edges on both. The fold on the cuff should be pointing toward the bottom. Pin.

Fold the hanger in half widthwise.

Slide the hanger between the cuff and lining on one side. The edges should all be even and the loop on the hanger pointing toward the bottom. Pin.

Stitch 1/8" from the edges through all layers to hold in place.

Slide the cuff and lining inside the stocking with right sides together. Line up all edges at the top. Pin.

Stitch 1/4" from the top edge. Backstitch at least once when sewing over the ends of the hanger.

Turn the stocking and lining right side out through the opening in the side of the lining.

Press the seams on the outer stocking only. Turn the edges of the opening in the lining to the inside 1/4" and press. Stitch closed by hand or machine.

Push the lining inside the stocking.

Fold the cuff down over the top of the stocking. It should measure about 15" tall.

Use the hanger to hang it up, and fill it with treats for your favorite furry friend!

.

Picnic Placemat and Cloth Napkin

Just because you’re eating outdoors doesn’t mean it can’t be a little fancy. Make this picnic placemat and cloth napkin for dining al fresco!

When the weather and the bugs cooperate, we love taking our dinner outdoors. Everything tastes better in the fresh air.

One of the biggest problems is keeping our napkins from blowing away. I’ve solved that issue with this placemat!

The ties are for securing the coordinating napkin, which you can also make, and the roomy pocket will hold even metal, full-sized eating utensils.

I’ve been sharing tutorials on my blog for over a decade, and I’m frequently asked how they can be printed or saved. The answer is here! You can find this printable tutorial in my shop, which contains the instructions, color photos, and templates from the original blog post, without the extra things you don’t need to make the project. The file is in PDF format, so you can either print or save it to your computer.

To make a placemat and napkin you’ll need:

  • 4-6 fat quarters or 4 half-yard cuts (depending on how many fabrics you’d like to use and for which parts)

  • 1/4 yd for binding

  • batting

Cut the following:

(9) 2 1/2” x 14 1/2” for the mat (3 strips each from 3 colors)

(1) 5 1/2” x 12 1/2” for the pocket

(2) 2 1/2” x 6 1/2” for the ties

(1) 16” x 20” for the backing

(2) 2 1/2” x width of fabric for the binding

(1) 18” x 18” for the napkin

(1) 16” x 20” batting

Fold the ties in half lengthwise with wrong sides together. Press. Fold both edges inside to the center. Press again.

Unfold the ties. Turn one short end 1/4” to the inside. Press.

Fold back together on original fold lines, keeping that short end folded in, and press again. Stitch close to the double fold edge on both. Set aside.

Fold the pocket in half widthwise with wrong sides together. Press. Set aside.

Lay out the 2 1/2” x 14 1/2” strips in the order you’d like them in the placemat.

Pin the ties in the vertical center of the first strip on the left. The raw edges should be even on the right and the strips to the left.

Lay the second strip from the left on top, right side down, edges even with the first strip. Pin.

Sew the strips together, 1/4” from the right edge. Press the seam open.

Move the tie out of the way to the left and sew the next strip right sides together on the right. Press the seam open.

Sew the next (4) strips to the right until you have (7) strips sewn together. Press the seams open.

Lay the pocket over the sewn strips, right side up if there is one. The folded edge should be toward the top and the raw edges even at the bottom and right.

Lay the next strip on top, right side down, with the right edges even. Pin. Sew 1/4” from the right edge. Press the seam open with the pocket edge toward the left.

Fold the pocket over to the left. Lay the final strip on top of the previous one, right side down, with the right edges even. Pin and sew 1/4” from the right edge.

Press the seam open and fold the pocket back over to the right.

Lay out the backing right side down, the batting, and the top right side up. Pin the layers with safety pins. Don’t pin the ties or pocket.

Quilt as desired, moving the ties and pocket out of the way as you go.

Trim the backing and batting even with the top. Make sure to keep the ties and pocket out of the way while cutting.

Pull the right edge of the pocket back so it’s even with the right edge of the mat. The middle will puff upward. Pin the right edges together.

Push the center of the bottom edge of the pocket down while pushing the sides underneath to create a pleat.

Pin the bottom edge of the pocket.

Stitch close to the right and bottom edges of the pocket to hold it in place.

Trim the selvage edge off the 2 1/2” x width of fabric binding strips. Sew the ends together to create one continuous piece. Fold in half lengthwise with wrong sides together and press.

Sew the binding around the edge of the mat on the back. Join the ends using your preferred method. Make sure the ties stay out of the way on the front.

Wrap the binding over the edge to the front and clip in place.

Stitch close to the inner edge of the binding to finish the placemat.

Fold all the edges of the napkin under 1/2” to the wrong side and press.

Unfold the edges at a corner. Fold the corner up from where the two folds meet, as shown. Press.

Clip the corner off between the folds (1/4”).

Fold the edges back in and press. Fold the edges into the fold 1/4” and press again.

Stitch close to the inner fold all the way around the napkin.

Fold and roll the napkin up, place it between the ties on the placemat, and tie a loose knot to hold it in place.

A little trick for storage - tuck the napkin in the pocket, roll the mat up from that end with the top side out, wrap the ties around and loosely knot.

Unroll, tie your napkin, add some eating utensils and you’re almost ready for a picnic!

Now we’re set!

.

Ruffled Tote Bag

This tote bag is the perfect size for a couple of books or a hand sewing project, and the ruffle adds a lot of personality!

I originally made this bag for my grandma, who loves to read, using a fabric I knew she would love.

I went on to make them for other people as gifts, but you know who didn’t have one? Yep, me!

This one is mine. I love the black and white with the flashy green ruffle and the polka dotted turquoise inside. I can’t wait to use it.

I’ve been sharing tutorials on my blog for over a decade, and I’m frequently asked how they can be printed or saved. The answer is here! You can find this printable tutorial in my shop, which contains the instructions, color photos, and templates from the original blog post, without the extra things you don’t need to make the project. The file is in PDF format, so you can either print or save it to your computer.

To make this bag, you’ll need:

  • fabric for the outer bag and inner pocket

  • fabric for the lining

  • fabric for the handles

  • fabric for the ruffle

  • medium weight fusible interfacing

The amount of fabric you’ll need will vary depending on what you use for each part of the bag, but you can get the outer bag and inner pocket pieces from 1/2 yard. The lining could also be from 1/2 yard (with more scrap).

Cut:

outer bag fabric

(2) 14” x 14”

(1) 6” x 14”

lining fabric

(2) 14” x 14”

handles

(1) 2 1/2” x width of fabric, subcut into (2) 2 1/2” x 20”

ruffle

(1) 2 1/2” x width of fabric

interfacing

(2) 14” x 14”

(1) 6” x 14”

Press the interfacing onto the wrong side of the outer bag pieces and the inner pocket. 

Fold the inner pocket widthwise with right sides together.  The two 6” edges should be together.

Stitch 1/4” from the edge, leaving 2” open on one side for turning. 

Clip the corners and turn right side out. Press, turning in the edges 1/4” in the opening.

Pin the pocket to (1) lining piece 3” from the top edge and centered side to side. The folded edge of the pocket should be toward the top.

Stitch close to the side and bottom edges. 

Pin the two outer bag pieces right sides together.  Stitch 1/4” from the sides and bottom, leaving top open. 

Repeat with the lining pieces, leaving 5” open in the side seam, at least 3” up from the bottom, for turning later. 

To make the boxed bottom in the bag, flatten the corner of the outer bag with the seams touching.  Fold the seam to one side. Measure 2” from the corner and draw a line across.  Stitch along the line.

Trim off the corner 1/4” from the stitching.  Repeat with the other corner, then both corners on the lining. 

Turn the lining right side out.

To make the handles, fold each in half lengthwise with right sides together and stitch 1/4” from the long edges, leaving the ends open. 

Turn right side out and press. 

Handles turned right side out for ruffled tote bag

Top stitch near both long edges.

To make the ruffle, fold lengthwise with wrong sides together and press. 

Fold the ends back out and stitch to each other with right sides together and ends even.

Fold back again and press.  Stitch a long basting stitch near the raw edge through both layers, starting and stopping at the seam. Don’t overlap the stitching, and leave the threads long.

Find the center opposite the seam and mark it with a pin.

Pin the ruffle to the lining with right sides together, matching the seam to one side seam and the pinned center to the other side seam. The raw edges should be even. 

Carefully pull the basting thread to gather the ruffle.  Stop at the pin and gather from the other side. 

Even out the gathers and pin the ruffle in place.

Use a long basting stitch, just under 1/4” from the edge, to sew the ruffle in place. 

Stuff the lining inside the bag so they are right sides together.  Match seams and upper edges. 

Slip the handles in between the layers, 4” away from the seam on each side. Make sure the handles aren’t twisted. Pin the handles and upper edges of bag and lining in place. 

Stitch around just over 1/4” from the edge.

Turn the bag and lining right side out by pulling everything through the opening in the lining side seam.

Turn the edges of the lining opening in 1/4” and press. Pin together.

Stitch the opening closed by hand or machine. 

Push the lining into the bag.  Press the seam at the upper edge, avoiding the ruffle. Stitch around the bag about 1/8” from the seam.

Finished!

I made these for a friend for Christmas one year.

You may have noticed the original bags had an outer pocket. I stopped adding it, but if you want one just make a second pocket like the inner one and sew it to the outer bag before you start assembling it.

Time to go add a few books!

.

Wi-Fi Mini Quilt

Need an easy and cute way to share your wi-fi info with guests? This mini quilt is the answer!

When I shared my Wi-Fi Signal Quilt Block earlier this month, I said I’d be back with a project to include it in. It’s here!

I live in Montana, just far enough out that guests usually need to hook up to our wi-fi in order to use their phones.

My daughter has a cute sign she bought to display her household info, and I kept thinking I should get something similar.

But then I realized I could make a mini quilt that could do the same thing! For my quilt I added a clear vinyl pocket at the bottom so I could slip in a piece of paper with the info on it. If it changes, I can just replace the paper.

I can’t think of a better way to use this quilt block! To make this you’ll need:

  • (1) completed Wi-Fi Signal Quilt Block (12 1/2” x 12 1/2” unfinished)

  • fabric for the border (I used the same as the background on my quilt block)

  • fabric for the backing and binding

  • batting

  • clear vinyl

Cut the following:

  • border

(2) 1” x 12 1/2”

(1) 1” x 13 1/2”

(1) 3” x 13 1/2”

  • backing

(1) 15” x 17” (I pieced this together from some scraps)

  • batting

(1) 15” x 17”

  • binding (I pieced this from scraps as well)

(2) 2 1/2” x width of fabric

  • clear vinyl

(1) 2 1/2” x 13 1/2”

Sew (1) 1” x 12 1/2” to the left side of the quilt block. Sew the other (1) 1” x 12 1/2” to the right. Press the seams away from the block.

Sew (1) 1” x 13 1/2” to the top edge of the block. Sew (1) 3” x 13 1/2” to the bottom edge. Press both seams away from the block.

Layer the backing, right side down, the batting, and the quilt top, right side up. Pin the layers together.

Quilt as desired. I followed the pieced design.

Trim the edges of the batting and backing to match the top. Mine was about 13 1/4” x 15 1/4” at this point.

Sew the (2) binding pieces together to create one long strip. Fold in half with wrong sides together and press.

Again, I pieced mine. I’ve kinda been into the scrappy binding lately!

Cut off 13 1/2” of the binding. Sew the double raw edge to the long edge of the vinyl with the edges even.

Wrap the fold on the binding over the seam to the other side of the vinyl. Stitch through all layers. Trim the width to match the quilt.

Place the vinyl on the quilt with the lower edge and sides of the vinyl even with the lower edge and sides of the quilt.

The binding edge of the vinyl should be at least 1/4” below the seam at the bottom of the wi-fi block. Trim off the bottom edge of the vinyl if needed to make it shorter, but don’t leave less than 1 3/4” of clear vinyl below the binding.

Clip the edges together.

Stitch about 1/8” from the raw edges of the vinyl to hold it in place for the next steps.

Cut 4 1/2” of binding. Fold both long edges into the center and press.

Stitch all layers together to create the hanging loop.

Pin the ends of the hanging loop to the back of the quilt at the top edge. Each end should be 3/4” from the center, with the loop toward the quilt. Tack the ends to the quilt by stitching through all layers 1/8” from the edge.

Sew the binding around the edge of the back of the quilt, over the hanging loop.

Wrap the binding to the front and stitch.

I used a strip of paper 1” tall and 10 1/2” wide for my info. You can download a page of them here.

There may be some variation depending on how you quilt it, but mine came out about 13 1/2” x 15 1/4”.

Now I’ll never have to scramble for the wi-fi info to give our guests again - I’ll just direct them to this quilt!

.

Top Twelve Sewing Projects

Wow, it’s been a big year for sewing! As it winds down, let’s talk about the twelve most popular sewing projects for 2022. See anything you haven’t made yet?

As the year draws to a close I like to look back at how it all went. There’s a whole range of emotions that can go along with that, but this year I’m so happy to see how many of you have been sewing along with me!

As usual, the projects kind of run the spectrum. We have simple scrap busters all the way up to a full sized quilt. There are things that fit in every season. Shall we take a look?

#12 Windowed Zip Bag

I’m never sure where to start, so let’s go in true, end-of-year, countdown to number one style. This bag was a hit, and I have a feeling the fact that you can see what’s inside played into that. I love this for whatever embroidery project I’m currently working on.

#11 Pentagon Star Ornaments

I love these star-in-a-pentagon ornaments for their ability to feature a fussy cut holiday print.

#10 Red Truck Mug Mat

Even though red trucks show no sign of disappearing as a trend, I don’t care if they do. I will always stop to admire an old truck - just ask my husband! 😅 This mug mat was just an ode to a love.

#9 Block of the Month Coffee Mug Quilt

This quilt was my first go at making a block of the month (there’s a little hint there about something that’s coming in 2023!) and it was so much fun!

#8 Adjustable Passport Bag

This project came about because one of my sisters-in-law was looking to replace an old bag for her passport. It turns out these things are very versatile, and she and I have both put them to work.

#7 Fitted Sheet Corner Anchors

I kinda have to laugh every time this one comes up. This was a legitimate problem I was battling with, but it seemed so simple I almost didn’t share it. I’m glad so many others find it helpful!

#6 Hexagon Mug Mat

This is another good project for fussy cutting. It also combines hand sewing with machine, which is always fun.

#5 Magnetic Needle Minder

So many of the things I share here are born out of necessity, and this is one for sure. I don’t know how I lived so long without it.

#4 Craft Show Vendor Apron

I made so many of these when I sold them in my shop and Etsy store. In fact, near the end of when I was still doing in-person craft shows, these were in my booth, and I never went back home with any of them.

#3 French Braid Mug Mat

This mat is a great way to use skinny scraps, and I think that’s why it always lands on my most-popular list. That, and it’s an easy way to dip your toe into the technique.

#2 Fabric Ribbon Candy Ornament

Do you have these on your tree yet? Based on how many readers have checked them out, I think the odds are pretty good. They’re definitely on mine!

#1 Quick Fabric Corner Bookmark

I totally understand how this one is always at the top. They’re quick to make, perfect for scraps, and a great way to show off a cute print. They also make a great gift for any age, and can give a handmade touch to a purchased book. I’ve made tons of these myself.

There you have it - the top twelve sewing projects you’ll find here. What’s next? Hang in there with me in 2023 to find out!

.

Fabric Flowers - made from 3 different shapes

Can I make a fabric flower using squares? Well, sure, I’ve done that a hundred times. Can I make a flower using circles? Yep, I’ve made a few of those as well. How about hexagons? I had to give it a try!

I’ve slapped fabric flowers onto a lot of things over the years, usually when I’d like to brighten something up, or give it some dimension. You can see them on my flip flop covers, my fabric flower wreath, and even a tiny version on my dress form ornament.

I’ve almost always made them starting with squares, but my wandering brain started thinking about other shapes. Probably while I was supposed to be doing something else.

Of course I had to give it a try. I made the typical version with squares, the also-common circles, and threw in hexagons just for fun. Read on for details, but I will tell you I like every one of them for different reasons.

To make these you’ll need:

  • these templates, printed and cut out

  • fabric

  • hand needle and thread

  • a small piece of cardboard

Paper templates for fabric flowers

We’ll start with the one I’m most familiar with - the square. You can use the template to cut five petals, or cut a strip of fabric 4” wide and subcut that into five 4” squares.

Five squares cut for fabric flower

Fold one square in half diagonally, with wrong sides together.

Fold square for fabric flower

Fold again diagonally so there’s one long raw edge. Do not press. Clip or pin to hold.

Fold square diagonally for fabric flower

Repeat with the other four squares. Make sure you like the part of the print that’s facing up. If not, unfold, turn, and fold again until you do.

Five square petals folded for fabric flowers

Thread a hand sewing needle with about 2 feet of thread. Knot both ends together.

Starting from one corner, stitch long stitches about 1/8” from the raw edge. Make sure you’re catching all the layers as you sew.

Begin stitching square petals for fabric flowers

When you reach the other corner, start again on the next triangle using the same thread.

Sewing finished on second square petal for fabric flower

Continue sewing petals until all five are strung onto the same thread. If your thread gets too short, just push the petals toward the knot to gather them and free up more space.

Pull the thread tight to gather the petals, being careful not to break it. Stitch the two end petals together, knot the thread and clip it.

All petals gathered for square fabric flower

I won’t repeat each step for every flower, as they’re all made in basically the same way.

For the circles, cut five from the fabric. Fold each in half once, then a second time with wrong sides together.

Fold circle in quarters for fabric flower

Stitch the raw edges, just like the squares, but along the curve.

Sew edge of second circle for fabric flower

Pull to gather and stitch the two end petals together.

All petals gathered for circle fabric flower

For the hexagons, cut five once again. Fold in half, and in half again.

Fold hexagon in quarters for fabric flower

The raw edge for this one isn’t straight, but has a corner in it. Stitch along the short side first.

Sew first edge of hexagon for fabric flower

When you reach the corner, pivot and stitch near the longer raw edge.

Sew second edge of hexagon for fabric flower

This makes for a little more awkward sewing process, but it works.

Pull carefully to gather the petals, and stitch the ends together.

Hexagon fabric flower petals gathered

So, you may be asking “What’s the difference?” In this two dimensional space they do look very similar, but when you see them in their 3D glory, they’re not.

Let’s start with the shape of the petal, especially the gathered edge. This is the square. It’s got a deep curve, which creates a larger hole in the center. Overall this one is very flat, which isn’t a bad thing if the project requires it.

The circle petal comes out with a much straighter raw edge (doesn’t that seem backwards?) so the finished center is smaller. That would work well if you want to use something like a button to cover it.

Pull thread to gather petals on circle fabric flower

I know the hexagon seemed a little silly to include, but it turned out to be its own kind of special. The corner on the raw edge creates a deeper valley in the petal, which gives it more dimension, making it perfect for a project where you want it to really stick out. The size of the center is similar to the squares.

Gather petals for hexagon fabric flower

Here’s what each looks like without the centers covered and next to the template used to make it.

There are lots of ways to cover the centers of these. For this version, cut out fabric and cardboard using the templates.

Cut cardboard and fabric for flower center

Stitch around near the edge of the fabric circle. Flip it wrong side up and lay the cardboard in the center.

Place cardboard in center of fabric for flower

Pull the thread to gather. Knot the thread and clip.

Pull thread to gather center of fabric flower

Glue in the center of the flower. Fluff the petals.

Center glued onto fabric flower

This was actually a really fun experiment.

Starting shapes for fabric flowers

And now I have lots of options when I want to add flowers to all the things!

Three fabric flowers made from different shapes
.

Octagon Coasters

I know we all like a quick and easy project in the summertime, so this month’s octagon coasters can be made in no time!

Here we are, halfway through the Year of the Octagon! If you’re new, every month I’m sharing a different project based on the shape of an octagon. If you’ve missed any, you can see the whole collection here.

To make these coasters you’ll need:

This post contains affiliate links. For my full disclosure policy, click here.

Cut out each template piece for the front from a different print. Use one of those prints to cut out the template for the back. Cut out two of the back from the fusible fleece.

Fabric pieces cut for octagon coaster

Lay piece 1 on piece 2 with right sides together. The two edges that are red on the templates should be lined up.

Piece 1 placed on piece 2 for octagon coaster

Stitch 1/4” from that edge. Press piece 1 away from piece 2.

Piece 1 pressed away from piece 2 on octagon coaster

Lay piece 3 on piece 2 with right sides together. Line up the two edges that are shown in blue on the template.

Piece 3 placed on piece 2 for octagon coaster

Stitch 1/4” from that edge. Press 3 away from 2.

Octagon coaster top sewn and pressed flat

Apply the fusible fleece to the wrong side of the assembled top and to the wrong side of the back.

Fleece fused to octagon coaster

Lay the back over the front with right sides together. Stitch 1/4” from the edge, leaving one straight edge between the corners open for turning.

Front and back of octagon coaster sewn together

Clip the corners. Turn the coaster right side out and push out the points.

Press, turning the opening in 1/4”.

Open edge turned in on octagon coaster

Stitch around close to the outer edge.

Stitch around outer edge of octagon coaster

Stitch close to the seams between the prints.

Stitching near seams of octagon coaster

Grab your favorite cup and you’re all set!

Pink and Green Octagon Coaster with mug

I make a lot of mug mats here, so you might be asking yourself, what’s the difference? It’s purely opinion on my part, but I think a coaster is usually smaller, sometimes has a little more filling, and usually comes in pairs or sets. A mug mat is meant to hold a mug and a treat, while a coaster is all about the drink.

Independence Day Octagon Coasters

These are so quick, and use few materials, so they’d be perfect to whip up for a party. 4th of July it on its way!

4th of July Octagon Coasters from Crafty Staci

Join me again in July for another octagon project!

Crafty Staci's Year of the Octagon
.

Octo Owl Placemat

This owl placemat is another of my octagon projects that inspired this whole series. Whooo looks at an octagon and sees an owl? Apparently I do, and now you will too!

This post contains affiliate links. For my full disclosure policy, click here.

This is a pretty easy project. I did try a new-to-me method for applique to add the face, with slightly mixed results. I’ll let you know how it went for me, but if you have a favorite method you’d rather use, go for it.

To make this owl placemat you’ll need:

supplies for octo owl placemat

Print out the pattern templates and tape them together, overlapping as needed to match up lines and printed words. Cut out.

I keep a rotary cutter with a blade that’s too dull for fabric to use specifically for cutting out paper patterns. I sure wish I knew which box that is in right now!

Octo owl placemat templates cut and pieced together

Cut:

  • large octagon

    • 2 fabric

    • 1 batting

  • small octagon

    • 1 fabric

    • 1 fusible web

  • wing

    • 4 fabric, flip template for 2 (I cut one, flipped the template for the second, then cut the remaining pair from a different print to get the contrast when the wing is flipped over)

  • ear

    • 4 fabric, flip template for 2

  • beak

    • 1 fabric

    • 1 fusible web

  • foot

    • 4 fabric, flip template for 2

  • eye, white

    • 2 fabric

    • 2 fusible web

  • eye, black

    • 2 fabric

    • 2 fusible web

Fabric pieces cut for octo owl placemat

Lay out the small octagon, right side up. Pin the fusible web on top with the paper side up. Stitch all the way around the shape, 1/4” from the edge.

Fusible web applied to small octagon

Peel away the paper. The easiest way to do that is make a small tear away from the edge and tear from there. Be sure not to tear the web.

Tear away paper on back of small octagon

Cut a slit in the middle of the fusible web that’s about 3-4” long. Very gently turn the small octagon right side out through the slit. Carefully push the corners out with a pointy tool.

turn small octagon right side out

You want to complete this step with as little tearing as possible. That said, a small amount of tearing isn’t going to hurt anything. We just want the stitching line to provide a folded edge and the web to hold this piece to the next. This is what it should look like from the back.

Back side of small octagon after turning right side out

What you want to try to avoid is allowing it to tear all the way to the seam, which mine did. As I mentioned above, I used medium weight fusible web, but I think a heavier weight would help. Even this problem is manageable though, it just requires a little more tucking as you press. My botched corner is shown below near the upper left, and I was able to roll it under.

front side of small octagon after turning right side out

Pin the small octagon in the center of the large octagon. Press to fuse in place. If you ended up with wild bits of web from tearing, either trim those away with some small, sharp scissors, or tuck them under the fabric as you press. Stitch close to the outer edge of the small octagon.

attaching small octagon to large octagon

Lay out the white eyes, black eyes, and beak, all right side up. Pin the web on top, paper side up. Stitch around each piece, 1/4” from the edge.

Sewing web to owl eyes and nose

Tear away the paper. Trim away about 1/16” of the seam to make the curves smoother. It doesn’t seem like much, but it really does help. Clip a slit in the web only and turn each right side out through it.

You can see in the photo below, my web tore at the bottom of the beak, allowing the corner to pop out. I simply tucked that under in the next step while pressing it down.

Owl eyes and nose turned right side out

Place the beak on the small octagon. I recommend placing the white eyes in place temporarily as well, so you can make sure the facial features are placed as you’d like them, and away from the edge a bit. Set the white eyes aside and press the beak in place.

Owl beak placed on small octagon

Stitch around close to the edge of the beak.

Owl beak sewn onto small octagon

Place the white eyes, press, and stitch around the edges.

Repeat the process with the black eyes on top of the white.

black eyes sewn onto small octagon

Pin each set of wings with right sides together. If you’re making them the same way I did, each set should include two fabrics. Stitch together with a 1/4” seam, leaving the short, straight end open.

wings sewn together in pairs

Trim away about 1/16” of the seam allowance near the rounded tip. Turn right side out. Press. Top stitch close to the seams.

Owl wings turned right side out and topstitched

Pin pairs of the feet with right sides together. Stitch with a 1/4” seam, leaving the long, straight edges open (opposite the V).

Owl feet sewn in pairs

Clip off the points and clip in the seam allowance at the V. Turn right side out. Press. Top stitch close to the seams.

Owl feet turned right side out and topstitched

Pin pairs of ears with right sides together. Stitch 1/4” seam, leaving the long edge from point to right angle open.

Owl ears sewn in pairs

Clip the corner. Turn the ears right side out. Press. Top stitch close to the seams. You can trim off the bit sticking out past the edge at the tip.

Owl ears turned right side out and topstitched

Lay out the batting. Add the face on top with the right side up. Center the raw edge of the wings on the straight edges of the octagon at the left and right. The side of the wings you want facing toward the back should be up. Pin in place.

Wings pinned to owl face

Pin the ears as shown with the raw edges even and the point 1/2” from the octagon point.

Ears pinned to owl face

Pin the feet at the bottom edge with the raw edges even and 3/8” from the point on each side, leaving about 1/4” between the two feet. Make sure all of your pin heads are to the outside of the face so they can be removed easily as you sew.

Feet pinned to owl face

Lay the remaining octagon right side down over the top of the face. Pin in place. Stitch 1/4” from the edge, leaving 3” open on one empty, straight edge.

Lay back over top of owl face

Clip the corners. Turn right side out through the opening. Press. Top stitch close to the edge of the large octagon.

Topstitch around owl face

Stitch again through all layers just outside the edge of the small octagon.

Stitch just outside small octagon through all layers

I originally planned to add Kam snaps to the tips of the wings and the face so they could wrap around silver wear or a napkin. When I got to this point, I realized the snaps weren’t really necessary. It still wraps just fine, and I’m not tied to putting them in the same position every time!

Octo owl placemat holding silver wear

I should say, my daughter’s not. She whisked these off to her house before I even had this post written!

Octo Owl Placemats on Crafty Staci blog

While I think these are adorable placemats, they would make an equally cute table runner, simply laid out next to each other.

Another octagon project in the books! If you missed any of the previous projects you can see those here. Join me again in June for number six!

.

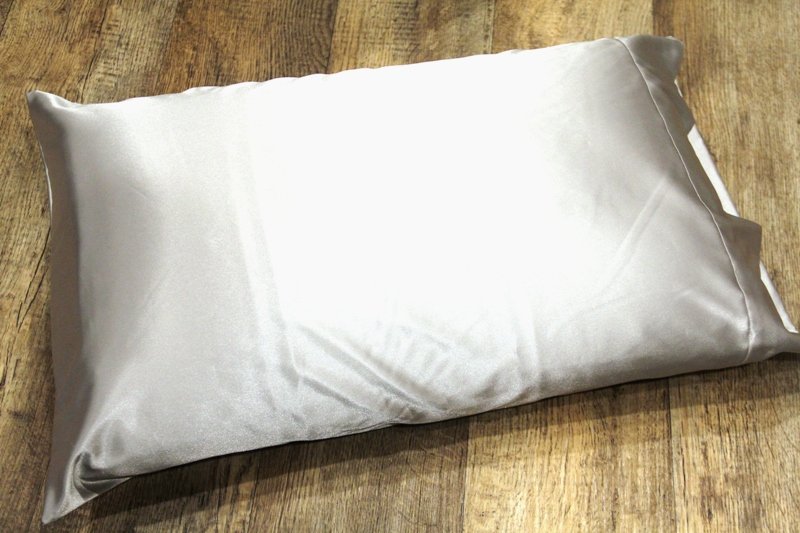
Satin Pillowcase

Due to a deal with my husband where I won’t cut my hair short if he won’t shave his face, I have long hair. If we’re telling the truth here, we’re both very happy with this situation. 😉 However, I wake up looking like I’ve been through something dramatic.

I hope you didn’t think there would be a pic here of my crazy morning hair. There’s no way I’m putting that on my permanent record! Anyway, I recently learned about a thing that might not only tame my mane, but it may also slow the wrinkle train.

This post contains affiliate links. For my full disclosure policy, click here.

When I first discovered these, everyone was talking about silk. Honestly, I just don’t have the time or space to deal with something that high maintenance right now (besides myself) but as I read more I found many experts find a satin pillowcase has all the same benefits. Machine washable satin is something I can definitely get behind.

To make one of these satin pillowcases, you’ll need

Most satin is 54-60” wide, so we will need to trim that a bit. Leave the 36” (one yard) length, and cut the width of the fabric down to 43”. I bought two yards of satin so I could make an extra pillowcase.

I’m planning to use the excess I cut off to make hair scrunchies, because I’m thinking the smooth satin should work well there too.

Before you begin, I have a couple of notes about working with satin. If you’re used to sewing with quilting cotton most of the time, you’ll want to turn down your iron for this. Trying to remove melted satin is NOT fun, and won’t result in a nice pillowcase. You should also do a quick test on the edge of the fabric to make sure your pins won’t leave permanent holes. I like to use sewing clips as an alternative where I can, although the pins were fine in mine. Finally, because this fabric is slippery, pin or clip generously.

Let’s sew! Fold the fabric with wrong sides together. The two 36” long edges should be touching. Clip or pin the edges. You should be seeing the right side of your fabric facing up.

Satin pillowcase folded in half and clipped

Stitch 1/4” from the long raw edges and one short edge. Don’t sew the second short edges together, unless you want to be picking out stitches like I was.

Turn the pillowcase inside out. Press the seams. Now you should see the wrong side of your satin facing up.

Stitch 1/2” from the edge near the original seams. The extra width is to encase the original seam and hopefully cut down on threads poking through.

Press the seam to one side. Turn the remaining raw edge to the wrong side by 4 1/2”. Press. Turn the raw edge under 1/2” again and press. Pin well, or if your pin test failed use a little fabric glue or fusible web to hold the cuff in place.

Stitch close to the inner fold on the cuff. If you want to get fancy, try a decorative stitch here.

I was tempted to sew some trim or lace over the stitching, but I felt that would defeat the smooth-surface theory. Turn the pillowcase right side out.

I didn’t bother pressing the last seam because the pillow will push it out, but you do want to check for rogue threads sticking through and trim where necessary.

This pillowcase fits my standard pillow nicely. I’m anxious to see how my hair responds - I’ll be happy with even a little improvement!

.

Hidden Octagon Bag

This month’s octagon-themed project was actually one of the first in my sketch book, it just took me a little time to bring it to life. I’m actually glad I waited, because this adorable fabric wasn’t in my stash until after my move, and this octagon bag wouldn’t bee the same without it! 😂

This post contains affiliate links. For my full disclosure policy, click here.

The octagon isn’t all that hidden once the bag is open, but once it’s closed, the surprise is a bit of a secret! To make this bag you’ll need:

  • this set of pattern templates, printed, taped together, and cut out

  • fabric for the outside

  • fabric for the lining

  • fabric for the inner pocket

  • fabric for the strap and strap loops

  • medium weight fusible interfacing (I use Pellon 931TD)

  • Craft Fuse (heavy fusible backing)

  • one button, about 1”

You can use different fabrics for each portion of the bag, all the same, or repeat some. I used the same for the lining and strap loops, and also for the inner pocket and strap. Assuming you do the same, you need to cut:

fabric one (outer)

  • 1 back (on fold)

  • 1 front

fabric two (lining and strap loops)

  • 1 back (on fold)

  • 1 front

  • 2 strap loops

fabric three (pocket and strap)

  • 1 inner pocket (on fold)

  • 3 2 x 18” (for strap)

medium interfacing

  • 1 back (on fold)

  • 1 front

  • 1 inner pocket (on fold)

  • 2 strap loops

Craft Fuse

  • 1 back (on fold)

  • 1 front

Pieces cut from fabric for octagon bag

Press the Craft Fuse onto the wrong side of the outer front and back. Press the medium interfacing onto the wrong side of the front and back lining, inner pocket, and strap loops.

Interfacing applied to fabric pieces for octagon bag

Fold the strap loops in half lengthwise with wrong sides together. Press. Fold both edges into the center and press again.

Strap loop for octagon bag folded and pressed

Stitch close to the double fold edge. Set those aside.

Sewn strap loops for octagon bag

Overlap two pieces of the strap with right sides together and the ends perpendicular. Stitch diagonally from corner to corner, as shown below.

Stitching line on strap pieces for octagon bag

Trim away 1/4” from the seam toward the corner. Repeat with the remaining strap piece on one of the other ends to create one long strip. Press the seams open.

Strap seam trimmed on strap for octagon bag

Fold the short ends of the strap under 1/4” to the wrong side and press. Fold the entire strap in half lengthwise with wrong sides together. Press. Fold both long edges into the center and press again.

Strap folded and pressed for octagon bag

Stitch close to both long edges. Set aside.

Strap sewn for octagon bag

Fold the inner pocket in half with right sides together. Press. Lay out the back lining with right side up. Place the pocket on top, with bottom edges even. Pin in place. Using the pattern template as a guide, stitch the two vertical dotted lines through all layers.

Sewing pocket inside octagon bag

Place the front lining over the pocket, with the right side down, and bottom edges even. Using just slightly larger than 1/4” seam, stitch down both sides and across the bottom. Clip corners.

Sewing lining front to back for octagon bag

Place the outer front on the outer back with right sides together and bottom edges even. Pin the lower edge. Fold back the upper edge of the front. Pin one end of one strap loop 1/2” down from the corner where the front meets on the left. Pin the other end right next to it, with the same side facing up. The loop should form kind of a V shape.

Pinning strap loop in place on octagon bag

Repeat on the right with the second loop. Make sure the pin heads are to the outside so you can remove them easily while sewing.

Strap loop pinned in place on octagon bag

Place the upper edge of the outer front back down and pin. Stitch down both sides and across the bottom with a 1/4” seam. Stitch a second time over just the ends of the loops. Clip the corners.

Outer front and back sewn together for octagon bag

Turn the lining right side out. Don’t worry about the corners. Stuff the lining inside the outer bag with right sides together.

Pushing lining into octagon bag

Match up the raw edges and pin well.

Pinning outer and lining edges on octagon bag

Stitch with a 1/4” seam, leaving 3” open at the top edge for turning. Pivot at the side seams and corners. Clip the corners and clip in at the side seams. Turn the bag right side out through the opening. Push out the corner with a pointy tool, then stuff the lining inside the bag.

Turn entire octagon bag right side out

Press the seams, turning in the opening 1/4”. Top stitch close to the edge.

Topstitch around upper edge of octagon bag

Draw a horizontal line 1/2” from the top edge on the outer bag and centered side-to-side for the button hole. Make sure the line is 1/8” longer than your button is wide. I forgot to add that, and couldn’t use the cute flower button I bought!

Mark buttonhole on octagon bag

Stitch the buttonhole on the line, and carefully cut open. If you’re not into the button idea, you can use a snap or other closure of your choosing. I like the button because I don’t have to figure out where it needs to go until the end.

Stitch buttonhole on octagon bag

Fold the flap to the front. Make a mark through the center of the buttonhole on the front of the bag. Sew the button on the mark.

Sew button over mark on octagon bag

Grab the strap, and push one end through the strap loop on the right. Overlap the strap by 1 1/2” and pin. Repeat on the left with the remaining strap end. Make sure there are no twists in the strap. Adjust the length if needed by overlapping the strap end further on the strap.

Stitch the ends to the strap using a box stitch close to the end, which is basically a square or rectangle with an X in the middle.

Box stitch end of strap on octagon bag

Fill it with your stuff, button it up, and go! My giant phone even fits in the inner pocket of this bag.

Hidden Octagon Bag sewing tutorial from Crafty Staci

The octagon is your little secret!

Hidden Octagon Bag sewing pattern from Crafty Staci

One more octagon down! If you missed any of the previous projects you can see those here. Join me again in May for the next one!

.

Fabric Tangram Puzzle

Make a fabric tangram puzzle using your scrap bin!

I’ll tell you the first thing I learned about tangram puzzles when I started working on the project. It’s tan-gram, not tan-a-gram. Why I thought it was the second I don’t know, but I’ve thought it my entire life. Oops.

The second thing I learned is that there are SO many different pictures that can be made with these! I had no idea. I won’t even tell you how long I spent looking at them, but fortunately I took time out to actually make the thing!

I’ve been sharing tutorials on my blog for over a decade, and I’m frequently asked how they can be printed or saved. The answer is here! You can find this printable tutorial in my shop, which contains the instructions, color photos, and templates from the original blog post, without the extra things you don’t need to make the project. The file is in PDF format, so you can either print or save it to your computer.

This post contains affiliate links. For my full disclosure policy, click here.

I’ve included a very basic printable book, which I’ll talk more about in a minute, but you can also find lots of ideas by searching. There are even books and cards you can buy that are just full of things you can make with only these seven pieces. It’s mind boggling.

To make the pieces you’ll need:

Cut the pieces from fabric and interfacing as indicated on the templates. Notice that there are two shapes that are used twice. Be sure to cut the fabrics either right sides together or wrong sides together so that they are opposites.

For mine, I used a different color for each piece, with one side as a solid and the other a matching tone-on-tone print.

Apply the interfacing to the wrong side of each fabric piece.

Pin the matching pieces with right sides together.

Stitch around each with a 1/4” seam, leaving 1 1/2” open on one straight edge.

Clip the corners. Carefully trim the seam allowance near the sharp points.

Turn each piece right side out.

Press, turning in the opening. Top stitch close to the edge around all pieces.

Your tangram pieces are ready for play!

To get you started, I made a couple of printable booklets full of shapes. The first is in color, for the younger users, so it’s easy to match the pieces. For a little higher difficulty level, print it in greyscale.

The second is all black silhouettes, so it’s harder to figure out where all the pieces go. Both books have the same pics in them.

color (or greyscale) booklet download

black booklet download

To create the booklet, fold it in half lengthwise with the writing up.

Unfold and fold it in half the other direction.

Fold it in half again that same direction.

Unfold the last fold. Cut from the folded edge along vertical (as shown in the photo) fold to the next horizontal fold.

Unfold completely. You should have a slit cut in the center from the last step. Fold in half again lengthwise. Push the ends in so it starts to separate in the middle.

Keep pushing together until the sides of the slit meet and the pages fold together.

Fold the cover over the inner pages and crease well.

Using the booklet, and some of the other options I mentioned above, see how many shapes you can make!

This tangram puzzle would be great for adding to an Easter basket or Christmas stocking!

.

Flower Octagon Mug Mat

I wanted to include flowers in this octagon mug mat to celebrate the beginning of spring!

I designed this mug mat by starting in the middle and working my way out to get the octagon shape I was going for. I think that went pretty well!

This one measures about 7 1/4" across when it’s turned this direction:

This post contains affiliate links. For my full disclosure policy, click here.

To make this flower octagon mug mat you’ll need:

  • cotton fabric in two shades of green, pink, and yellow

  • batting

  • diagram for top

Cut the following pieces from the fabrics:

light green

A (4) 2 3/4" x 2 3/4"

B (4) 2 3/4" x 3 1/2"

dark green

C (4) 1 1/2" x 1 1/2"

D (4) 2" x 2"

pink

E (4) 2" x 2"

yellow

F (4) 1" x 1"

Draw a diagonal line from corner to corner on the wrong side of all C, D, and F pieces.

Lay out all the pieces generally following the diagram. The pieces that have a line drawn on are shown wrong side up in this photo.

Pin one D to the corner of each B, with the line following the direction on the diagram. Stitch along the line.

Trim 1/4" away from the stitching. Flip the corner right side up and press the seam toward the darker fabric. As you sew pieces together to create units, lay those back down where they belong according to the diagram.

Pin one C to the corner of each E with the line following the diagram. Stitch along the line, trim 1/4" from the stitching, flip the corner back, and press the seam toward the darker fabric.

Pin one F to the corner of each CE unit, following the diagram. Stitch along the line.

Trim 1/4" from stitching, flip back, and press.

Sew the CEF units together in pairs to create two horizontal rows. Press the seams in opposite directions so they’ll fit together well in the next step.

Sew the two rows together to make the flower. Press the seam to one side.

Stitch the upper and lower BD units to the flower. Press the seams toward the lower edge.

Stitch one A to the upper edge and one A to the lower edge of remaining BD units. Press the seams toward the upper edge.

Sew the three vertical rows together. Press the seams to one side.

If you’d like, you can leave it square and skip the next step, but where’s the fun in that?

To make the octagon shape, cut off the corner of each A diagonally from seam to seam.

Once all corners are trimmed, press the top well.

By the way, those are two of my most-used tools in the photo above. The Creative Grids rulers are almost all I buy now, because they have a non-skid surface on that back that doesn’t interfere with their use.

The Quilter’s Select rotary cutter has some weight to it, which makes it easier to cut with for me, and I like the quick tap to put it back into safety mode. I credit this one with the fact that I’ve kept all my finger tips so far.

Use the top as a pattern to cut matching batting and backing pieces. Cut the fabrics with right sides together so they’ll fit together well.

Lay out the top with right side up, the backing with right side down, and the batting on top. Pin. Stitch around 1/4" from the edge, leaving 2" open on one straight edge.

Clip the corners. Turn the mat right side out through the opening. Carefully push out the corners with a pointy tool. Press, turning in the opening 1/4".

Top stitch around close to the edge.

If you’d like to add some quilting go ahead and do that, and leave the starting and ending threads long.

Flip to the back side and pull the threads to the back by pulling on the first loop in the chain with a pin or needle.

Once you have all the threads on the back, tie them in a knot (or knots, depending on how close together they are) and feed them into the eye of a needle. Push the needle through the first fabric layer next to the knot and out a short distance away.

Pull the needle through and clip the threads close to the mat. If necessary, pull the fabric a little so the tail disappears into the hole.

I did some stitching around the flower to make it pop out a little more.

I also did some quilting on the light green, just to fill that space.

This would be a fun project for some hand stitching, but I did like how quickly I could finish it on the machine!

.

Heart Corner Bookmark

If you love someone who loves books, this heart bookmark is the project for you!

Paper Valentines are cute, and there’s definitely a time and a place for them, but what I really love is something I can give that the recipient can keep using.

These heart bookmarks are easy to make, only require a few scraps, and can be gifted on their own or with a book.

To make these you’ll need:

  • (4) 5" cotton fabric squares (these are a great use for leftover charm squares!)

  • this pattern template, printed in color

Cut (2) heart shapes for the outside and (2) for the inside. We’ll identify each piece as outer front, outer back, inner front, and inner back.

You’ll notice there are two edges on the template that are green. With the fabric right side up, fold that green edge under 1/4” on the left hand side of the outer front and inner back. Press.

On the inner front and outer back, do the same with the right hand green edge.

Pin the outer front and inner front with right sides together and edges even. The two pressed edges should match up.

Stitch around 1/4” from the edge, pivoting at each corner. Leave the pressed edges open for turning.

Clip off the corners within the seam, and clip in at the center top.

Turn right side out through the opening. It’s a little tight, but there’s not a lot of thick fabric to squeeze through. Gently push out all the corners with a pointed tool. Press.

Because we took the time to press those four edges under at the beginning, we don’t have to do anything with them now. So easy!

Repeat all steps with the outer back and inner back. You should end up with two hearts. Don’t worry about stitching the openings closed. That will happen in the next steps.

Pin the hearts with the inner front and inner back together. The openings should all match up.

Sew a straight line through all layers about 1/8” from the green edges on the right and left hand sides. Using a denim needle in your sewing machine will make it easier to get through all the layers smoothly.

I forgot to switch to that needle for the pink and purple, and you can definitely tell a difference on the red one, where I did use one.

Make these to give to all your favorite Valentines!

.

Cocktail Napkins and Coordinating Coasters

Cocktail napkins have been on my list of things to make for a long time, and what makes them better than some matching coasters?

Years ago, my husband and I started a tradition with another couple we’ve known forever (when I say forever, I mean the wife and I attended kindergarten together!). On December 31st, the four of us gather at our house to catch up, eat food, sometimes play games, and ring in the new year together.

Since we’re about to move out of our house, and to a different state than our friends, our little tradition is about to get shaken up. To honor all those years and the coming changes, I decided our party needed something a little extra this year!

This post contains affiliate links. For my full disclosure policy click here.

I found this adorable fabric at My Quilting Loft, and I think the bright colors with black and white make it perfect for a party. The print also made my napkins look like they were carefully pieced together, but they aren’t. It’s one solid piece.

To make four napkins and four coasters you’ll need:

  • one or two print cotton fabrics

  • one to four coordinating fabrics

  • fusible fleece

For the napkins, cut:

  • four 6 x 6” for the centers from one print

  • four 8 x 8” for the back and binding - one from each coordinating fabric

For the coasters, cut:

  • four 1 1/2 x 12” from print

  • four 1 1/2 x 12” one from each coordinating fabric

  • four 4 1/2 x 4 1/2” from fusible fleece

  • four 4 1/2 x 4 1/2” from fabric of your choice for back

Unless otherwise instructed, all seams are 1/4”. The finished size of the cocktail napkin is just under 6” square and the coaster is about 4” square.

We’ll start by making the napkins first. Lay the napkin back wrong side up on the ironing board. Fold each edge in one inch and press.

Unfold edges. Fold each corner in so the tip lands where the two creases meet.

Fold the corner up again the same amount and press. The bottom fold should be where the creases meet.

Keeping the corners folded, fold in the long edge to meet the original crease. Press.

Fold the edge up again along the original crease. Press.

Complete the steps to fold and press the remaining three sides.

Unfold all the edges and corners and lay the print fabric inside, centered and right side up. If it seems a little tight, trim 1/8” off each side of the print square.

Fold everything back as it was and press one more time. Pin in place.

Stitch around close to the inner edge of the binding.

Complete the other three napkins in the same manner.

And now for the coasters. Stitch one print strip to each coordinating strip with right sides together, so you have four sets. Press each set open with the seam to one side.

Cut each strip into four 2 1/2” squares. Discard the excess. You should have sixteen squares, and you’ll need four for each coaster.

This is the fun part. You’ll need to decide which four squares you’ll use together, and how you’ll arrange them. I had originally planned to use all four colors on each coaster, with the print to the outside.

Once I laid it out, I didn’t really like it, so I tried it with the colors to the outside.

I liked that better, but realized it would be easier to know who was using each coaster if they had their own color. So I went back to the print to the outside, but only one solid.

Almost. The last one was the charm. I recommend taking a photo of each layout to help you decide. They really do look different “on paper” than to the naked eye.

Once you’ve settled on a layout, sew the pairs of squares side by side. Press the seams in opposite directions to make them easier to nest together in the next step.

Sew the two rows together to finish the top. Press the seam to one side.

Complete the three remaining coaster tops.

Fuse the fleece to the wrong side of the coaster tops.

Lay out a coaster top right side up. Pin the coaster back to it with right sides together. Stitch around the edge, leaving 2” open on one side. Trim the corners.

Turn the coaster right side out. Press, turning in the opening.

Stitch around the coaster close to the edge.

Complete the steps with the remaining coaster tops.

Tell me these don’t look like they belong at a party!

I can’t wait to use them!

.

Yo Yo Ornaments

I’m here today to share the second of what my husband has dubbed “camper crafts.” If you missed the first, check out my Pentagon Star Ornaments. These yo yo ornaments were just as fun to make, but even faster. I think these would make great little gift toppers!

You know those things you stick in your online shopping cart, then push them into “Save for later”? The tool I used to make these ornaments sat in cart-limbo for months, before I finally decided to give it a try. I’m so glad I did, because it made these really fun, easy, and consistent!

This post contains affiliate links. For my full disclosure policy click here.

You could, of course, make the yo yos without this tool. It makes a nice big 2 3/8” which was perfect for the ornament, so I’d aim for a similar size if you go that route.

To make one yo yo ornament you’ll need:

  • Quick Yo-Yo Maker, extra large size

  • Two 6 - 6 1/2” squares of cotton fabric (different prints if desired)

  • 12” of 1/4” wide ribbon

  • two 1” buttons (optional - I actually ended up preferring mine without)

Following the package directions, place the yo yo maker disk against the wrong side of the fabric, paying attention to the instructions for which side of the maker disk should be face up.

Insert the disk into the plate. The instructions recommend trimming the fabric to 1/8 - 3/16” from the edge. I suggest using the slightly larger number.

Start stitching by folding that allowance in, then stitching by pushing the needle down through the disk and plate.

The next step is important. You need to stitch back up through the same curved hole you stitched down into. Look at the fingernail shaped holes on the plate and that will make sense. Whatever direction you have to go in to stay on track, continue in that direction as you sew around the disk.

Be sure to catch and fold over the raw edge with each stitch. Also, make sure you start with enough thread to make it all the way around the circle. It’s kind of a bummer to figure out halfway that you didn’t. 😉 On my second try, I went with 55” of thread, doubled. Be sure to knot the two ends together before beginning.

Continue stitching until you reach where you started. Stitch through the first hole a second time. Do not knot or cut your thread.

Remove the plate.

Push the edge of the fabric off the disk with your thumb to remove.

Pull the thread to gather the yo yo. Push the gathers around until they’re even and the hole is centered.

Knot the thread and trim.

Repeat the process with the second fabric square. Because most of the thread was cut off the first, I was able to reuse it for this one.

Fold the ribbon in half. Place the raw ends on the back of one yo yo, so they won’t stick out the bottom. Stitch in place through the center.

Push the needle out the gathered side and leave it. Place the second yo yo on the first, with the flat sides together. Using the needle from stitching the ribbon, sew through the center of both yo yos to attach.

If you’re leaving yours without a button, you can knot the thread and clip it at this point.

If you’d prefer to add buttons, sew those on each side with the thread before knotting and clipping it.

To be honest, I’ve never really understood the draw of yo yo quilts, but now I think I get it. These are so fun to make, and are great for scraps. I’m not saying I’m ready to take on anything that big, but I’ll definitely make more of these little ornaments!

.

Pentagon Star Ornaments

I really wanted to try sewing something just to see if I could. Obviously, a simple project would be best, and something that wouldn’t take up a lot of room to make. I’d wanted to try my own version of these pentagon star ornaments, and it fit the bill.

I’ve been sharing tutorials on my blog for over a decade, and I’m frequently asked how they can be printed or saved. The answer is here! You can find this printable tutorial in my shop, which contains the instructions, color photos, and templates from the original blog post, without the extra things you don’t need to make the project. The file is in PDF format, so you can either print or save it to your computer.

Spending a month alone in our Montana camp trailer has been a unique experience for me. One of my biggest concerns was that something would break that I wouldn’t be able to fix. You know, like the heat on one of the 10 degree nights.

But, so far so good! And I’ve had lots of fun spending time with my growing grandbabies (and their parents!)

The hardest part about making this ornament wasn’t the assembly. In fact, sewing in my trailer proved to be pretty fun. You know what my biggest challenge was? Editing the photos! They were kinda dark and I’m working on my laptop, which is quite different than my giant desktop screen. 😂

All in all, everything ended up okay, and I’m ready to share these with you!

To make one of these pentagon star ornaments you’ll need:

  • cotton fabric (2 different prints/colors)

  • fusible fleece

  • ornament hanger

  • this template

Using the pentagon template, cut two fabric and one fusible fleece.

Fuse the fleece to the wrong side of the pentagon you’ll use for the outer part of the star (the back, parts of which fold to the front).

Pin the two fabric pentagons with right sides together. Stitch 1/4” from the edge, leaving about 1 1/2” open for turning.

Clip the corners. Turn right side out through the opening. Press, turning in the opening.

Hand stitch the opening closed. Don’t worry about tiny, perfect stitches, it’s really just to hold it closed for the next steps.

Find the midpoint on each side between the points. The easiest way to do that is fold two points together and stick a pin in the fold. You could leave the pins, or mark the spots with a fabric pen.

Stitch between each of these marks, so you’ll end up with a pentagon within your pentagon. It’s easier to see that stitching on the back of mine.

Stitch again, skipping a corner each time so you end up with a star shape inside the pentagon.

Fold one point in so the tip meets the inner point on the stitched star. Pin well.

Fold the point next to it up in the same manner.

Repeat with the remaining points until all are folded up and pinned. Adjust as needed to make sure they’re even and their lower edges meet.

Top stitch near the two inner edges of each point. I found this works best if you start at the tip and sew to the edge on each side. I recommend using a denim needle or similar in your machine for this step.

Full disclosure, the star stitching does not match up on the back for me, but who’s looking at the back anyway?

Stitch the ornament hanger to the back.

And find a good place to hang your stars!

I tried to fussy cut the inner fabric, but next time I’d like to try it with a small print. Can’t not love this gingerbread man though!

I’m going to call my first trailer-craft a success!

.

Easy Reversible Placemat with Rounded Corners

We had a couple of friends over for dinner last weekend. A few minutes before they arrived, I realized that in my frenzy to get our house ready to list a couple of weeks ago, I’d packed away all of my placemats except my jelly roll rug fail/win , but there’s only four of those. I needed six.

Our big wooden table needs some protection, so I ended up folding a couple of dishtowels for makeshift placemats. Not exactly pretty.

I have a set I really like, now in a box somewhere, that are large with rounded corners. I decided to replicate those to keep that from happening again. These turned out to be very easy to make!

This post contains affiliate links. For my full disclosure policy click here.

To make these placemats you’ll need:

  • fabric for the front side (1 yard if you’re making a set of four, or one fat quarter for one)

  • fabric for the back side (1 yard if you’re making a set of four, or one fat quarter for one)

  • fusible fleece

  • circle template, or a 3” diameter circle to trace

A quick note on the circle template I’ve linked to: it’s the same one I have, only mine is over 30 years old! I was kind of surprised it hasn’t changed (except the color) since I bought mine in college, but it’s definitely held up well, and I use it often in my sewing.

These placemats should wind up about 14 x 20”. I’m referring to one side as the front and the other as the back for clarity in the instructions, but they’re reversible. For this tutorial, I made four placemats. Cut the following for each placemat:

  • one 14 1/2 x 20 1/2” from front side fabric

  • one 14 1/2 x 20 1/2” from back side fabric

  • one 14 1/2 x 20 1/2” from fusible fleece

Supplies for placemats

Fuse the fleece to the wrong side of the front fabric.

Fleece applied to placemat

I couldn’t decide which direction my front fabric should go. In my head, those are either leaves, which should point up (in my head) or feathers, which should point down. I dug the selvage out of the trash. because I thought the name of the line might help me decide. Yeah, “Feathers and Foliage” didn’t help one bit. Feathers it is! 😂

I decided to use holiday fabric for the back side so I can just flip them over when the holiday season begins. Sometimes I plan ahead!

Lay the front fabric out right side up. Cover with the back fabric, right side down. Line up edges. Make a mark 1 1/2” from each corner on the wrong side of the back fabric.

Marks near corners of placemat

Lay the 3” circle template on the corner with the mark in the center of the two sides at the edge, as shown below. Draw a line at the edge of the template that covers the fabric corner.

Drawing circle on placemat corner

Here’s what that looks like with the template removed.

Rounded corner drawn on placemat

Pin the two fabrics together above the line. Cut along the drawn line to round the corner. Repeat on the remaining three corners.

All corners trimmed on placemat

Add more pins to hold the layers securely. Stitch around 1/4” from the edge, leaving 4” open for turning.

There are a couple of ways to deal with the seam allowance at the corners in order to have a smooth seam when it’s turned right side out. Some people like to cut in clips, others notches. I prefer to trim away some of the seam, following the stitching line and tapering in and out.

Corner trimmed after sewing placemat

It’s a little easier to see from the fleece side.

Corner trimmed from fleece side of placemat

Turn the placemat right side out through the opening.

Turning placemat right side out

Make sure all corners and seams are pushed out and flat.

Placemat turned right side out

Press well. Turn the opening to the inside 1/4” and press.

Opening turned in and pressed on placemat

Stitch close to the edge, all the way around the placemat. Stitch around again 1” from the edge.

EDIT: When I originally made these, I though this would be enough stitching to hold the fusible fleece. What I forgot is, placemats see a LOT of washing machine time, so I would do more stitching into the center of these next time.

Two rows of stitching on front side of placemat

Here’s the stitching from the back side.

Two rows of stitching on back side of placemat

Now I’m all set for the next time I need placemats…providing I don’t accidentally pack these away too!

Rounded corner placemats

And if we’re still here after Thanksgiving, I’ll flip them over for Christmas!

Two holiday placemats
.

Magnetic Needle Minder

A few nights ago, I was doing some hand stitching while my husband and I were watching television. After I’d been at it for a while, I was trying to hold my empty needle while I did something else, and it slipped through my fingers and dove between the cushions of my chair. It’s a recliner with lots of hardware inside, and that needle was no where to be found.

I had to ask myself, as I have too many times before, why don’t I have a needle minder?

This post contains affiliate links. For my full disclosure policy, click here.

I’ve been sharing tutorials on my blog for over a decade, and I’m frequently asked how they can be printed or saved. The answer is here! You can find this printable tutorial in my shop, which contains the instructions, color photos, and templates from the original blog post, without the extra things you don’t need to make the project. The file is in PDF format, so you can either print or save it to your computer.

Now I have one! This little sewing tool was fun to make, and it works great. All you need is:

Here’s a single hexagon you can print out to use, or if you happen to have this hexagon ruler, it’s the smallest one available on it. I’ve used that tool a LOT more than I expected to when I bought it.

Cut out four hexagons (or whatever shape you’ve selected) from the fabric. This is a great opportunity for fussy cutting so you can have a cute picture on your needle minder.

Also cut four from the fleece or interfacing. I used fusible fleece, which gave it a little dimension, but interfacing would work also. It’s just something to keep the magnet from rubbing on the fabric too much and help the needle minder keep its shape.

Pieces cut for needle minder

Apply the fusible fleece to the wrong side of the fabric.

Fusible fleece applied to needle minder pieces

Press one straight edge under 1/4” on each piece.

One edge pressed under on needle minder pieces

Pin matching pieces with right sides together. Stitch 1/4” from the edges, leaving the pressed edge unsewn.

Edges sewn together on needle minder

Clip the corners. Turn the shape right side out through the opening. Push the corners out with a pointy tool. Press, making sure the edges stay turned inside the opening.

Needle minder edges pressed

Slide one magnet inside each shape. Make sure your magnets are oriented in the right direction so when they stick together the sides you intended to show are out. In other words, make sure your magnets don’t repel each other.

Inserting magnet into needle minder

Stitch all the way around each shape, close to the outer edge.

Stitching close to edge of needle minder

I thought I’d need to stitch closer in to the magnet as well, which would have been tricky, but these seem to work just fine as is.

Magnetic Needle Minder

Put one needle minder piece on each side of your project and allow the magnets to connect. Add your needle on top, and you’ll always know where it is!

Needle Minder from Crafty Staci
.