You also want an ePaper? Increase the reach of your titles
YUMPU automatically turns print PDFs into web optimized ePapers that Google loves.
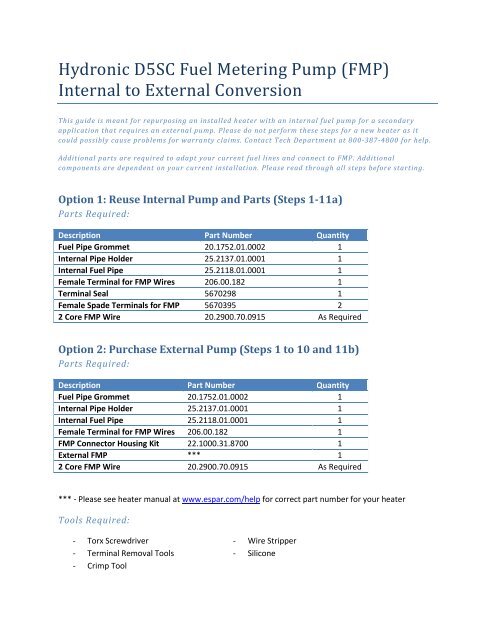
Hydronic D5SC Fuel Metering Pump (<strong>FMP</strong>)<br />
<strong>Int</strong>ernal <strong>to</strong> <strong>Ext</strong>ernal <strong>Conversion</strong><br />
This guide is meant for repurposing an installed heater with an internal fuel pump for a secondary<br />
application that requires an external pump. Please do not perform these steps for a new heater as it<br />
could possibly cause problems for warranty claims. Contact Tech Department at 800-387-4800 for help.<br />
Additional parts are required <strong>to</strong> adapt your current fuel lines and connect <strong>to</strong> <strong>FMP</strong>. Additional<br />
components are dependent on your current installation. Please read through all steps before starting.<br />
Option 1: Reuse <strong>Int</strong>ernal Pump and Parts (Steps 1-11a)<br />
Parts Required:<br />
Description Part Number Quantity<br />
Fuel Pipe Grommet 20.1752.01.0002 1<br />
<strong>Int</strong>ernal Pipe Holder 25.2137.01.0001 1<br />
<strong>Int</strong>ernal Fuel Pipe 25.2118.01.0001 1<br />
Female Terminal for <strong>FMP</strong> Wires 206.00.182 1<br />
Terminal Seal 5670298 1<br />
Female Spade Terminals for <strong>FMP</strong> 5670395 2<br />
2 Core <strong>FMP</strong> Wire 20.2900.70.0915 As Required<br />
Option 2: Purchase <strong>Ext</strong>ernal Pump (Steps 1 <strong>to</strong> 10 and 11b)<br />
Parts Required:<br />
Description Part Number Quantity<br />
Fuel Pipe Grommet 20.1752.01.0002 1<br />
<strong>Int</strong>ernal Pipe Holder 25.2137.01.0001 1<br />
<strong>Int</strong>ernal Fuel Pipe 25.2118.01.0001 1<br />
Female Terminal for <strong>FMP</strong> Wires 206.00.182 1<br />
<strong>FMP</strong> Connec<strong>to</strong>r Housing Kit 22.1000.31.8700 1<br />
<strong>Ext</strong>ernal <strong>FMP</strong> *** 1<br />
2 Core <strong>FMP</strong> Wire 20.2900.70.0915 As Required<br />
*** - Please see heater manual at www.espar.com/help for correct part number for your heater<br />
Tools Required:<br />
- Torx Screwdriver - Wire Stripper<br />
- Terminal Removal Tools - Silicone<br />
- Crimp Tool
Step 1: Loosen plastic cover screws and remove cover.<br />
Step 2: Loosen coolant pump retaining screws and wiggle coolant pump out of heater casing.<br />
Step 3: Unclip coolant pump wire and place coolant pump aside. Don’t lose O-rings for coolant ports.
Step 4: Disconnect and remove <strong>FMP</strong> wires and remove fuel hose. Loosen screws and set cover aside.<br />
Step 5: Loosen ECU retaining screws. Unclip connec<strong>to</strong>r and set ECU aside. (Remove intake saddle cover<br />
for easier access <strong>to</strong> ECU connec<strong>to</strong>r).<br />
Step 6: Remove <strong>FMP</strong> wires from 14-pin ECU connec<strong>to</strong>r using terminal removal <strong>to</strong>ols. (Pins 7 and 8).
Step 7: To prevent moisture from getting in<strong>to</strong> ECU, put a small amount of silicone in <strong>FMP</strong> ports on ECU<br />
connec<strong>to</strong>r. Only put enough <strong>to</strong> cover holes, not fill holes.<br />
Step 8: Reassemble heater and place replacement components in<strong>to</strong> heater. Reuse the fuel inlet<br />
grommet.
Step 9: Connect coolant pump wire, place O-rings on male ends of ports and press coolant pump in<strong>to</strong><br />
place. Fasten all remaining screws.<br />
Step 10: Crimp and connect terminal on<strong>to</strong> <strong>FMP</strong> signal wire <strong>to</strong> pin 4 on B1 connec<strong>to</strong>r (harness side) and<br />
extend <strong>to</strong> reach <strong>FMP</strong>.<br />
Step 11a: Connect <strong>FMP</strong> signal wires <strong>to</strong> <strong>FMP</strong>. Reuse rubber boot while crimping on new female terminals
Step 11b: Crimp and connect <strong>FMP</strong> signal wires <strong>to</strong> <strong>FMP</strong>.<br />
For Steps 11a and 11b:


